AI Analytics Designer
General Description
Data analytics plays a key role in the ZDMP architecture with many expected use cases dependent upon it. The AI-Analytics Designer component deals with machine learning integration into ZDMP. The main purpose of machine learning in ZDMP is to detect and/or predict any defects in the production process and parts that lead to delay or inconsistency in the delivery of further products. The machine learning models are built using analytic algorithms based on the statistical-machine-learning linear-algebra libraries.
| Resource | Location |
|---|---|
| |
| |
| |
|
Screenshots
The following images are illustrative screenshots of the component.
Component Author(s)
| Company Name | ZDMP Acronym | Website | Logo |
|---|---|---|---|
| Software Imagination & Vision | SIMAVI | www.simavi.ro |  |
Commercial Information
| Resource | Location |
|---|---|
| IPR Link | Machine Learning Server |
| Marketplace product description | AI Analytics Designer |
Architecture Diagram
The following diagram shows the position of this component in the ZDMP architecture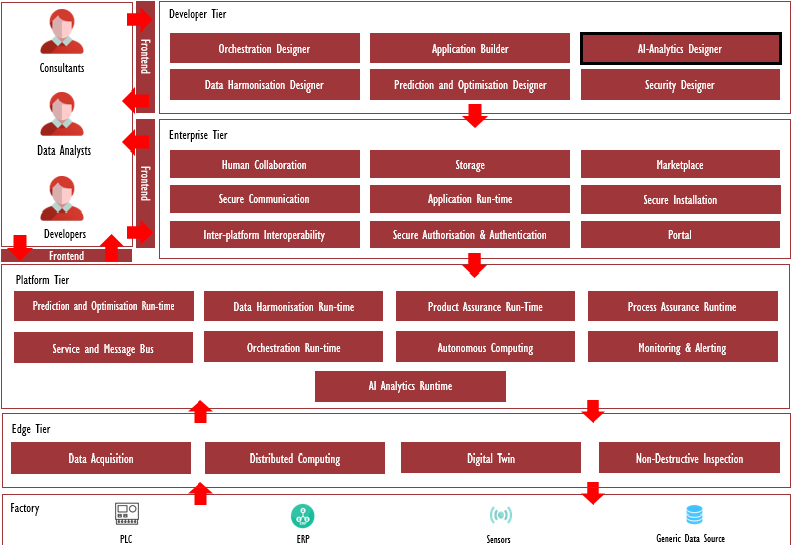
Figure 1: Position of AI Analytics Designer Component in ZDMP Architecture
Benefits
Build machine learning scripts, train, and apply a machine learning model
Automate machine learning workflow, which includes automatic training and tuning of many models within a user-specified time limit.
Use AutoML to produce highly predictive ensemble models
Features
The features for this component are itemized below and explained thereafter:
Design learning model
Auto ML
Design learning model
Users can build machine learning scripts, train, and apply a machine learning model. The other components are called via a rest API.
The functions and features of the AI Designer are the following:
Integrates with Secure Installation to add a security layer over model training
Integrates with Storage for retrieving the datasets needed for the model training and uploading the model files MOJO/POJO in Storage for other components
Manages the User Interface
Prepares the meta-information which is sent along with the model file to T5.6 AI Runtime
Creates charts based on AutoML JSON data
AutoML
AutoML is used for automating the machine learning workflow, which includes automatic training and tuning of diverse models within a user-specified time limit. Stacked Ensembles – one based on all previously trained models, another one on the best model of each family – are automatically trained on collections of individual models. These produces highly predictive ensemble models which, in most cases, are the top-performing models in the AutoML Leaderboard. This component creates tasks for model training based on user input data, builds machine learning models, creates MOJO/POJO files for AI Runtime, and generates information for AI Designer’s chart functionality.
The functions and features of the AutoML component are the following:
Creates tasks for model training based on AI Designer’s chosen data files
Manages CRUD for tasks
Generates MOJO/POJO files for AI Runtime
Generates information in JSON format for AI Designer’s chart functionality
System Requirements
Minimal requirements needed:
- Docker
Associated ZDMP services
Required
Optional
Installation
Installation steps
Once obtained from the Marketplace, the component is available for installation through the Secure Installation component. Some installation variables can be set:
“Private Registry Settings”
“Private Registry URL”: the ZDMP container registry URL
“Private registry user/password”: the login for the ZDMP container registry
“Private registry secret”: The Kubernetes Secret name
“Ingress Settings”
“Use Ingress”: Use Ingress true/false
“Ingress domain”: used to form the URL of the component
“Public URL of the Portal Component”
“Minio storage”
“Minio endpoint”: Minio server
“Minio endpoint URL”: Minio server URL
“Minio Access Key”: Minio Access username
“Minio Secret Key”: Minio Access password
“Minio Use Https”: set if Minio server uses Https
“Minio Dataset Bucket Name”: use default “aidesignerbucket”
Deployer Integration
“Deployer API URL”: URL of the AI Runtime Component Deployer API root URL
“Deployer API list URL”: Deployer API list URL, leave default
“API Gateway URL”: API Gateway URL, leave default
localStorage: enable for local databases or storage databases
MiniZDMP installation
After setting up the catalogs in the Application Runtime available as miniZDMP distribution select the AI Analytics Designer application and fill the form with the desired configuration described for the installation through the Secure Installation component:
“Private Registry Settings” section variables
“Ingress Settings” section variables
“Public URL of the Portal Component
“Minio storage” section variables
“Deployer Integration” section variables
localStorage: enable for local databases or storage databases
Docker installation
The AI Analytics Designer component can be installed using Docker files.
To run this component, use the following steps:
- Before cloning the projects, you must log in to Gitlab, for gitlabregistry make sure you have created a Personal Access token in Gitlab and login using the access token as password
docker login gitlab-zdmp.platform.zdmp.eu –username xx –password xx
docker login gitlabregistry-zdmp.platform.zdmp.eu –username xxxxx –password youraccesstoken
- Clone the AI Analytics Designer project
git clone https://gitlab-zdmp.platform.zdmp.eu/developer-tier/t5.6-ai-analytics-designer.git
- Start the AI Analytics Designer application
cd t5.6-ai-analytics-designer\orchestration\
docker-compose up -d –V

For windows, when running the docker-compose for [t5.6-ai-analytics-designer\orchestration\] you may need to run “net stop winnat” and “net start winnat”

```bash
cd t5.6-ai-analytics-designer\orchestration\
net stop winnat
docker-compose up -d –V
net start winnat
- Clone the T6.4 portal project (dependent)
clone https://gitlab-zdmp.platform.zdmp.eu/enterprise-tier/t6.4-portal.git
cd t6.4-portal\orchestration\
You need to add the next mapping “127.0.0.1 keycloak” to your local hosts file (ping keycloak will return 127.0.0.1)
For Windows, the path is:
C:\Windows\System32\drivers\etc\hosts
Modify [t6.4-portal\orchestration\docker-compose.yml] to run with the orchestration_backend network (or copy the updated file from [t5.6-ai-analytics-designer\orchestration\dependent\t6.4-portal\orchestration\] )
version: '3'

...

networks:
    default:
        external: true
        name: orchestration_backend

services:

    portaldb:
	...
        ports:
            - 27017:27017
        networks:
            - default

    postgres:
        ...
        ports:
            - 5001:5432
        networks:
            - default

    keycloak:
        ...
        depends_on:
            - postgres
        networks:
            - default

    auth-api:
        ...
        depends_on:
            - keycloak
        networks:
            - default


    portal-api:
        ...
        depends_on:
            - auth-api
        networks:
            - default

    portal-frontend:
        ...
        depends_on:
            - portal-api
        networks:
            - default
- Start the Portal component application (dependent)
docker-compose up
- Clone the Storage (Minio) component application (dependent)
clone git clone -b vilce https://gitlab-zdmp.platform.zdmp.eu/enterprise-tier/t6.2-storage.git
Modify [t6.2-storage\orchestration\minio\docker-compose.yml] to run with the orchestration_backend network (or copy the updated file from [t5.6-ai-analytics-designer\orchestration\dependent\t6.2-storage\orchestration\minio\])
- Nginx port must be set to 9001:9000 to avoid port overlap and hostname set to minio
version: '3'

services:
  minio1
    ...
      retries: 3
    networks:
      - default

  minio2:
	...
      retries: 3
    networks:
      - default

  minio3:
	...
      retries: 3
    networks:
      - default

  minio4:
	...
      retries: 3
    networks:
      - default

  nginx:
    hostname: minio
    ....
    ports:
      - "9001:9000"
    ....
      - minio4
    networks:
      - default

networks:
  default:
    external: true
    name: orchestration_backend
- Start the Minio application by running
cd t6.2-storage\orchestration\minio\
docker-compose up
- Acces Minio and add datasets to the aidesignerbucket from
http://localhost:9001/minio/
user: minio / 	pass: minio123 / bucket: aidesignerbucket
In Minio you must create a bucket named “aidesignerbucket” if is not created and add youe CSV datasests for model training.
- Access the AI-Designer application from
http://localhost:8000/
User administration
Before using the application, you must login to Keycloak and create a new user.
You can login to Keycloak Administration using the next credentials:
user: admin
password: Pa55w0rd
For more information on user administration access the t5.2-secure-authentication-and-authorization documentation
https://gitlab-zdmp.platform.zdmp.eu/enterprise-tier/t5.2-secure-authentication-and-authorization
Django administration - server configuration
To login to the administration area of AI-Designer (Django), a superuser is needed and you can use the next credentials (logout from other keycloak accounts when accessing the admin area):
user: zdmpsuperadmin
password: zdmpsuperadmin
After the user is created the Keycloak server must be added. This can be performed in the Django Admin (see Figure 2: Add Server in Django Administration).
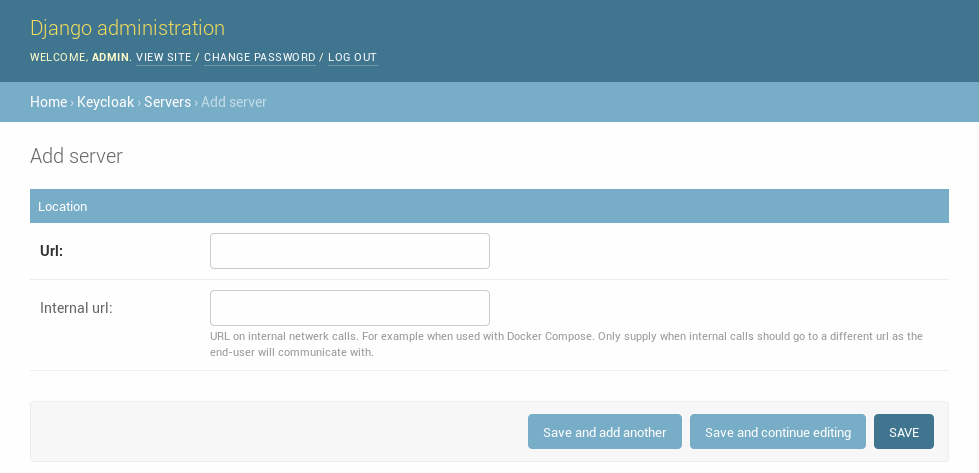
Figure 2: Add Server in Django Administration
The URL that must be used in the setup is Server Url: http://keycloak:8080/auth
No Internal Url is needed for the current setup.
Note: When the application accesses the Keycloak server using a different URL than the public one, this URL can be configured as an “internal URL”. Django Keycloak uses that URL for all direct communication but uses the standard server URL to redirect users for authentication.
Realm configuration
After a REALM and Client are created in Keycloak, after registration, the new realm and client are automatically added in Django after the first login if they do not exist. The info can also be added or modified manually in the Django administration area (See Figure 3: Add Realm in Django Administration).
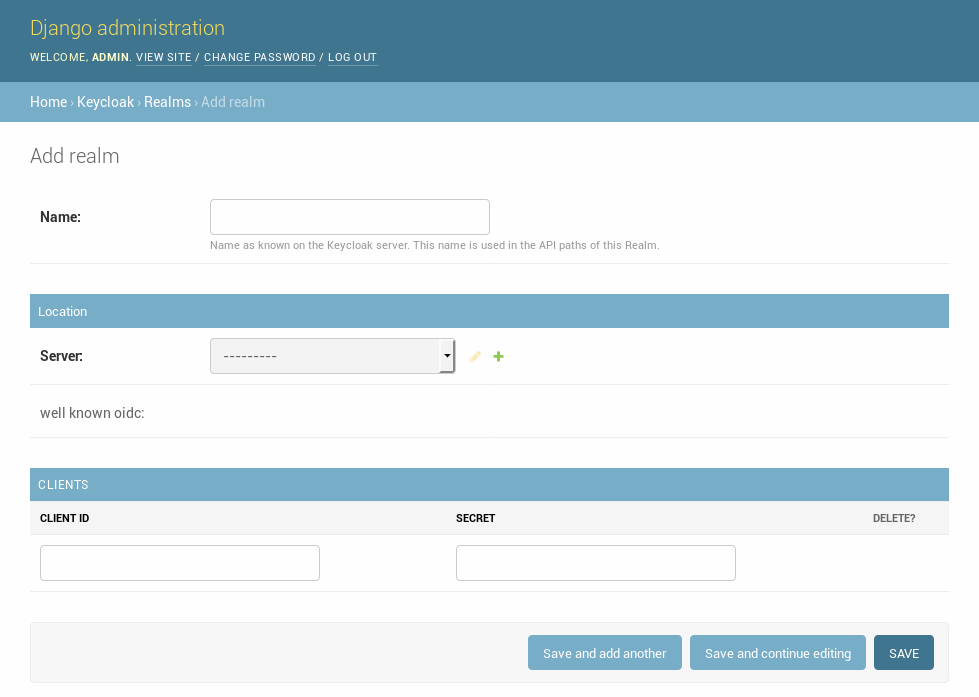
Figure 3: Add Realm in Django Administration
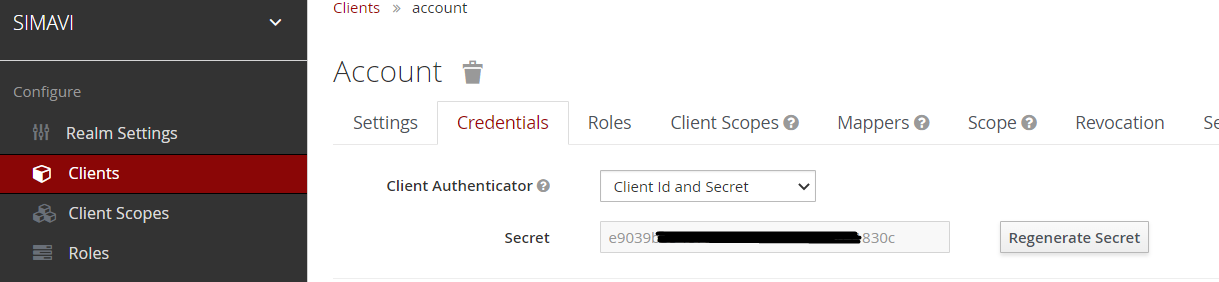
You must set the Client ID: account
Secret will be retrieved from Keycloak Administration choose your REALM, Clients > Account > Credentials > Secret

After the realm is added run the following actions (see description below):
Refresh OpenID Connect .well-known
Refresh Certificates
Synchronize_permissions (when using the permission system)
Refresh OpenID Connect .well-known
In the Django Admin, the action “Refresh OpenID Connect .well-known” can be applied to a realm (See Figure 4: Refresh OpenID Connect .well-known action). This retrieves the .well-known content for the OpenID Connect functionality and caches this in the database. In this way, it is not required to fetch this file before each request regarding OpenID Connect to the Keycloak server. This operation is automatically applied after the first login.
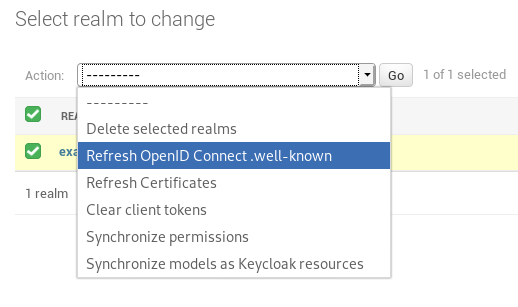
Figure 4: Refresh OpenID Connect .well-known action
Refresh Certificates
This refreshes the cached certificates from the Keycloak server. These certificates are used for the validation of the JWTs. This operation is automatically applied after the first login. (See Figure 5: Refresh Certificates action).
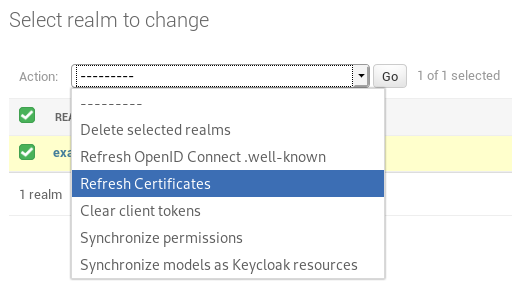
Figure 5: Refresh Certificates action
Clear client tokens
While debugging client service account permissions, it is sometimes required to refresh the session to fetch the new permissions. This can be performed with this action in the Django admin (See Figure 6: Clear client tokens).
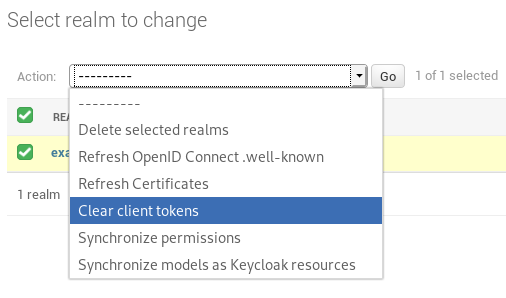
Figure 6: Clear client tokens
How to use
Using the AI Analytics Designer, users can train models, store them in the Storage component and send them to AI Analytics Runtime which deploys them and expose an API to allow interaction with the AI models and make predictions based on new data.
The user can configure the training process with his datasets, set the information that is used for the training process and the response column, set a maximum training time, and can review the performance and effectiveness of the resulted models.
Create a project
In the first step, the user can create a new project by adding a project name, project version, description, and tags that are used for searching (See Figure 7: Create a new project).
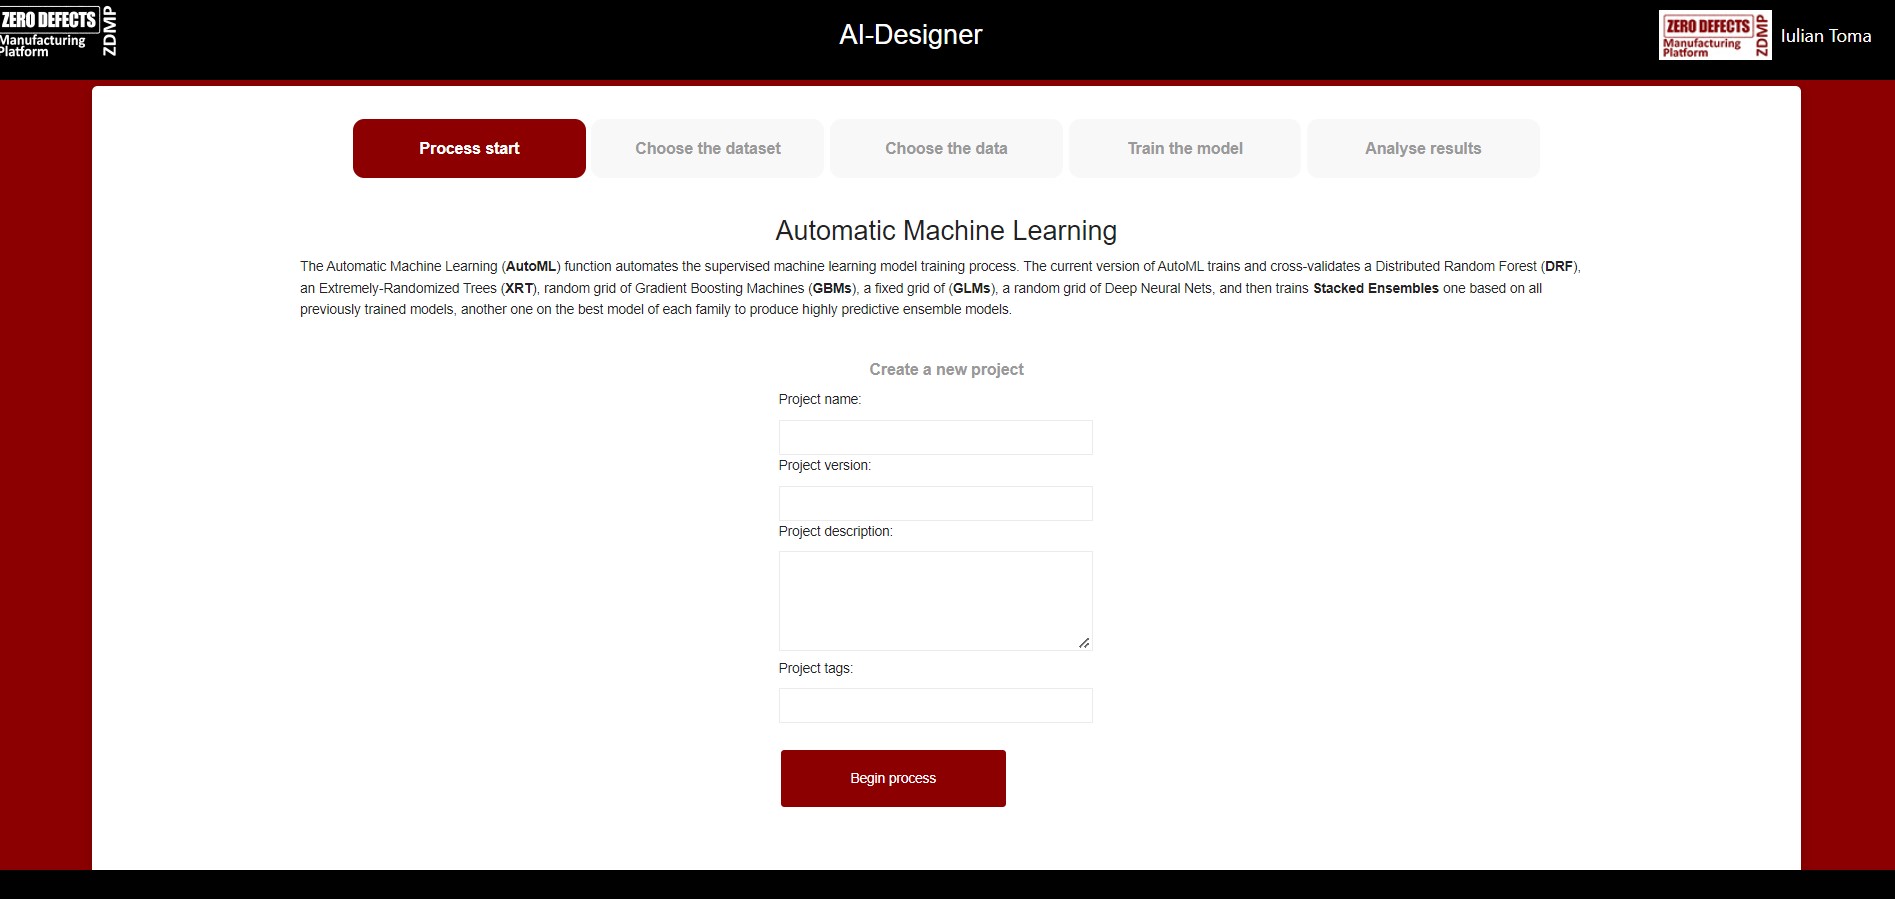
Figure 7: Create a new project
Choose a training data file
In the second step, the user can choose the CSV dataset file that is used for the AI training process (See Figure 8: Choose training data file).
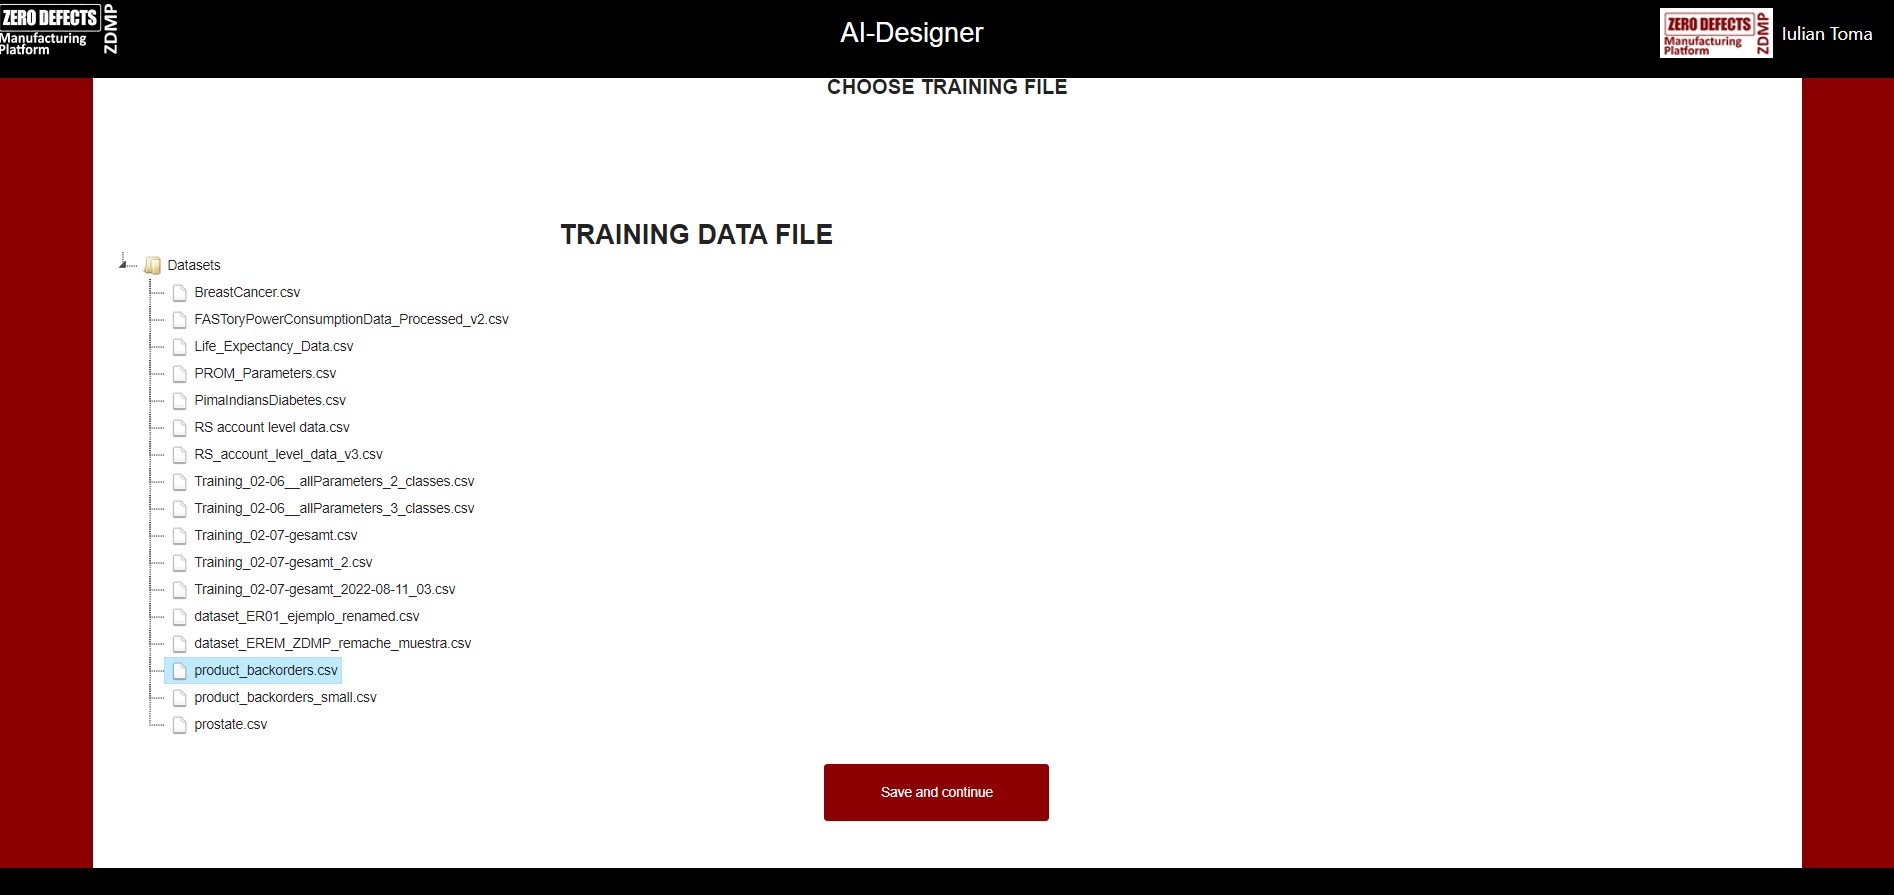
Figure 8: Choose training data file
Choose the columns for the training dataset
In this step, the content and column structure of the previously selected dataset file is displayed, and the user can review the data (See Figure 9: Training dataset page).
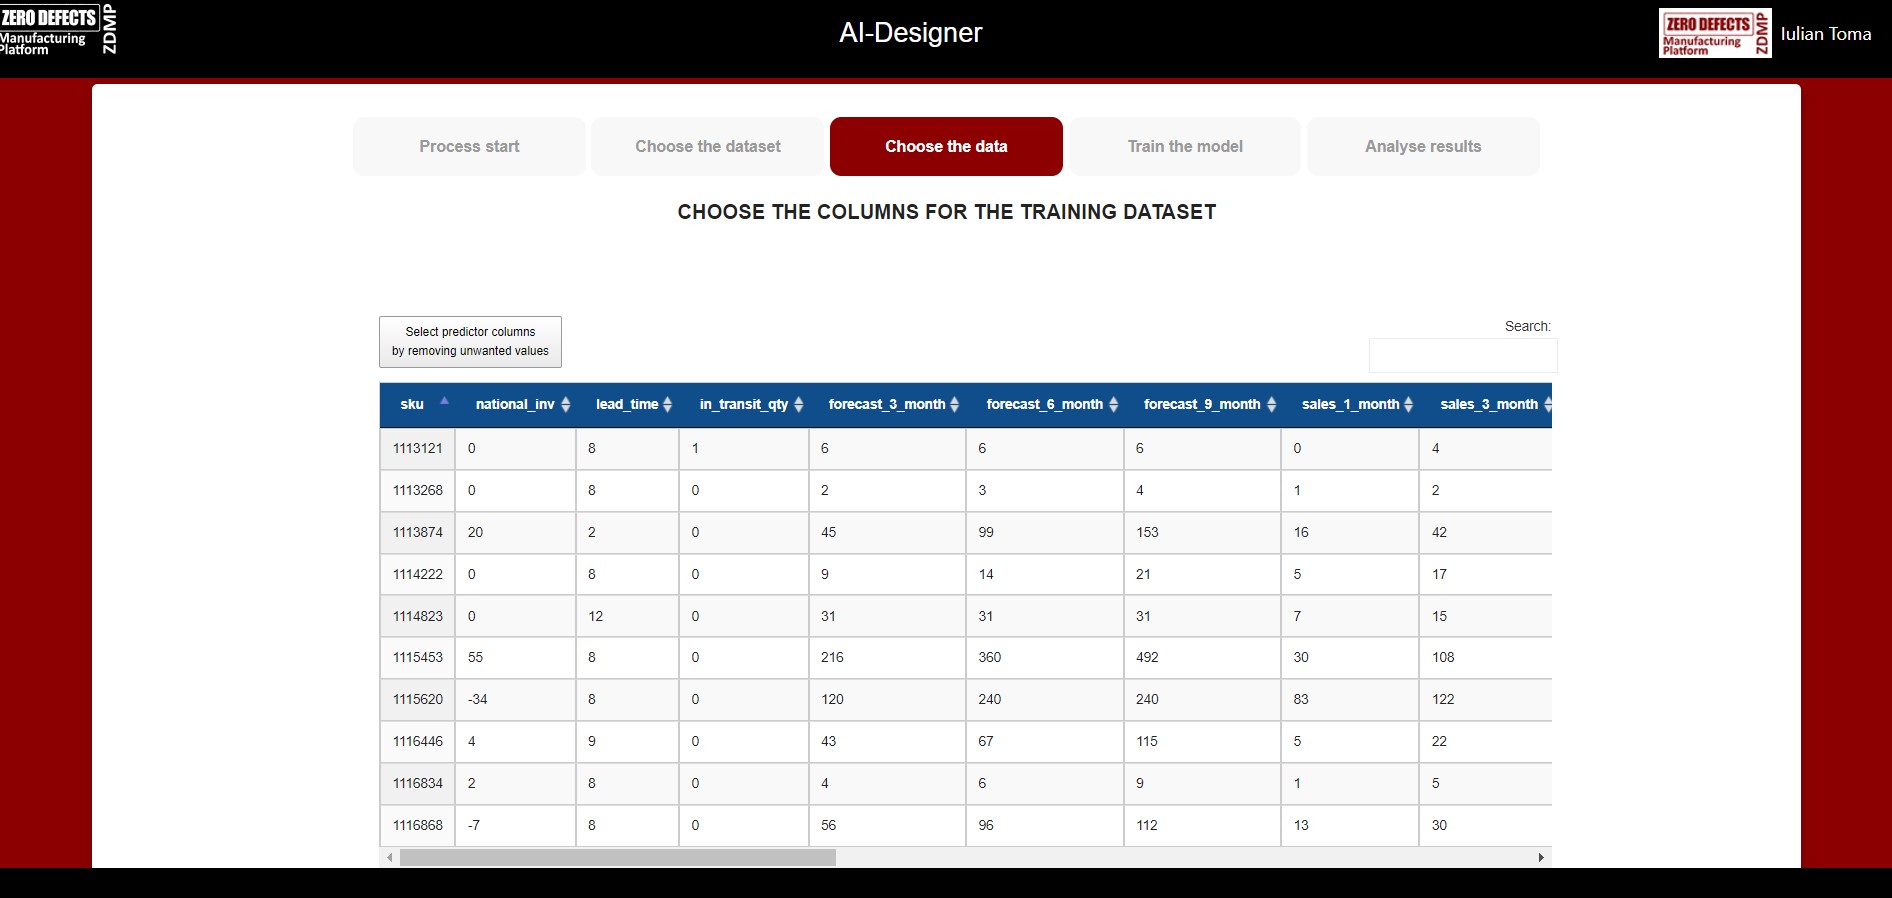
Figure 9: Training dataset page
The user must select the predictor columns that are used for the training process.
By default, all the columns in the dataset are used in the training process as “predictor columns” except a later defined “response column”. These predictor columns can be customized by removing unwanted columns in the dataset (See Figure 10: Select the predictor columns).

Figure 10: Select the predictor columns
The user must select the response column that is used for the training process. The response column is the column that the model is trained to predict (See Figure 11: Select the response column).
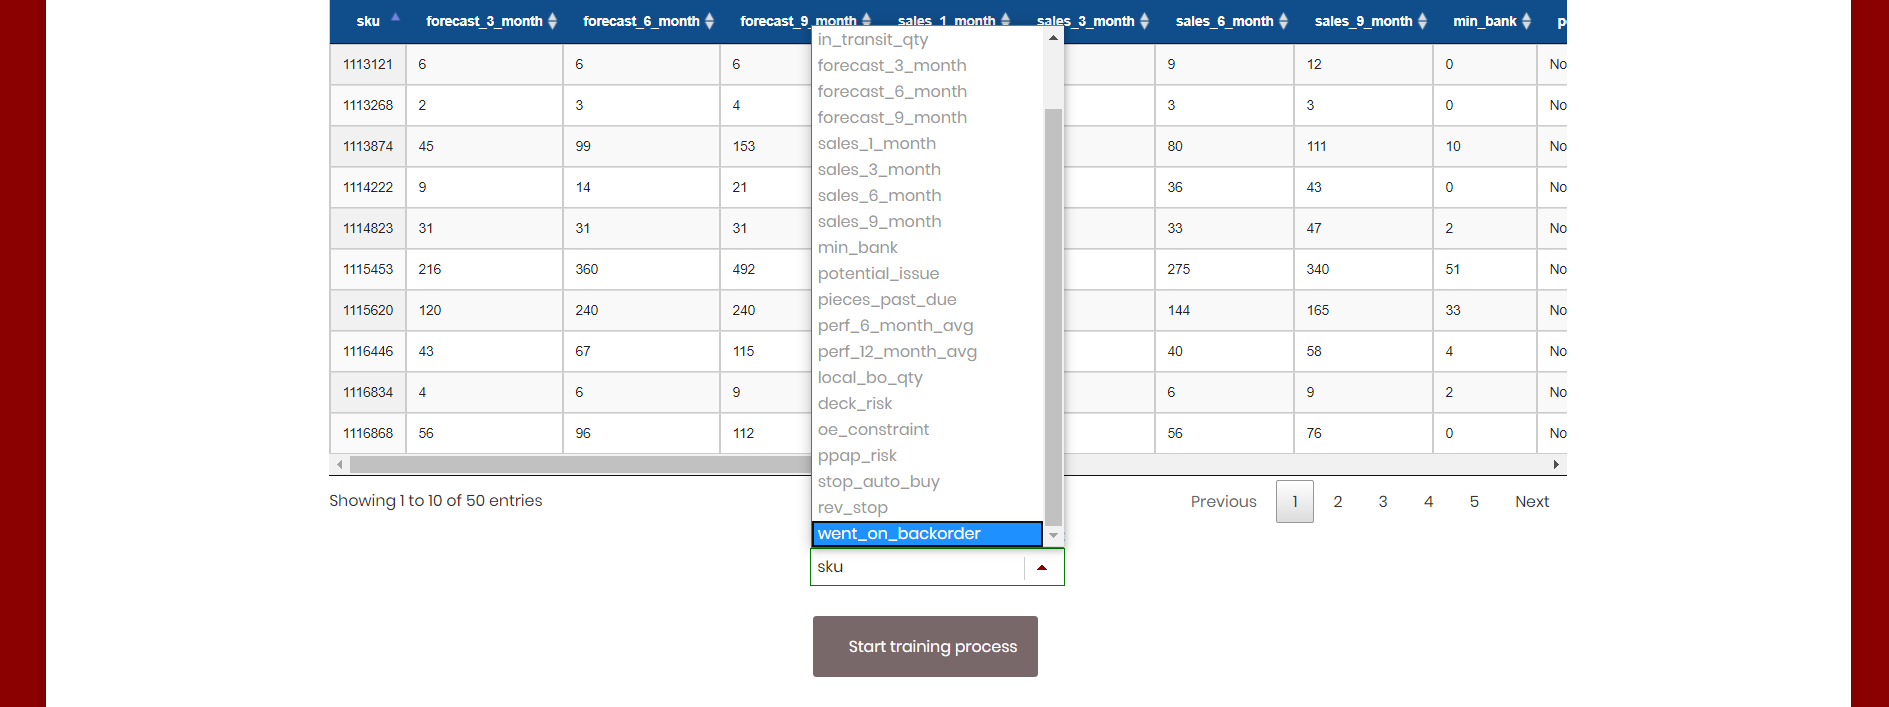
Figure 11: Select the response column
Finally, they can choose the maximum run time for the training process before training the final Stacked Ensemble models (See Figure 12: Select maximum run time).
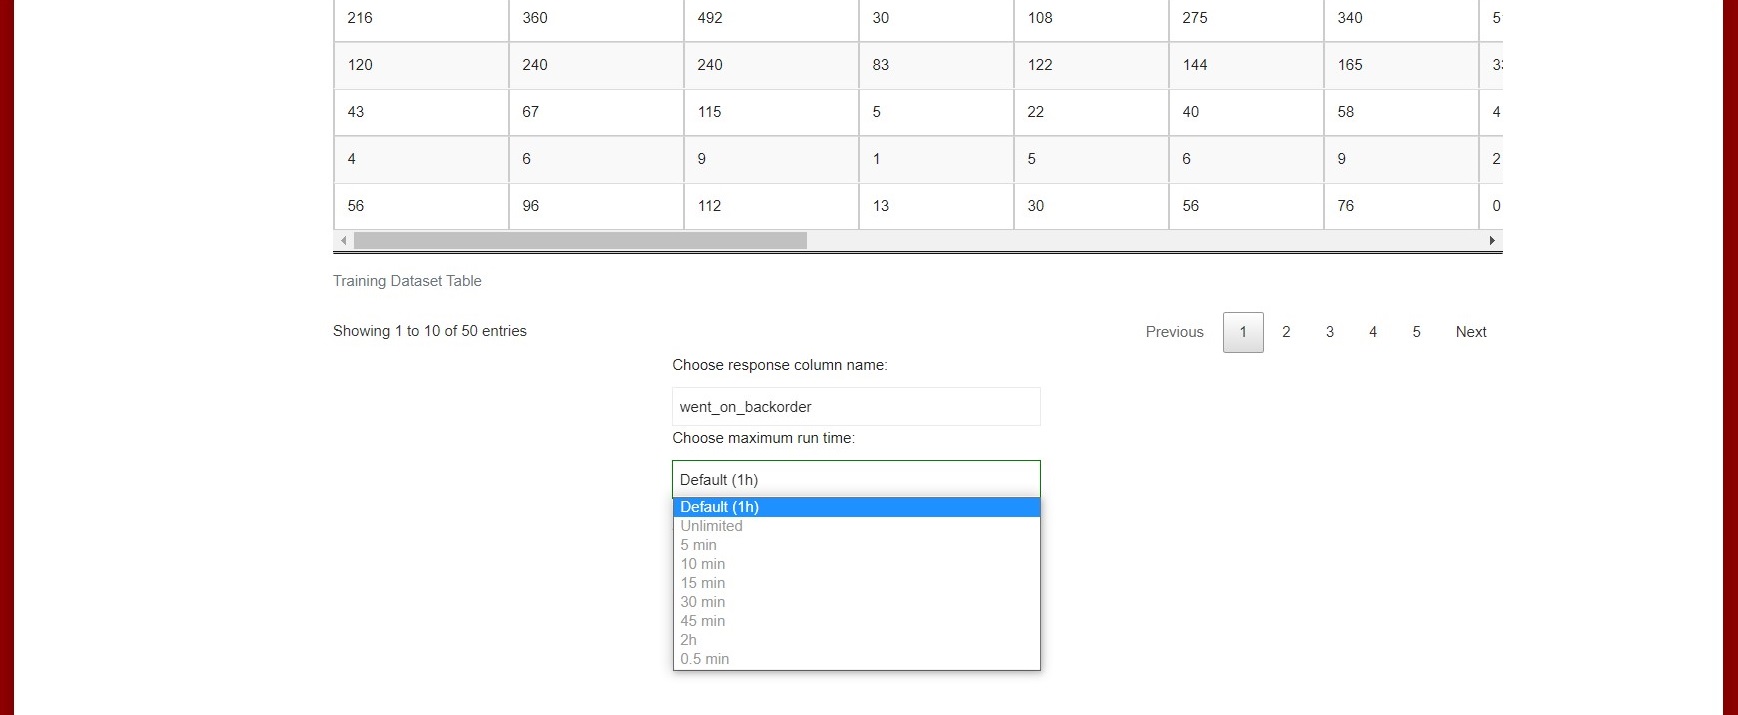
Figure 12: Select maximum run time
Train the model
The application starts the training process with selected data and displays the status for the current process (See Figure 13: Start the training process and Figure 14: Finished training).
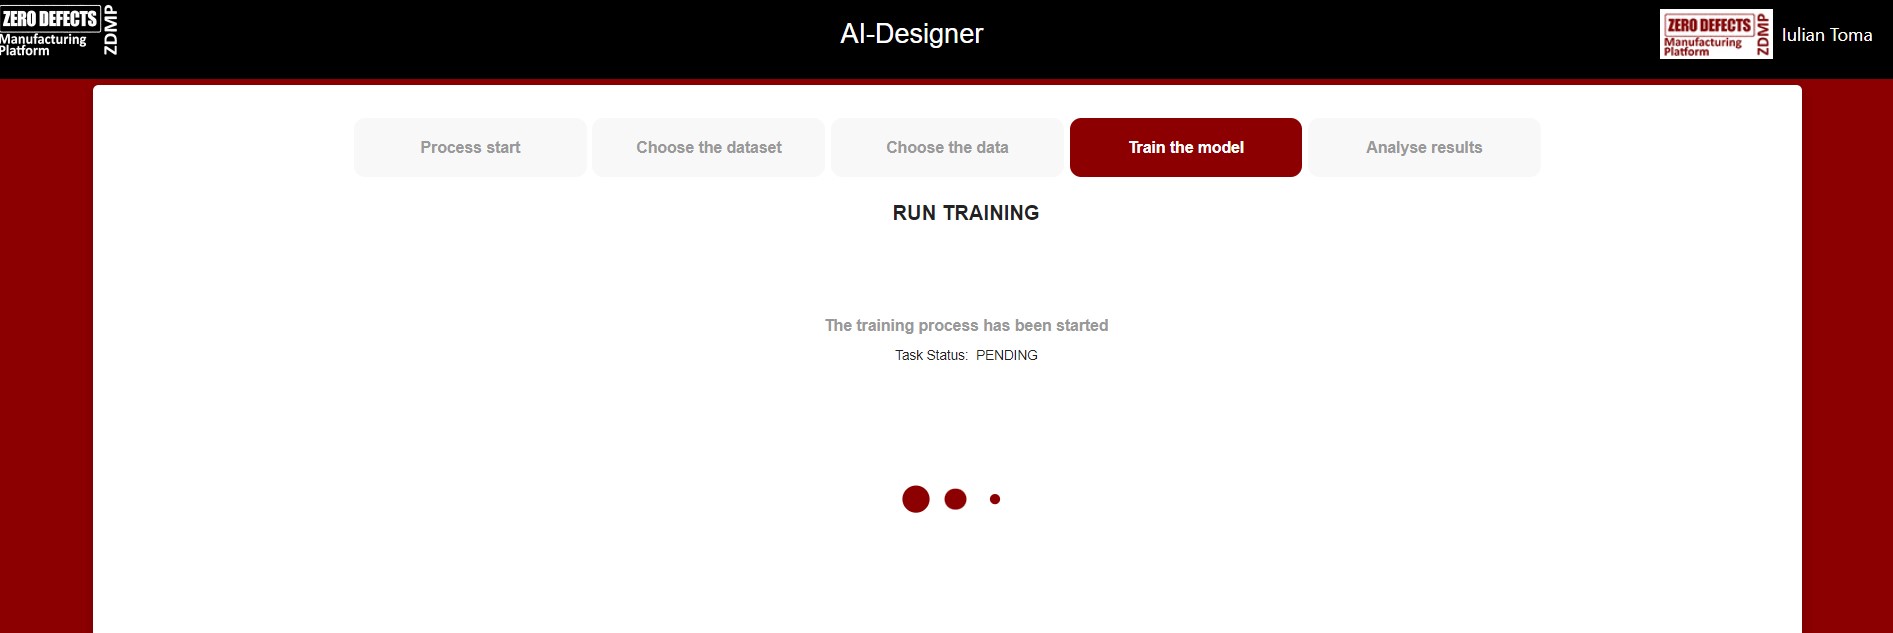
Figure 13: Start the training process
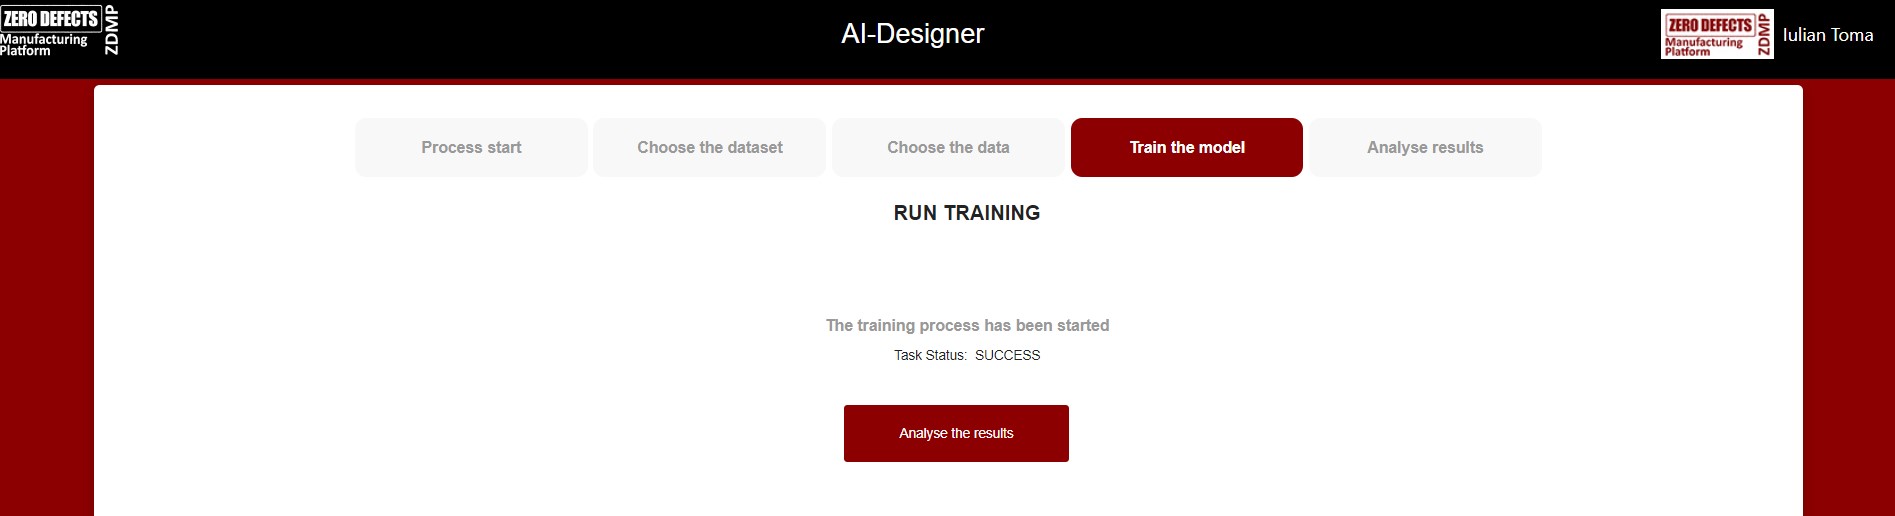
Figure 14: Finished training
AutoML algorithms and models
AutoML trains and cross-validates the following algorithms (in the following order): three pre-specified XGBoost GBM (Gradient Boosting Machine) models, a fixed grid of GLMs, a default Random Forest (DRF), five pre-specified H2O GBMs, a near-default Deep Neural Net, an Extremely Randomized Forest (XRT), a random grid of XGBoost GBMs, a random grid of H2O GBMs, and a random grid of Deep Neural Nets. In some cases, there might not be enough time to complete all the algorithms, so some may be missing from the Leaderboard.
For best performance, AutoML then trains two Stacked Ensemble models “All Models” and “Best of Family”. The “All Models” ensemble contains all the models and is optimized for model performance. The second ensemble “Best of Family”, contains just the best performing model from each algorithm class/family and is optimized for production use since it only contains six (or fewer) base models. It should be relatively fast to use (to generate predictions on new data) without much degradation in model performance when compared to the “All Models” ensemble. Both of the ensembles should produce better models than any individual model from the AutoML run except for some rare cases.
Analyse training results
In this step, the results are displayed including generated model Leaderboard and graphical representation of the models from the results (See Figure 15: Data results page (model Leaderboard)).
The AutoML process generates a “Leaderboard” of models that were trained in the process. The models are ranked by a default metric based on the problem type (the second column of the Leaderboard). In binary classification problems, that metric is AUC (Area Under the ROC Curve), and in multiclass classification problems, the metric is mean per-class error. In regression problems, the default sort metric is deviance. Some additional metrics are also provided, for convenience.
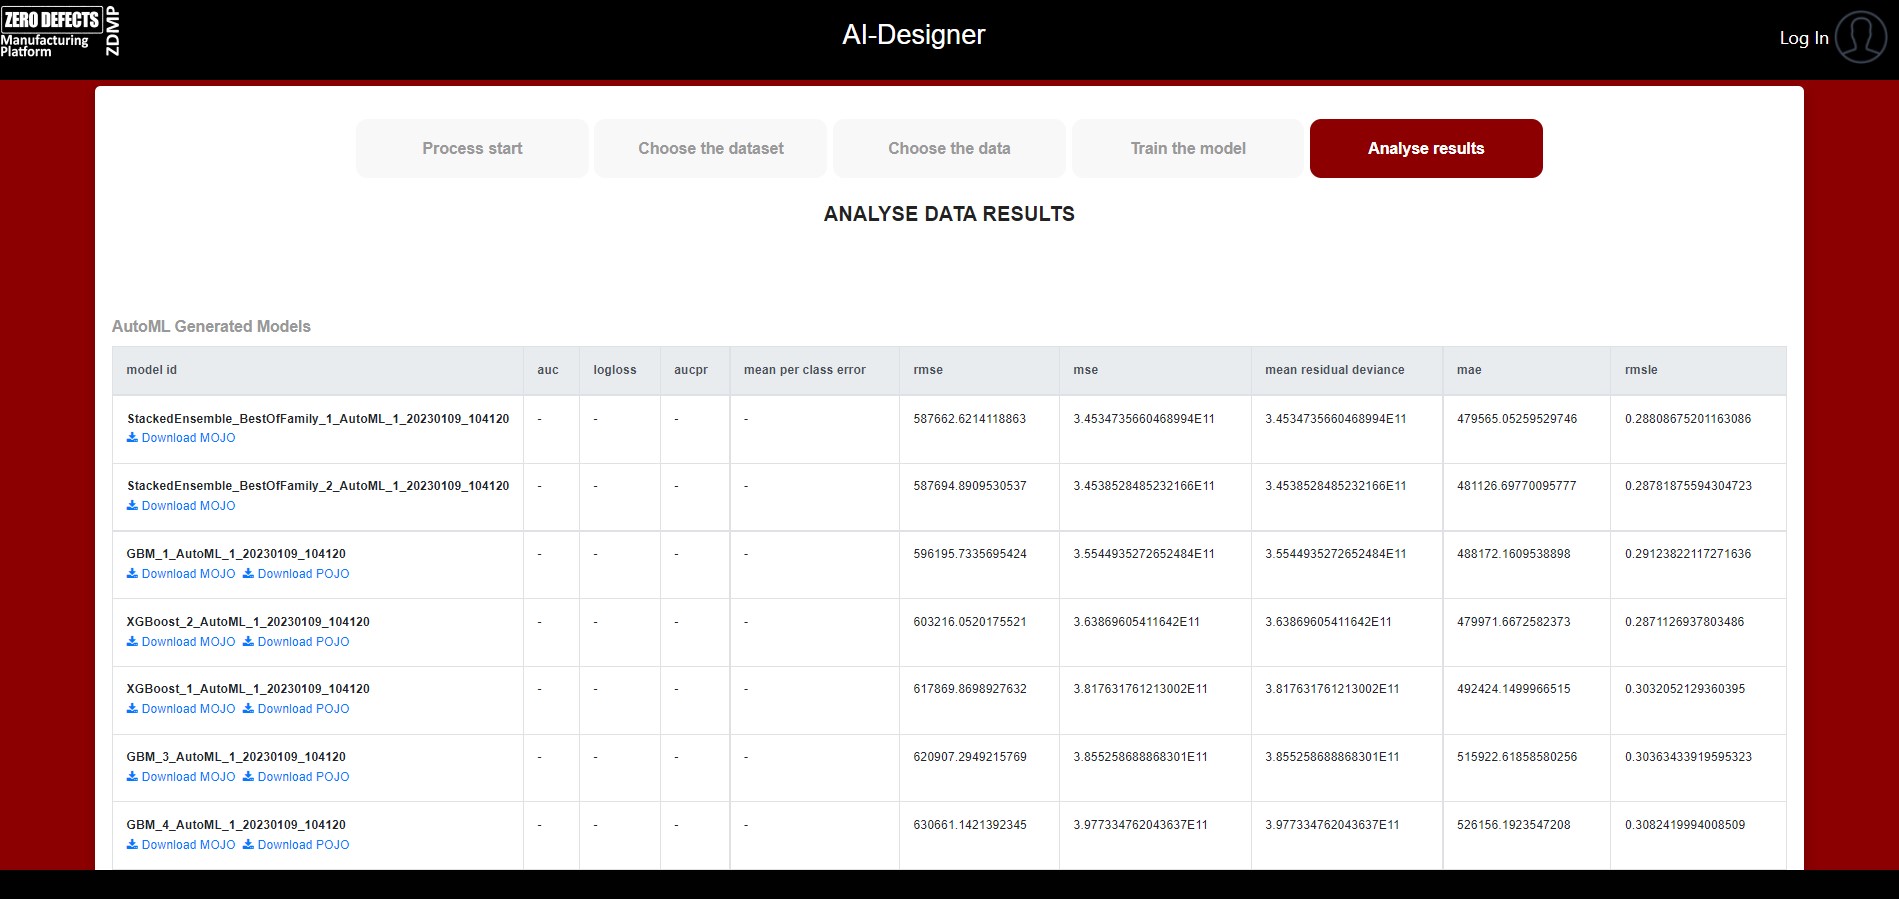
Figure 15: Data results page (model Leaderboard)
Graphical charts and plots of the metrics are displayed to show the performance of each model.
The Gains/Lift Table page uses predicted data to evaluate model performance. The accuracy of the classification model for a random sample is evaluated according to the results when the model is and is not used. The gains/lift chart shows the effectiveness of the current model(s) compared to a baseline, allowing users to quickly identify the most useful model. H2O uses the response rate of the top ten groups to evaluate the model performance; the highest response and greatest variation rates indicate the best model (See Figure 16: Gains Lift Table graph).
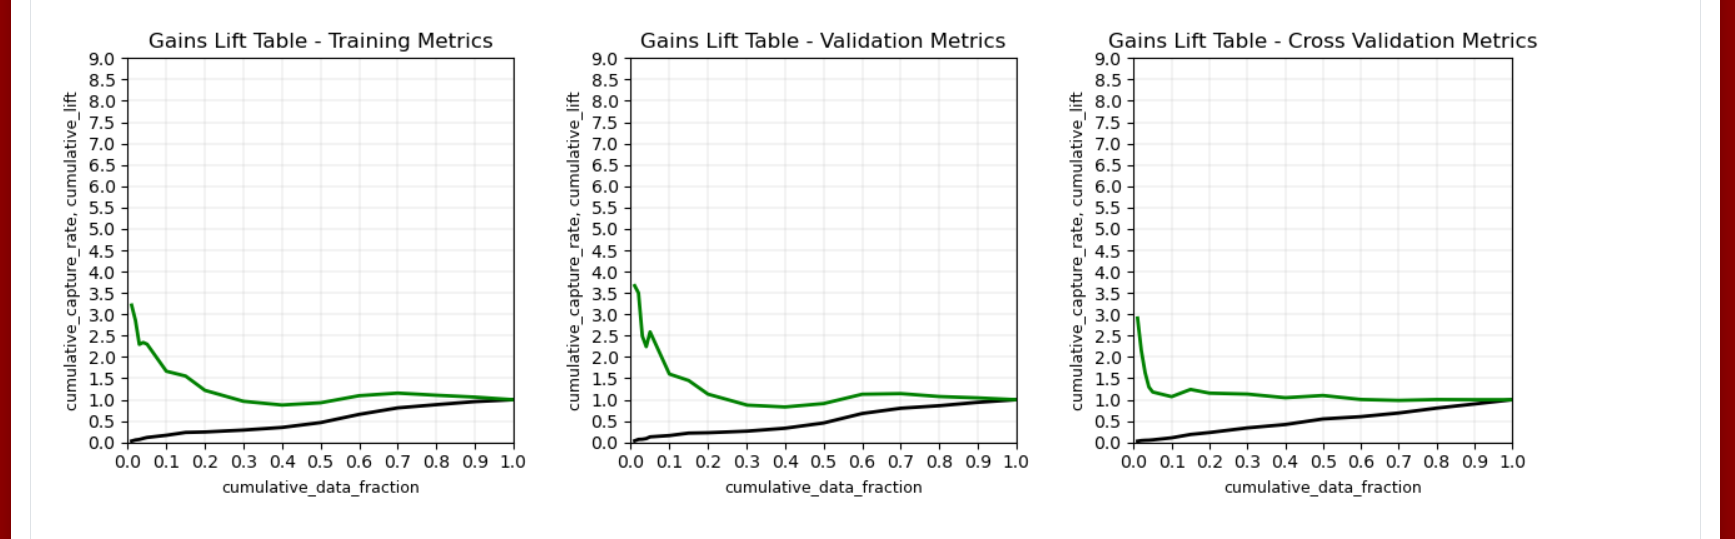
Figure 16: Gains Lift Table graph
The ROC Curve graph represents the ratio of true positives to false positives. The lower-left side of the graph represents less tolerance for false positives while the upper-right represents more tolerance for false positives (See Figure 17: ROC Curve graph).
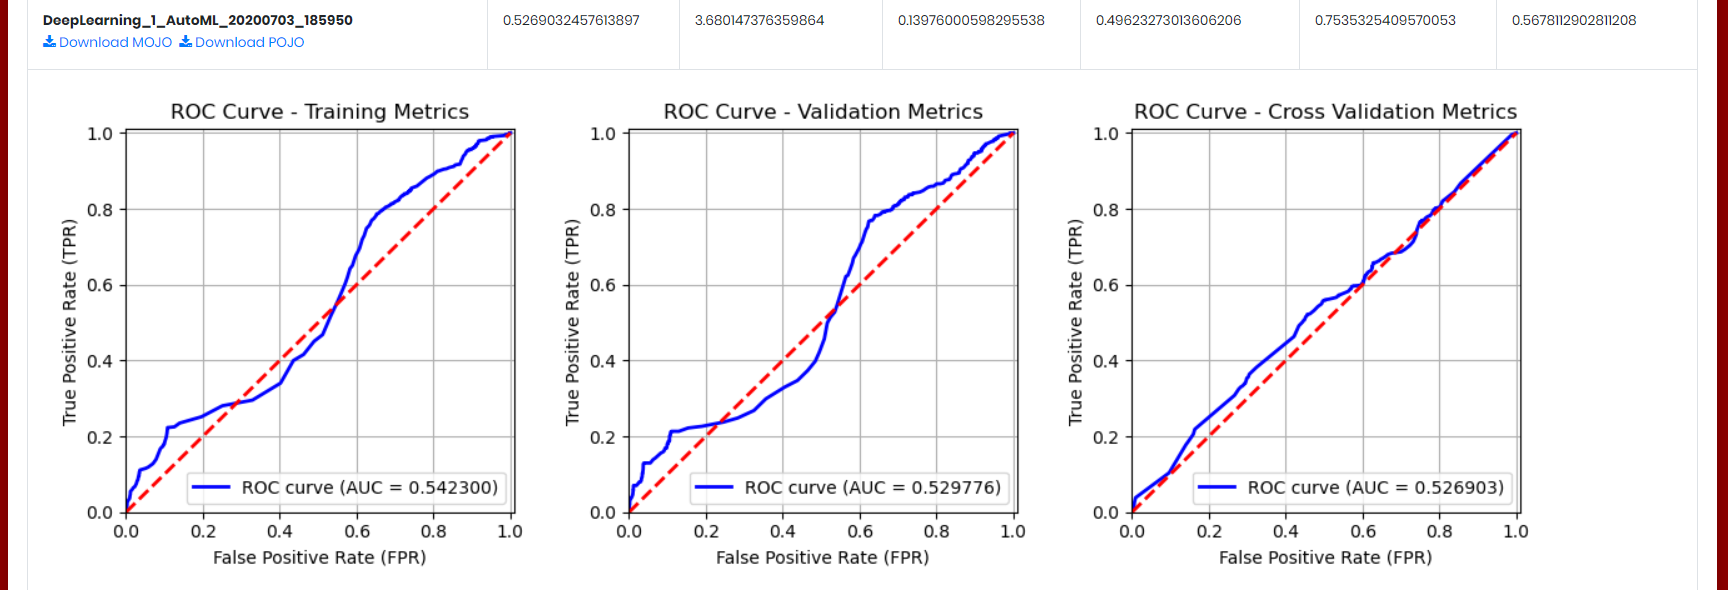
Figure 17: ROC Curve graph
The Standardized Coefficient Magnitudes chart represents the relationship of a specific feature to the response variable (See Figure 18: Standardized Coefficient Magnitudes chart). Coefficients can be positive (orange) or negative (blue). A positive coefficient indicates a positive relationship between the feature and the response, where an increase in the feature corresponds with an increase in the response, while a negative coefficient represents a negative relationship between the feature and the response where an increase in the feature corresponds with a decrease in the response (or vice versa).
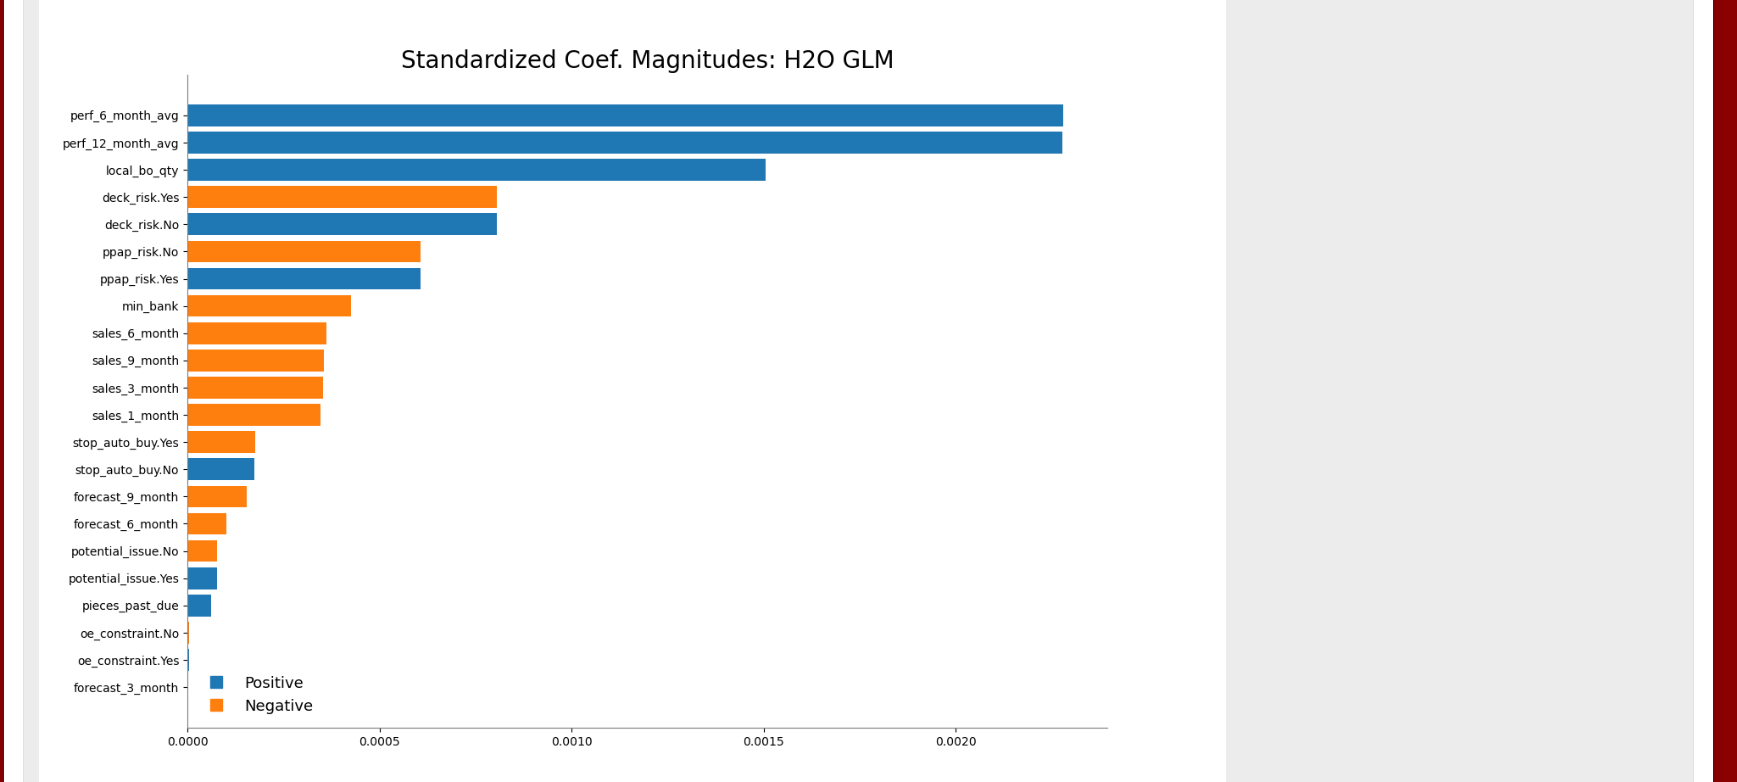
Figure 18: Standardized Coefficient Magnitudes chart
Variable importance is determined by calculating the relative influence of each variable for GBM and DRF models (See Figure 19: Variable importance chart).
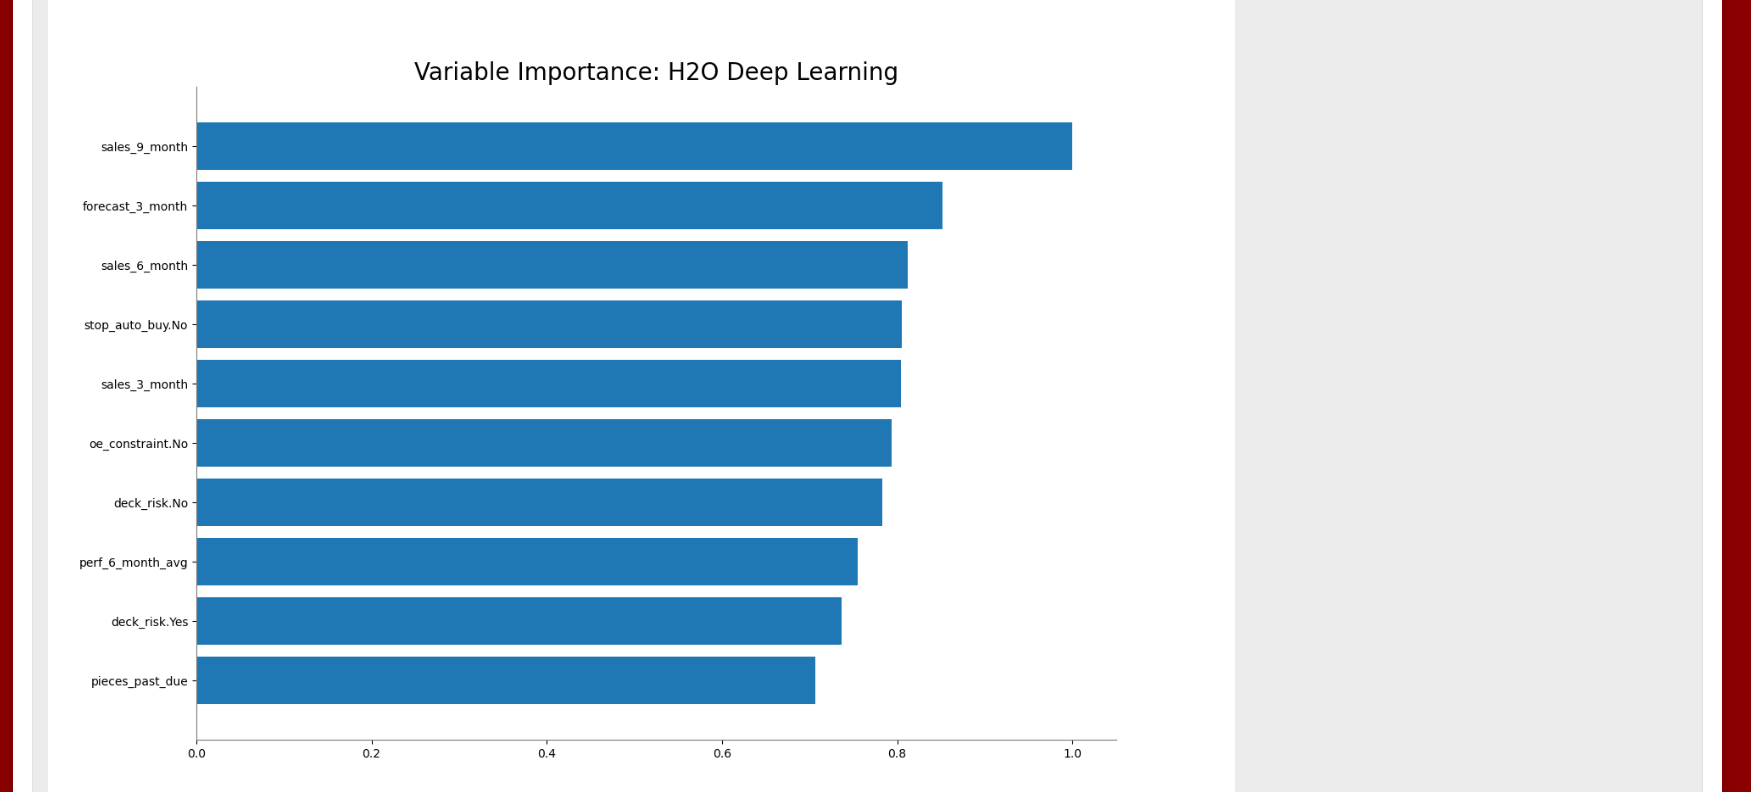
Figure 19: Variable importance chart
Deploy model to AI Runtime
After the AutoML training, the MOJO/POJO model files are available for download for each model (the Download MOJO and Download POJO links).
The best performing model, usually “Best of Family” is the default preselected model that will be used for deploying. The user has the option to choose the model that will be deployed using the list of models available in the dropdown “Choose the model for deploying (optional)” (See Figure 20: Model selector).
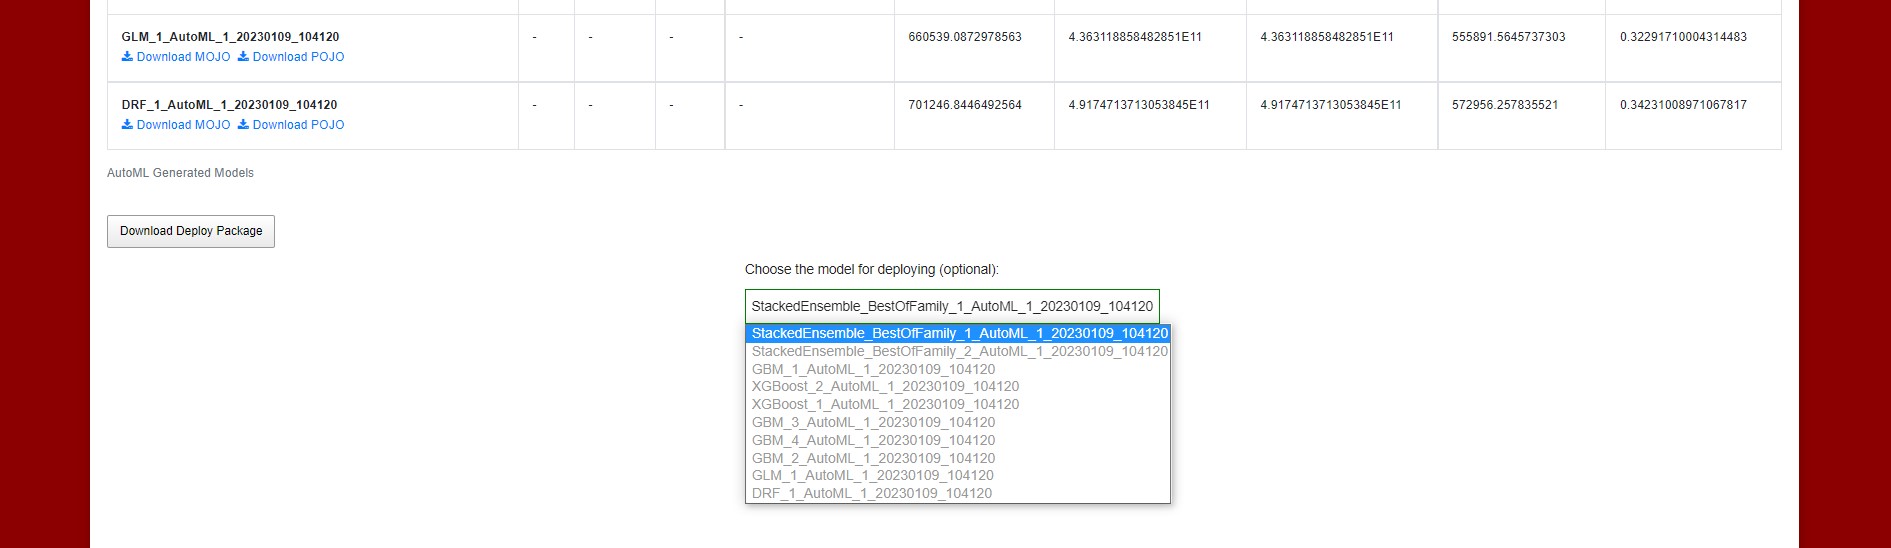
Figure 20: Model selector
The default best performing model, or the custom chosen model will be used and sent to the AI Analytics Runtime Component (See Figure 21: Deploy project button and Download Deploy Package button)
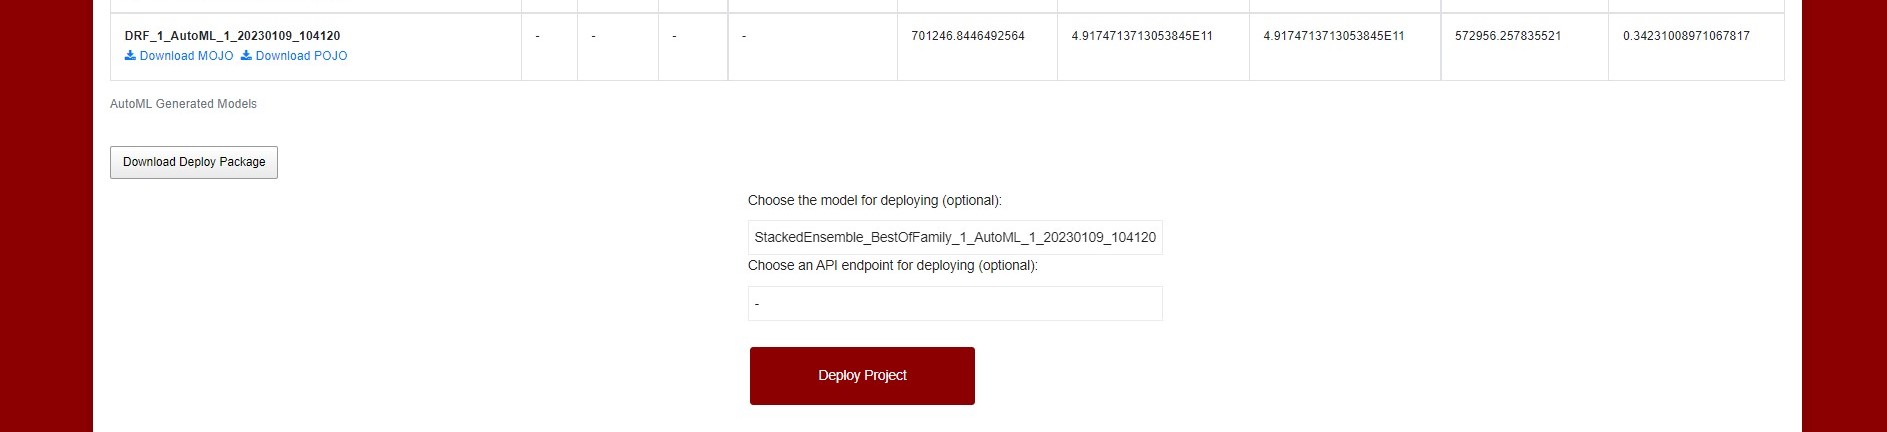
Figure 21: Deploy project button and Download Deploy Package button
Before sending the model to AI Analytics Runtime the user has also the option to choose the API endpoint that will be used for deploying. The default endpoint is the one set in the application. To define custom API endpoints the user can create new endpoints in the Gateway API with special naming for filtering: the endpoints must contain the word “aiar” and realm name. (eg: *aiar*simavi*). The API endpoint selector will contain the default API endpoint and the endpoints that contain “aiar” and the realm name of the current user (filtered endpoints for each realm). (See Figure 22: Choose an API endpoint)
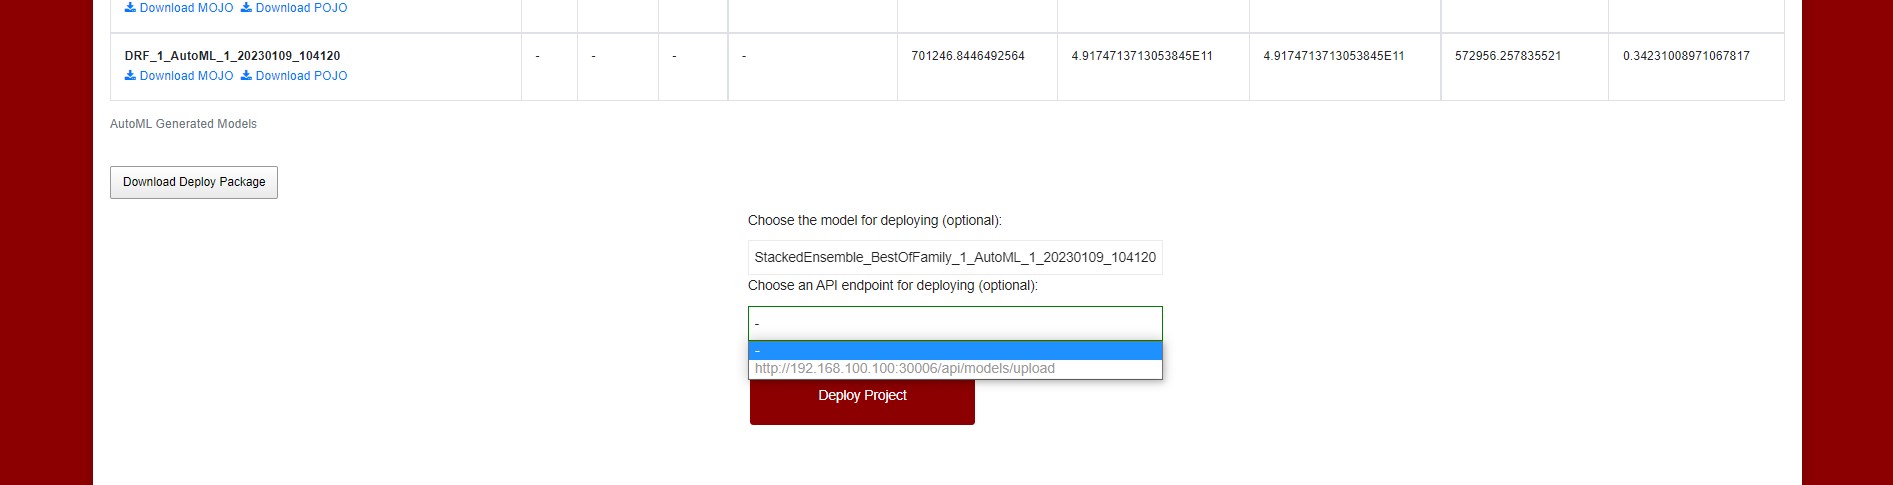
Figure 22: Choose an API endpoint
The model selector is also used for the “Download Deploy Package” button that downloads the package which will be sent with “Deploy Project” option to AI Runtime.
The deploy package contains the MOJO model generated from the training process and the prediction methods that use the model for future predictions (See Figure 23: Deploy package content). The prediction method can be called also from this downloaded package by editing run.bat and configuring the JSON with the input data.
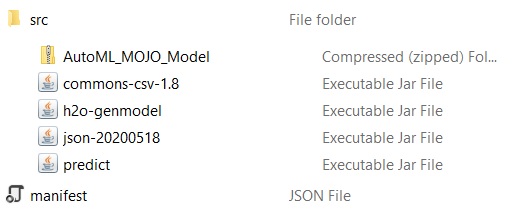
Figure 23: Deploy package content
java -jar predict.jar "{ 'predictValues': [ {'ppap_risk':'Yes', 'forecast_9_month':'9', 'stop_auto_buy':'No', 'perf_12_month_avg':'0.98','perf_6_month_avg':'0.99', 'deck_risk':'No', 'min_bank':'5', 'pieces_past_due':'0', 'sales_9_month':'6','sales_6_month':'7', 'oe_constraint':'No', 'national_inv':'2', 'in_transit_qty':'4', 'sales_1_month':'0','potential_issue':'No', 'forecast_6_month':'6', 'lead_time':'2', 'rev_stop':'No','went_on_backorder':'Yes', 'local_bo_qty':'3', 'sku':'1118248', 'sales_3_month':'1','forecast_3_month':'1'} ] }"
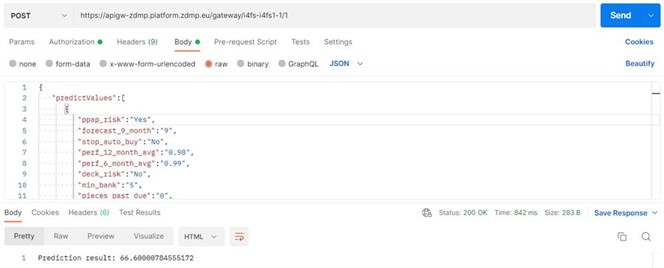
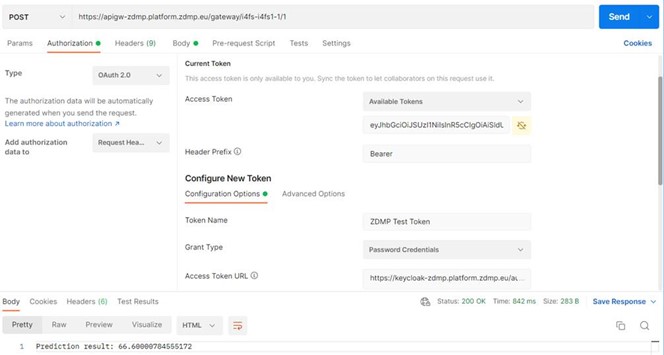
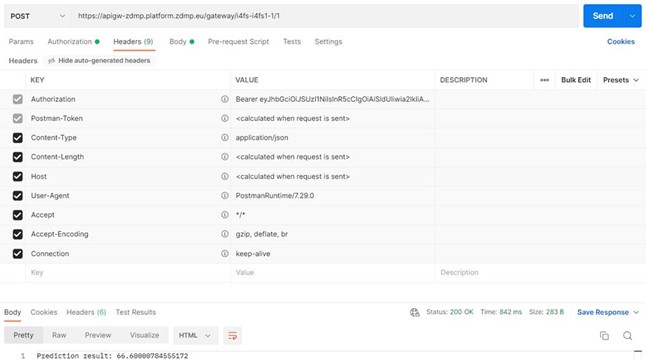
After the model is successfully deployed, the API endpoint can be used for prediction with new sets of data (As can be seen in Figure 24: Calling the prediction method with new data):

Figure 24: Calling the prediction method with new data
The user can make a request to the Runtime API URL by sending the token with the request like in the configurations below: