Autonomous Computing

General description
The Autonomous Computing component enables the decentralisation and automation of decisions by autonomously controlling processes values and resources, be it zApps, ZDMP components or computational resources, as well as communicating and cooperating with other components.
To execute actions autonomously, users can define limits for data points, as well as qualifiers (eg energy consumption is ‘larger than’ & ‘100 kWh’) to trigger user defined actions. The actions to be used are obtained from the Orchestration component, where the user can model BPMN Processes.
| Resource | Location |
|---|---|
| Source Code | Link |
| Online Documentation | Link |
| X Open API Spec | Link |
| Video | Link |
| Further Guidance | None |
| Related Datasets | None |
| Additional Links | None |
Screenshots
The following images are illustrative screenshots of the component
Component Author
| Company Name | ZDMP Acronym | Website | Logo |
|---|---|---|---|
| Ascora GmbH | ASC | www.ascora.de |  |
Commercial Information
| Resource | Location |
|---|---|
| IPR Link | |
| Marketplace link | https://marketplace-zdmp.platform.zdmp.eu/637624dd6a998 |
Architecture Diagram
The following diagram shows the position of this component in the ZDMP architecture
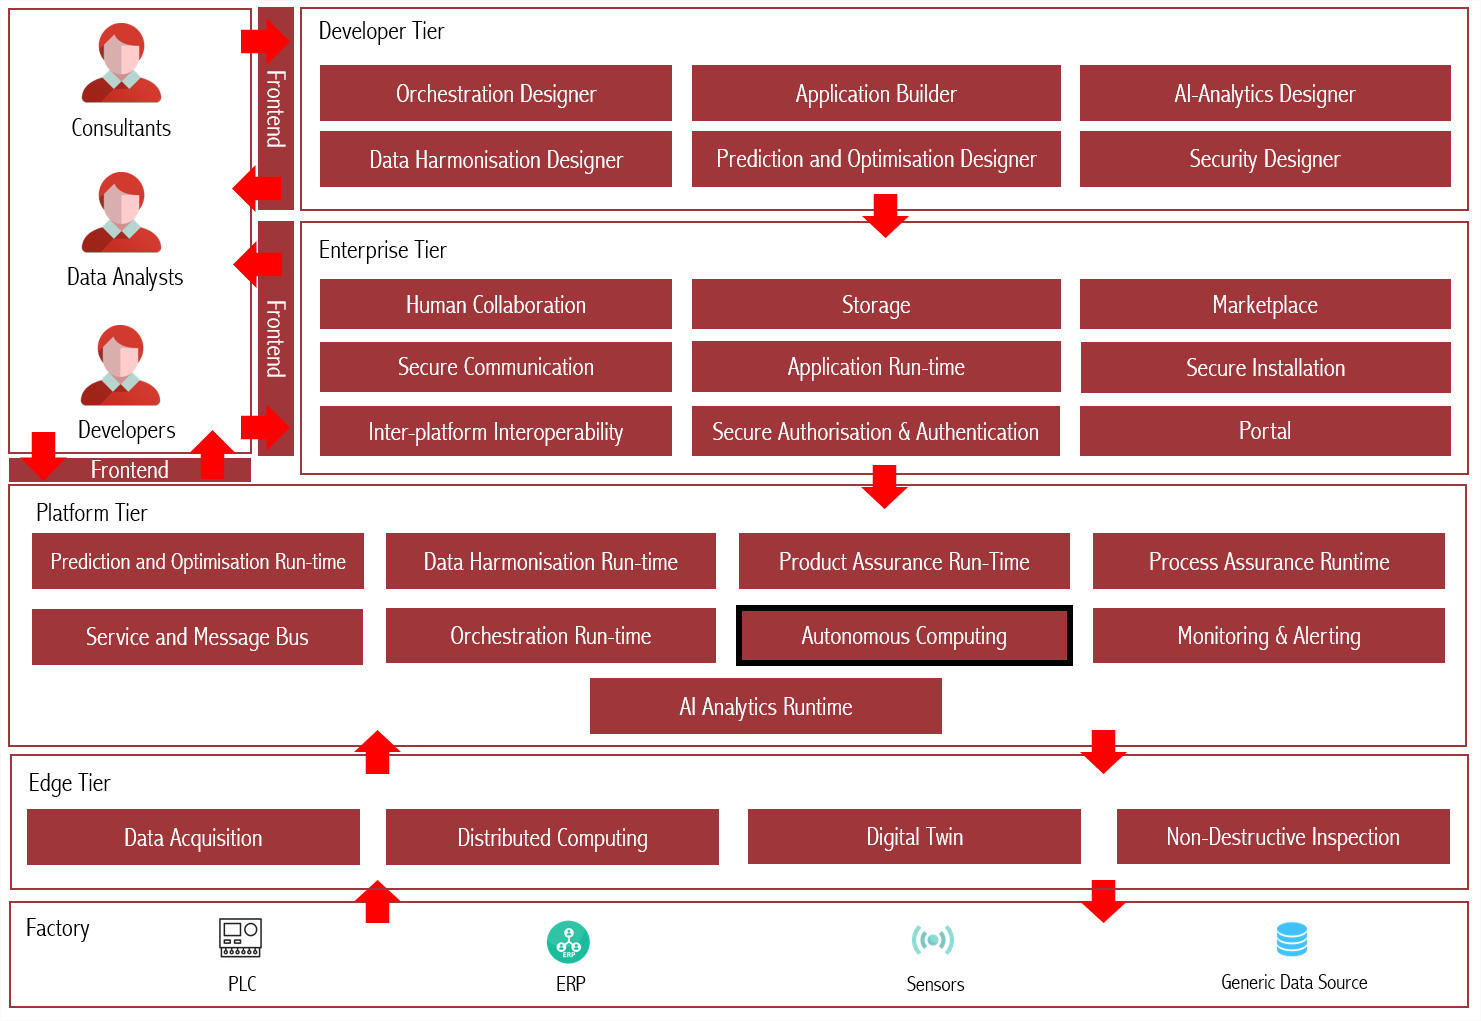
Figure 1: Architecture Diagram
Benefits
Facilitates automation of critical processes which should kick in once specified KPI conditions meet
Provides an easy-to-use Graphical User Interface for defining autonomous process, KPIs etc
Provides a dashboard for creating and visualizing reports and graphs related to functioning of Autonomous processes and subscribed KPIs
Facilitates the AI-Analytics component to generate insights from historical trends of Autonomous process and KPI conditions
Features
The Autonomous Computing Component offers the following features.
Create Autonomous Process
Allows the creation of Autonomous Processes consisting of rules based on KPI values, and API calls that are executed whenever the condition specified is matched. This gives the user the possibility to automate the execution of Processes when the production indicators are not conforming with quality standards, minimizing the reaction time for critical situations.
View Autonomous Process Historic Data
Allows the user to see the Autonomous Processes data and its execution through time. This information is used by the AI-Analytics component to offer the user insights on how to improve the conditions applied. The KPI’s values associated to an Autonomous Process can also be visualised in a timeline to improve the visibility of the impacts of the autonomous processes’ execution in the KPI’s values.
Autonomous Process Monitor Engine
Monitors the KPI values changes to trigger the execution of a process. The component monitors the value change of every KPI associated to the Active Autonomous Processes, whenever the KPI values changes, an algorithm is applied to the conditions related to it, when the conditions are matched for one or more Autonomous Processes, the list of API calls defined are executed.
Improvement Insights UI
Displays insights on how to improve the autonomous processes accuracy, these insights are gathered from the AI-Analytics component based on the historic data of the autonomous process’s execution and its impacts on the associated KPI’s values.
System Requirements
The Autonomous Computing has the following requirements:
Hardware Requirements
2 CPUs
8GB RAM
64GB disk space
Software Requirements
- Docker
Associated ZDMP services
Required
Installation via Docker Compose
The Autonomous Computing component can be installed via docker-compose, thus it is a server for the email credentials is needed:
Download the latest docker-compose from ZDMP’s HCE GitLab.
Add the environment variable values. Choose the way to do it following the instructions from docker: https://docs.docker.com/compose/environment-variables/.
As an example, create a file named ‘.env’ in the same folder of the docker-compose file, with the following information:
MONITORING_AND_ALERTING_SERVICE_PORT=28001
MESSAGE_BUS_SERVER=http://yourMessageBusServer.com
MESSAGE_BUS_PORT=PreferredAmpqPort
MESSAGE_BUS_USER=yourMessageBusUser
MESSAGE_BUS_PASSWORD=yourMessageBusPassword
MONGO_INITDB_SERVER=DateBaseServer
MONGO_INITDB_DATABASE=DataBaseName
MONGO_INITDB_ROOT_USERNAME=yourDataBaseUserName
MONGO_INITDB_ROOT_PASSWORD=yourDataBasePassword
- Install and start the component by executing the following command:
docker-compose up -d
Installation via miniZDMP
To install the Autonomous component on a miniZDMP instance, some preliminary work is necessary. To follow this guide, we assume that the installation and setup of the miniZDMP platform has been completed. Instructions on how to do this can be found here (https://gitlab-zdmp.platform.zdmp.eu/enterprise-tier/t6.4-application-run-time/-/tree/master/minizdmp or D087 Platform Integration and Federation).
For the component to be used, the following things must be ready:
T6.4 Service and Message Bus (or RabbitMQ Message Bus)
- Please login into your Rancher Instance and navigate to the Apps Section.
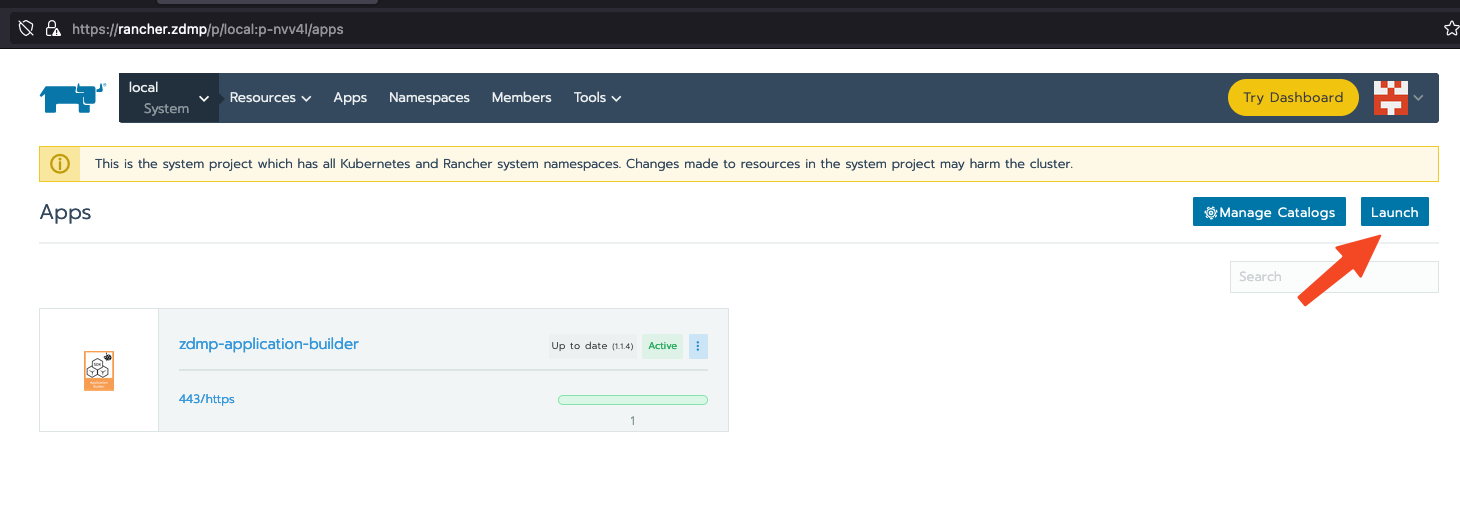
Figure 2 - Rancher Lunch an App
Please click on the Lunch Button to launch a new Application on the miniZDMP Kubernetes Cluster
Search for the Entry of “Autonomous Computing / zdmp-autonomous-computing” and click on it.
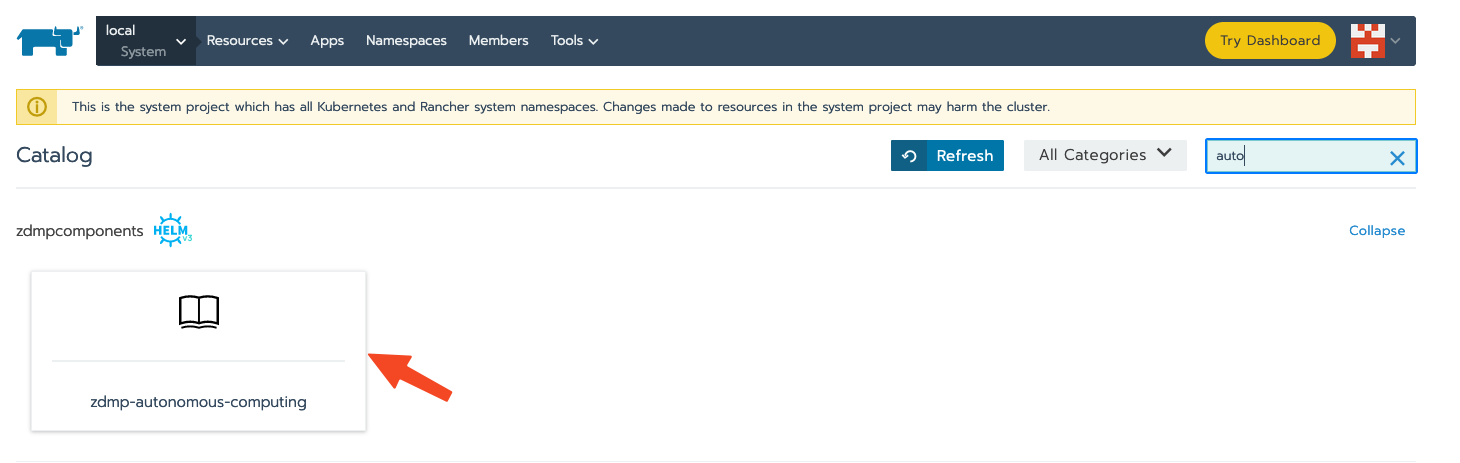
Figure 3 - Lunch the Autonomous Computing App
In this step there are a few configurations needed, please set it to your needs.
Storage Type
Please set it to LOCAL or NFS. For NFS it is needed that you configure a NFS-Server in your miniZDMP Platform. Local means that the Data that are collected in this component will be saved to the local Server disk. In case of a NFS the data can be saved to Network Shared Directory (recommended way, prevents data loss).Domain Settings
You can adjust here the domain name, where this component will be available. The default is set to zdmp.home which is also a default of the miniZDMP Platform.
- Private Registry Settings
These settings are necessary to download the container of registry of ZDMP. For the HCE Gitlab please use your own credentials as username and password.
- Database
You can choose between a central database (where you need to provide the credentials) or a preconfigured database for this component.
- Backend environment vars
The access data for the message bus must be stored here. In the standard case, this data is configured so that the accesses are used by the reference platform.
- Environment Vars
Here it is possible to adapt the URLs in order to call up either other components or internal components. In a standard installation of miniZDMP, no changes should be necessary here.
- Please click on the Lunch Button, to start the process that the Autonomous Computing component will be deploy to the miniZDMP Cluster.
How to use
The Autonomous Computing component can be used through an API or a friendly user interface:
API: Please refer to http://localhost:28011/api or https://autonomous-computing-api-zdmp.zdmp.home/api for the Swagger instructions on how to use the API. There are all the possible requests the component accepts, and its expected parameters or body content. The API can be accessed in http://localhost:28011/ or https://autonomous-computing-api-zdmp.zdmp.home/ (miniZDMP)
User Interface (UI): Access http://localhost:28012 or https://autonomous-computing-zdmp.zdmp.home/ to access the user interface.
API Calls
To facilitate the reuse of API Calls and the association with Autonomous Processes, the user may create and store API Calls configuration, either in its specific menu, or within a modal window in the Autonomous Processes creation/update.
Each API call consist of:
ID (auto generated)
Description (for the user to identify the different API calls
Method
URL
With credentials (if the request needs credentials)
Headers
Params
Auth
Proxy
Data
The following example is based on the pencil productions where we have KPIs to monitor the quantity of pencil produced, considering the process to schedule the distribution of the batch of pencils:
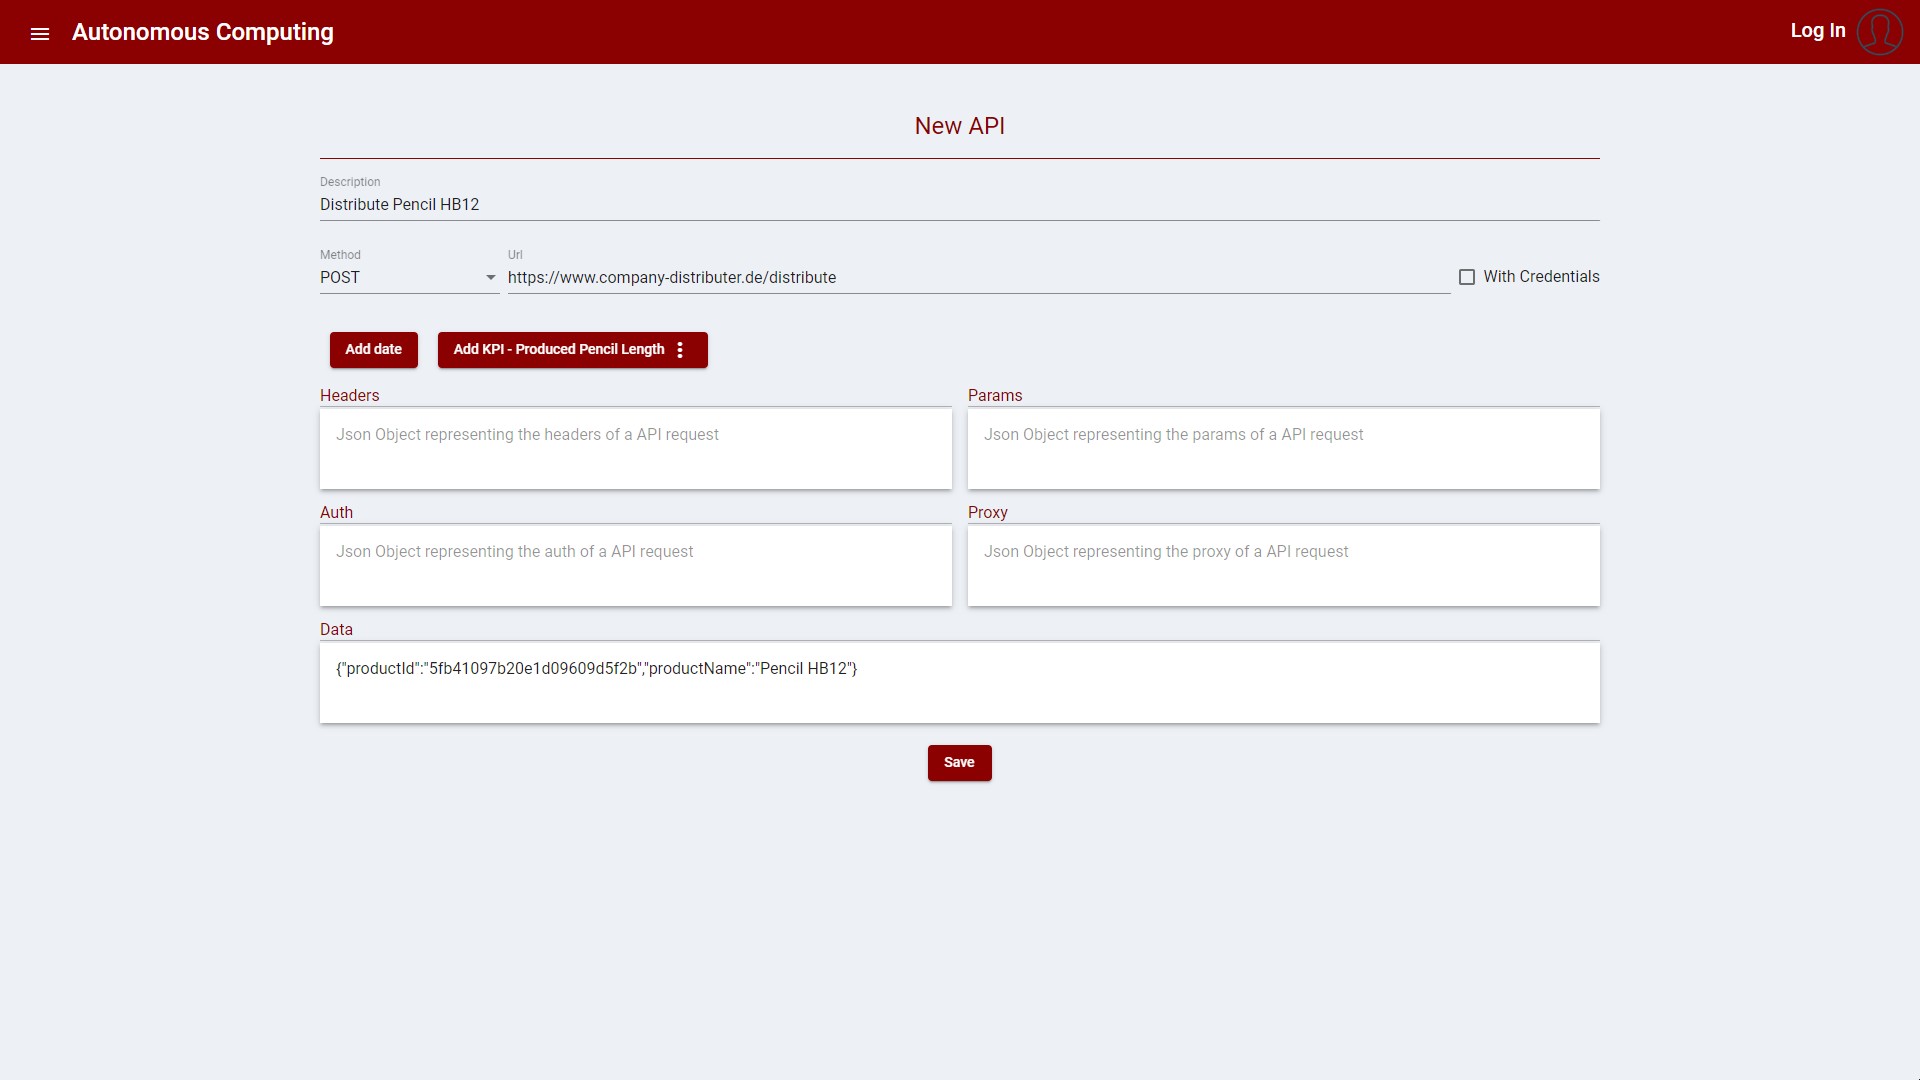
Figure 4: Create new API Call
After creating an API Call, it is displayed in the list as depicted in the image bellow:
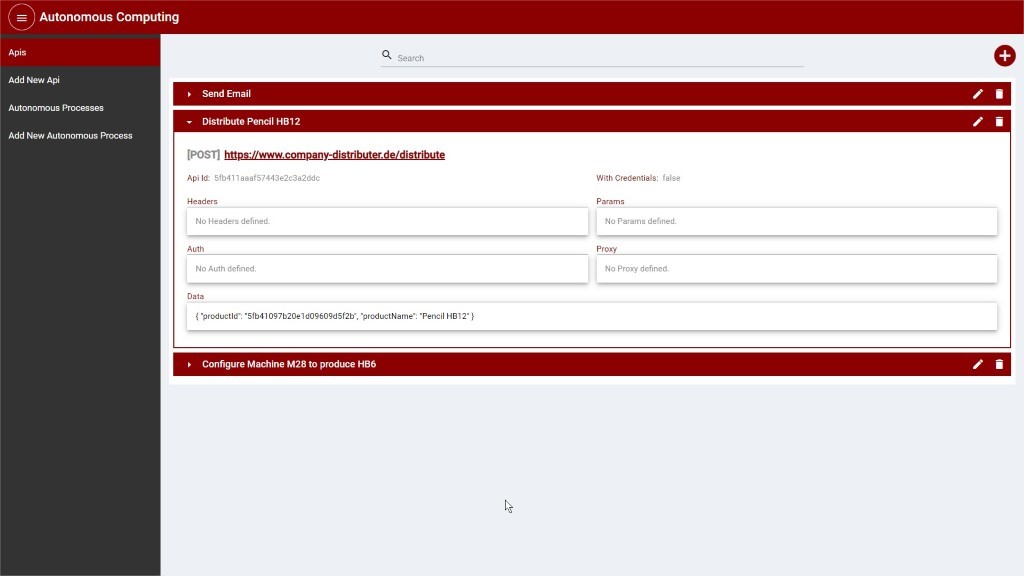
Figure 5: API Calls list view
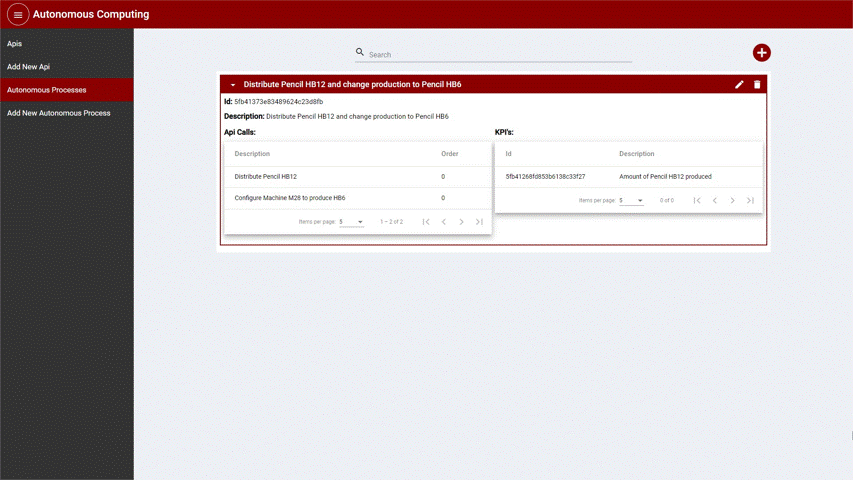
Autonomous Processes
One or more conditions can be applied to KPI’s to ensure the quality of the products or help in automatically keeping values on track. The user can then select API calls to be executed when certain conditions are met. For example, an autonomous process can be created when a machine completes the target number of produced pencils. The autonomous process would then schedule the distribution of the pencils and the machine should be configured to start producing a different product.
To create an Autonomous Process, the following is necessary:
Description to identify the Autonomous Process
One or more conditions that compares the values of KPI’s
One or more API calls to be executed when the conditions are matched
When more than one condition is provided, a logic query identifying the relation between the conditions needs to be provided. (See example bellow)
Follows is an example based on the ‘pencil’ scenario:
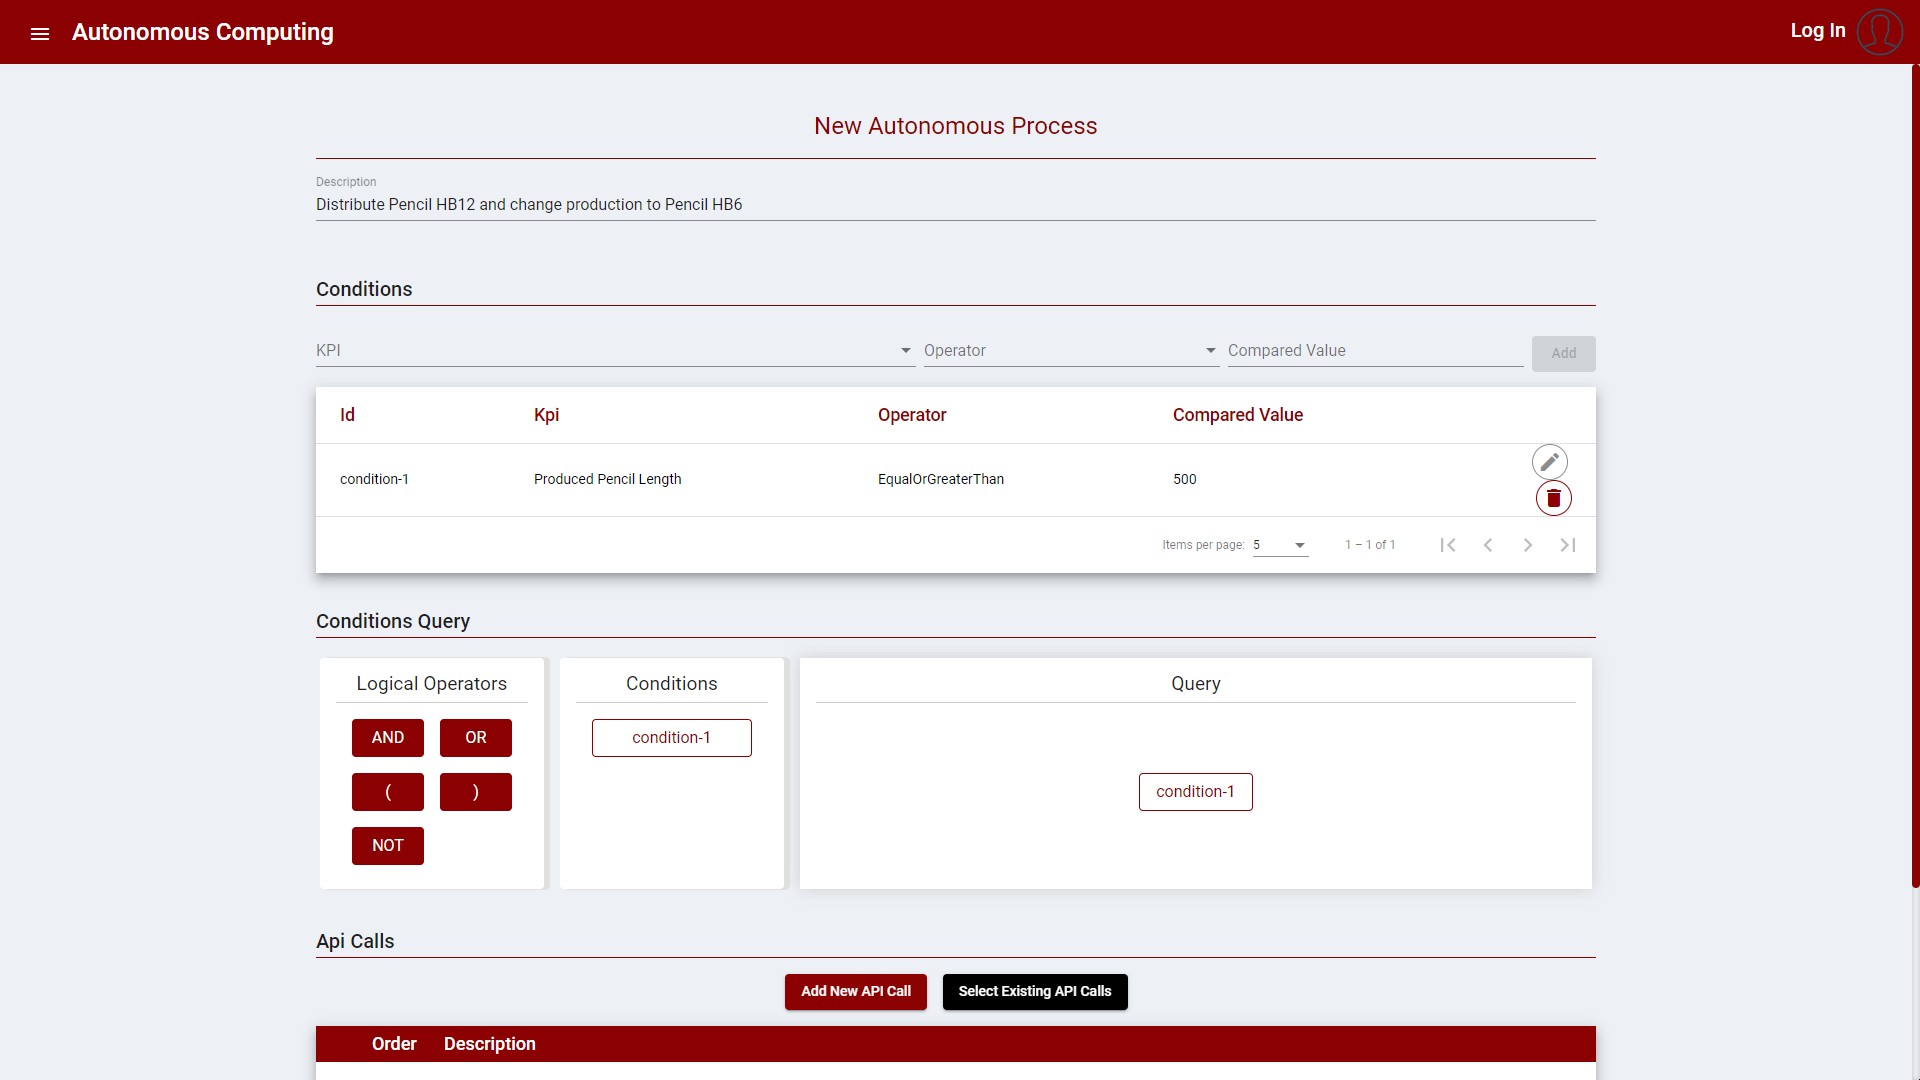
Figure 6: Create new Autonomous Process
The Conditions query must be formulated using the conditions identifiers and the logical operators available in the drag and drop UI.
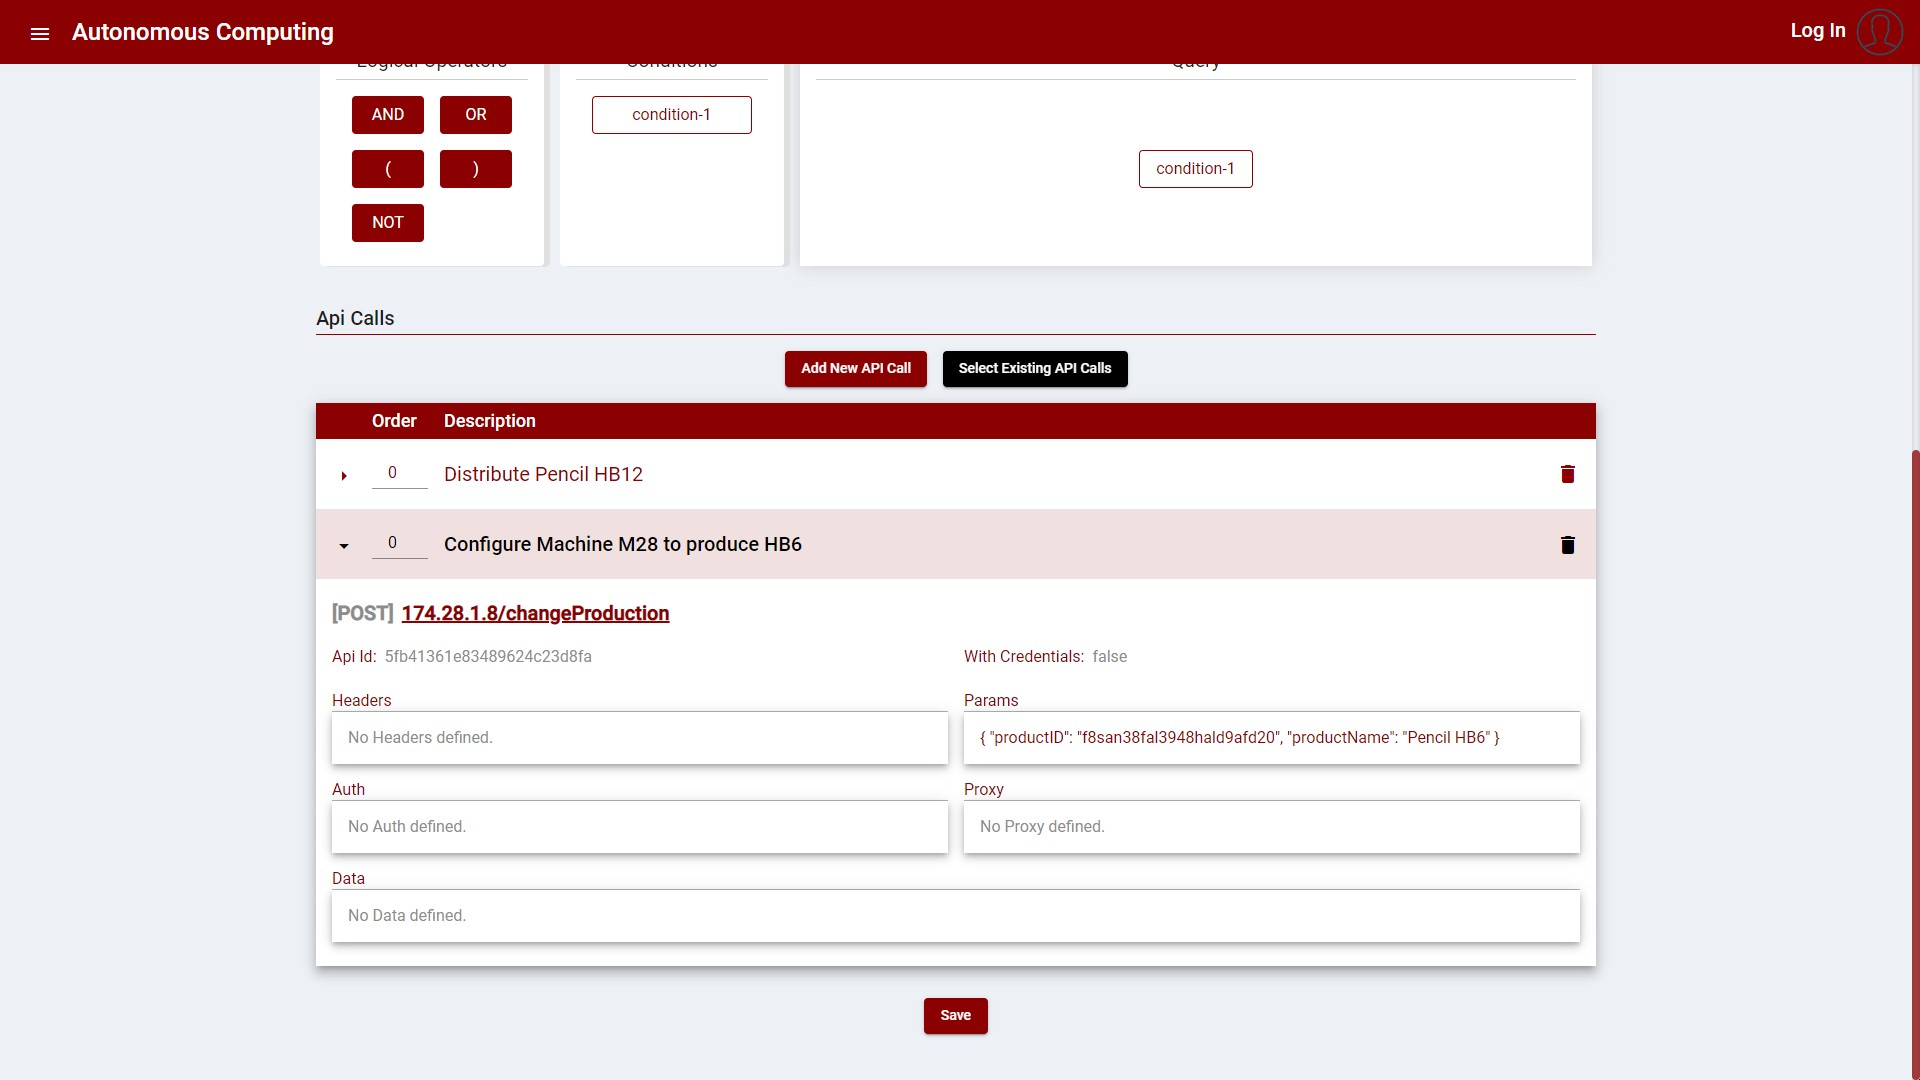
Figure 7: Create a new Autonomous Process – Expanded API Call item
The API calls can be either selected or created when creating/updating the Autonomous Process.
The following images display the process:
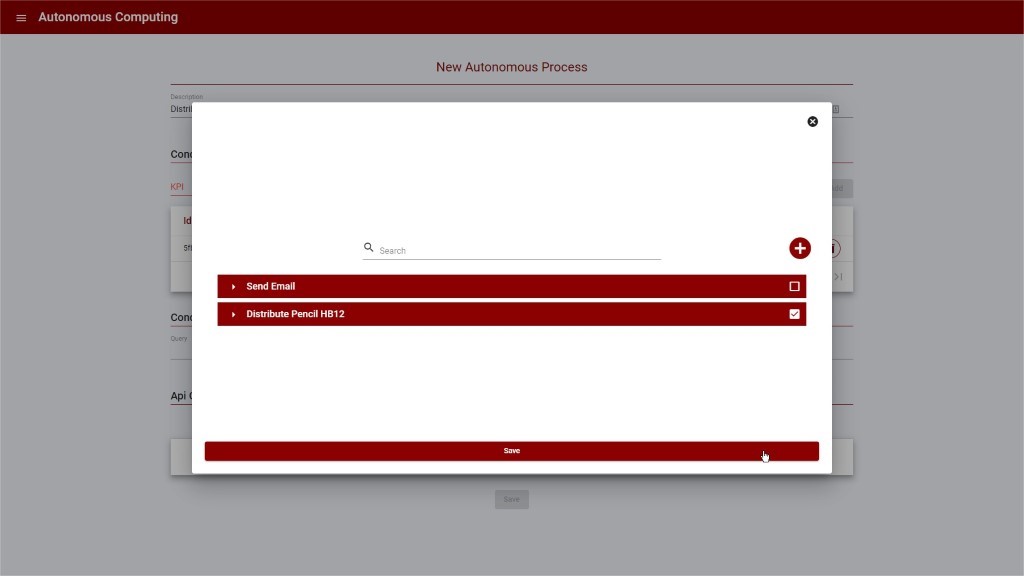
Figure 8: Create new Autonomous Process – Select API Calls
The API Call can include data from the KPI at the time the autonomous process is triggered as part of the API Call data. The buttons in the upper area are used to add these values, such as the KPI ID, value, or description:
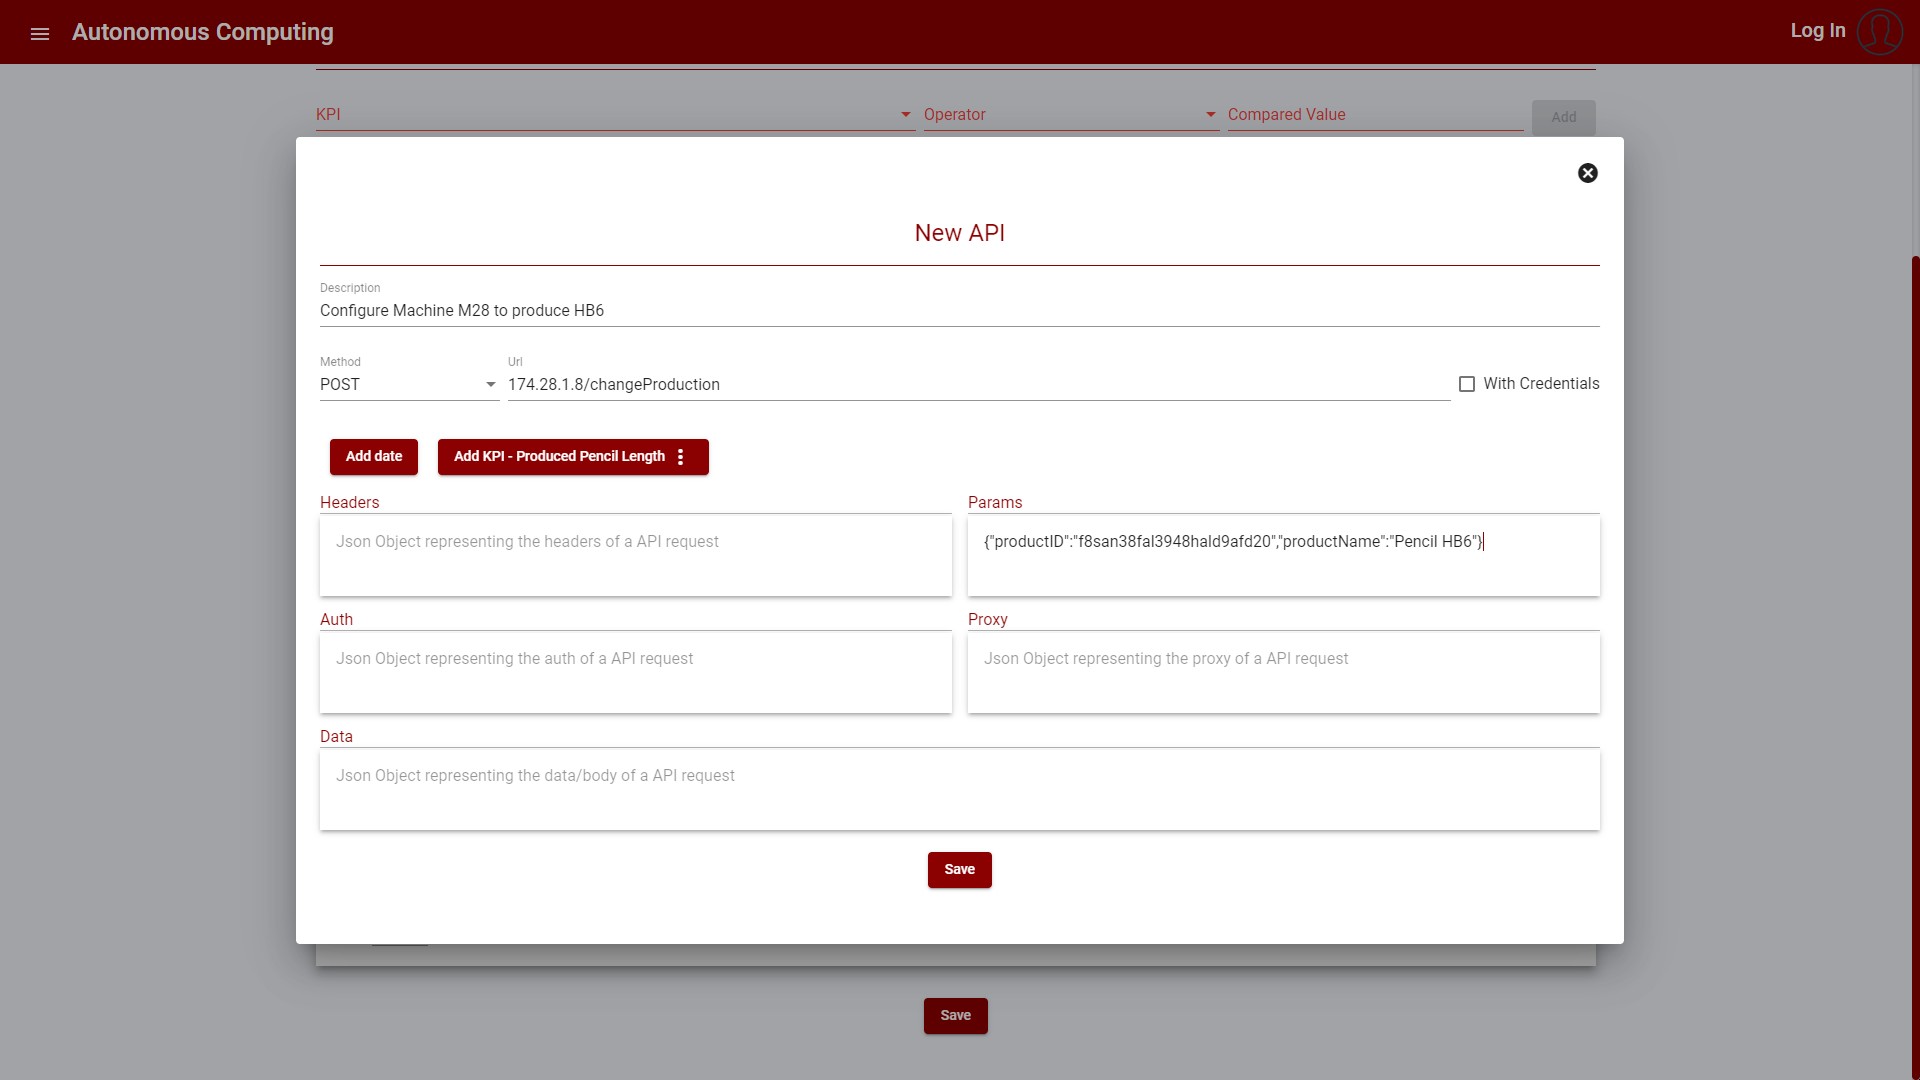
Figure 9: Create new Autonomous Process - Create new API Call
After creating an Autonomous Process, the item is displayed in the list as depicted in the following image:
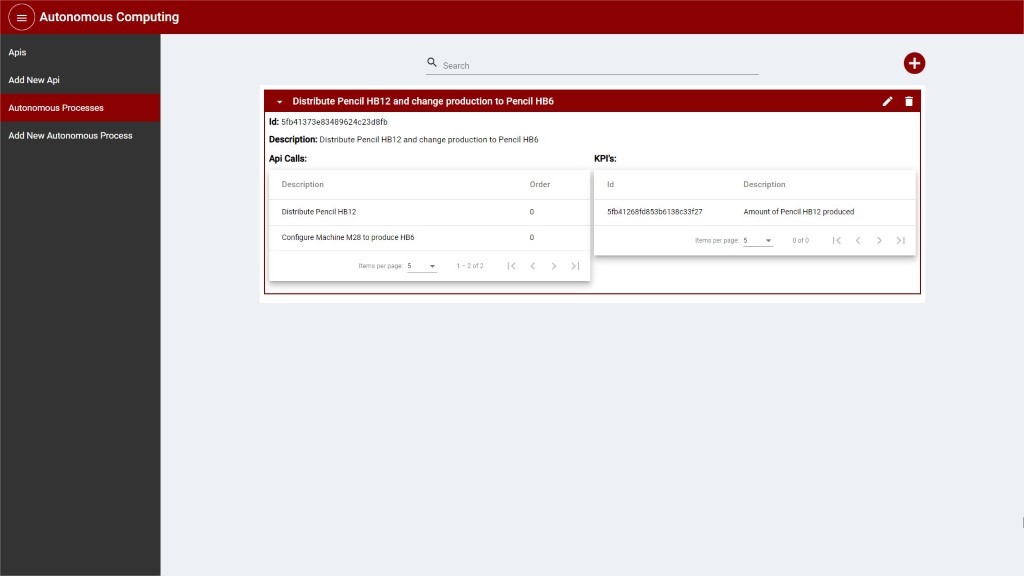
Figure 10: List of Autonomous Process
When the conditions are matched, the API Calls are executed, following the order specified.