Orchestration Designer and Runtime

General Description
The Orchestration Designer and Runtime component is responsible for allowing users to model multiple manufacturing workflows to orchestrate the various assets available within a collaborative framework.
To support the objectives of ZDMP a tool needs to be created and then used that allows the orchestration of various ZDMP assets (components, sub-components or zApps) and other services.
The Orchestration Designer is a visual online reactive canvas allowing a business process designer to pull in existing models from a library representing the virtualised manufacturing assets. Each asset may support additional properties that can be defined. The defined workflow can consist of sub workflows and be saved and versioned within the storage as (eg BPMN 2.0) model definitions.
The Orchestration Runtime is based on open source BPMN engine Camunda and provides a “super layer” on top of it to manage process instances, user tasks, service to service communication, and the NodeJS Code Generator upgraded from the vf-OS project.
| Resource | Location |
|---|---|
| Source Code | Link |
| X Open API Spec | Link |
| Video | Link |
| Online Documentation | Link |
Screenshots
The following images are illustrative screen shots of the component.
Component Author(s)
| Company Name | ZDMP Acronym | Website | Logo |
|---|---|---|---|
| Information Catalyst for Enterprise | ICE | www.informationcatalyst.com |  |
Commercial Information
| Resource | Location |
|---|---|
| IPR Link | Process Designer |
| Marketplace link Designer | https://marketplace-zdmp.platform.zdmp.eu/63ece7f44d5da |
| Marketplace link Runtime | https://marketplace-zdmp.platform.zdmp.eu/63ece916f0dc2 |
Architecture Diagram
The following diagram shows the position of this component in the ZDMP architecture.
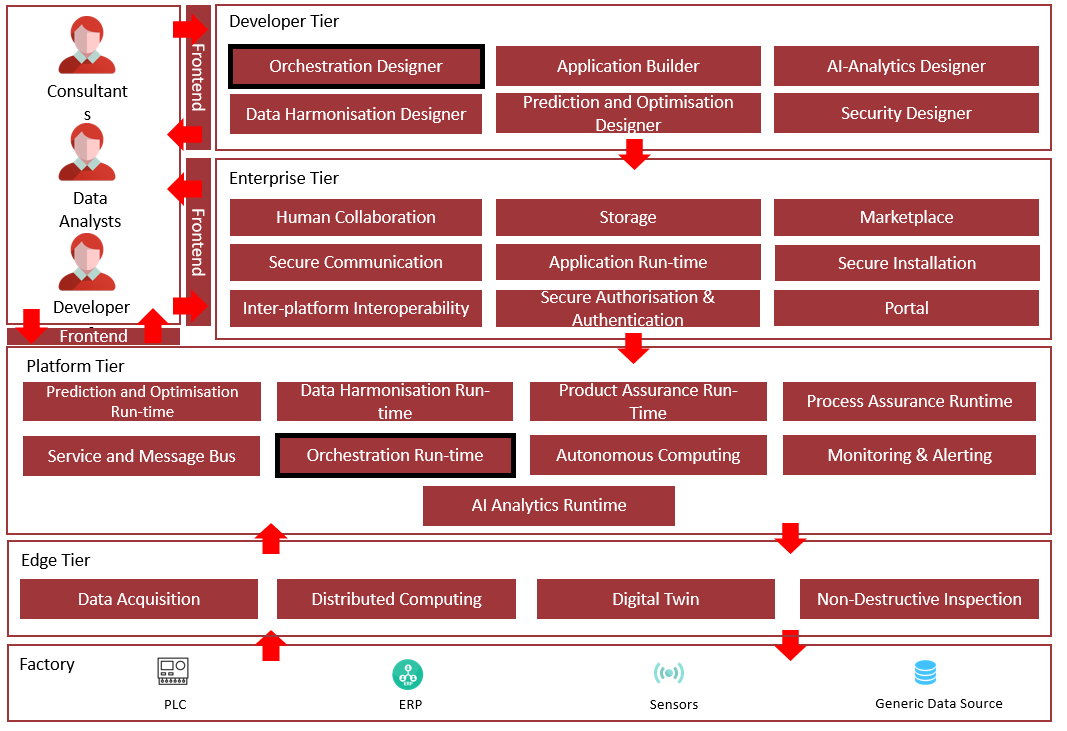
Figure 1: Position of Component in ZDMP Architecture
Benefits
Create standard BPMN diagrams to describe business process using a web editor.
Connect internal ZDMP services together to support business process operations, along with other services published in ZDMP Marketplace
Create tasks that must be done by humans, describing their inputs and outputs.
Start/Stop/Troubleshoot business process instances.
Provide inputs for awaiting tasks.
Features
The Orchestration Designer and Runtime offers the following features:
BPMN browser-based designer: Full BPMN designer that provides the user all tools needed to design a business process:
User task integrated into the user system.
Exclusive, inclusive, parallel gateways with condition expressions
Service tasks with inputs/outputs definition mapping
Script tasks using JavaScript.
Zoom, align, distribute elements.
Real time error validation
Export to BPMN format
Process explorer with diagram preview
NodeJS Code Generator: Used to convert the BPMN diagrams to fully performant NodeJS code. This gives superior performance for service-to-service communication processes.
Integrated with Camunda Engine: Powered by Camunda, the open source BPMN Engine, tweaked to get the most out of business process execution.
Keycloak: The Orchestration Runtime is integrated with the Portal and the Secure Authentication and Authorisation components.
REST API: This facilitates access to the Camunda Engine. It provides methods to:
Suspend / resume / delete processes.
Start / suspend / resume / delete individual processes instances.
Execute the completion of user tasks.
Retrieve a wide variety of information for processes, process instances and user tasks.
Process Control Dashboard: This is a UI for the management of business processes. The UI displays a list of active processes that are owned by the current user. The user can suspend / resume / delete processes, as well as start / suspend / resume / delete individual process instances. There is a facility to view the status of a process instance via a BPMN view interface.
Task Dashboard: This is a UI for the management of user tasks and supports human input as part of the business process. The UI displays a list of active tasks assigned to the current user. The user can execute the task by following the instructions (optional) and entering the information required in the task form. When the task has been completed, the process engine automatically resumes its operation with the information entered by the user.
Integrated with ICE Service Repository: User can drag and drop a service from the repository and include its functionality inside the business diagram.
Support for send/receive tasks: This kind of service tasks work in pairs and allow a fire-and-listen message flow scenario.
User tasks form editor: This is a web-based user task forms designer, so users can customize the appearance of forms at runtime, adding/removing fields and choosing validations.
System requirements
The Orchestration Designer and Runtime has the following system requirements:
Docker
A desktop Linux, or Windows PC with these minimum resources:
2 CPU
4 GB RAM
3 GB+ Disk space
A way to extract ZIP files.
The Orchestration Designer and Runtime runs in the ZDMP platform but if a user wants to test it in a local environment these are the recommended minimum requirements:
Docker
A Kubernetes Cluster
Resources depend on the use but minimum
2 CPUs
4 GB RAM
2 GB+ Disk Space
Associated ZDMP services
Required
Optional
Installation
The Orchestration Designer and Runtime component is deployed to Kubernetes using the helm charts created in conjunction with the Application Runtime, and from the ZDMP Marketplace.
For ZDMP, it should be installed using the Marketplace and the Secure Installation, but it could also be deployed standalone on-premises to miniZDMP using Rancher.
Here is provided a description of the variables that can be set either from Secure Installation or Rancher.
Select the template version to install and Name as default (it can be changed)
Namespace as default (it can be changed)
Helm Options set to default values
Repository: Image Repository as default or change if using a different repository
Private Registry Settings
Private Registry URL as default if deploying it from standard zdmp repository or change
Enter the registry user and password and leave the registry secret with default values
Edit common settings in all subcomponents if needed:
App
Name: Name of Kubernetes Object
Container:
Image:
name: Docker image name
tag: Image version tag
Services and Load Balancing:
Name: port name
Service Type to ClusterIP if ingress enabled, otherwise select NodePort.
Ingress Configuration to true or false if enabling ingress to select the ingress domain name to be used.
Storage:
Use Persistence in order to persist data pipelines in a Kubernetes Persistent Volume
NFS Enabled: set to true if using NFS as storage (default ZDMP), and set the Server URL and Path
Set Storage size required
Form Designer UI
- API Endpoint: Process designer API URL endpoint
Process Designer Form Designer UI
Allowed Fronts: List of allowed URL User Interfaces
API Gateway: Process engine gateway URL endpoint.
Process Designer UI
API Endpoint: Process designer API URL endpoint
Form Designer URL: WASP URL including form designer ID.
Process Engine API
- Camunda Address: Process engine URL endpoint
Process Engine Gateway
- API Endpoint: Process engine gateway API endpoint.
WASP
Process Designer Endpoint: Process designer User Interface URL endpoint
Form Designer Endpoint: Form designer User Interface endpoint.
Service Directory Endpoint: WASP service directory User Interface endpoint.
Process Engine Gateway Endpoint: Process engine gateway User Interface endpoint
Portal API Endpoint: Portal API endpoint.
WASP Service API
- Server: WASP service API URL.
WASP service directory API
- Server: WASP service directory API URL.
WASP Service Directory UI
Backend: WASP service directory API URL
Gateway Backend: Process engine gateway API URL
Click on Launch Button
How to use
Manage processes.
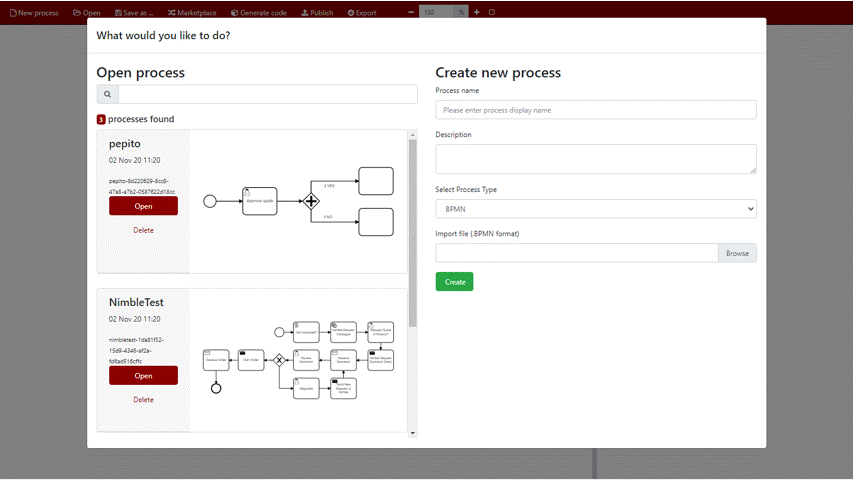
- The first-time the user opens the application; the welcome screen lets the user choose whether to create a new process or open an existing one. It is also possible to import a .BPMN file.
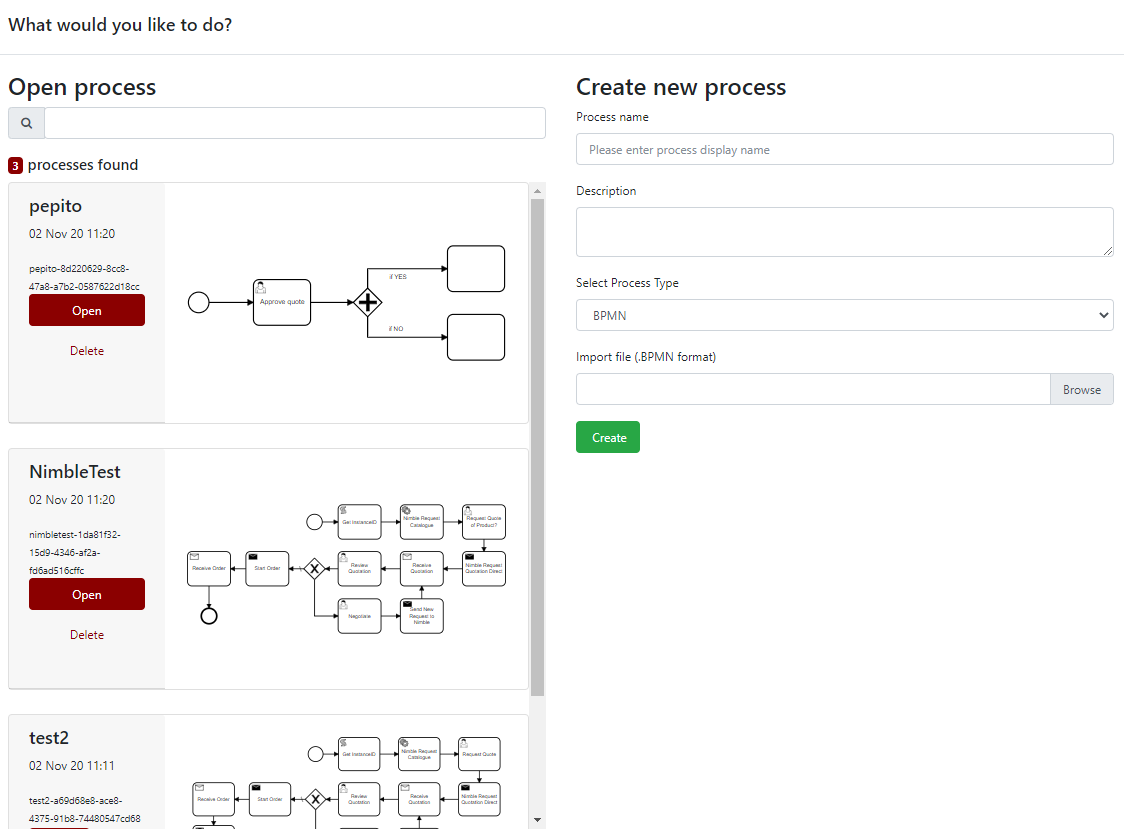
Figure 2 Welcome Screen
The process is created / opened, and the main window opens, with the palette at the left, the canvas at the centre, and the properties panel at the right.
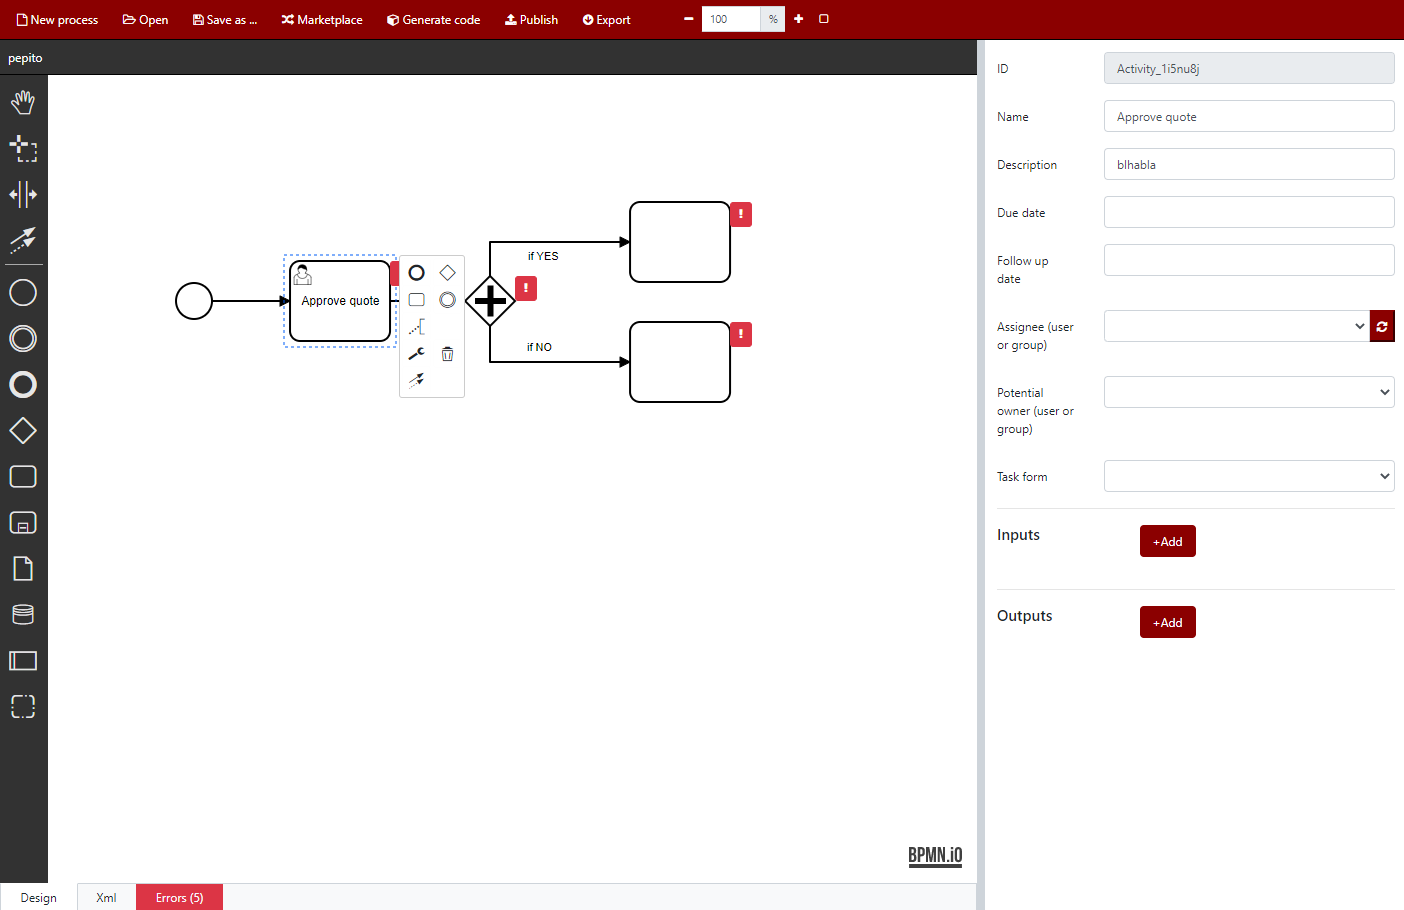
Figure 3: Main screen
Design a process.
When selecting the start element (the empty circle), the user can then select from the popup window the type of element to attach, whether it is a task (square), an event (circle) or a gateway (diamond)
It is also possible to attach elements by dragging and dropping from the palette.
After selecting an element, it is possible to move it to another place by simply dragging it
The zoom can be increased/decreased by pressing Ctrl while moving the mouse wheel.
The auto save feature takes care of persisting the changes while the user creates the diagram.
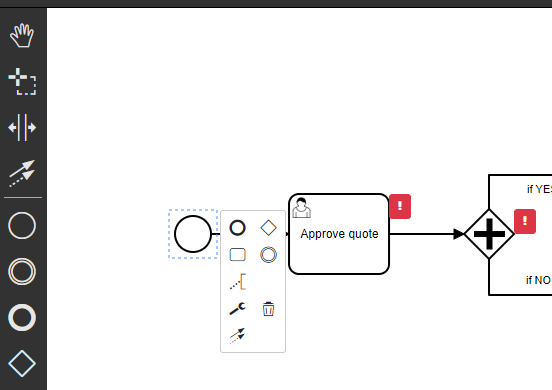
Figure 4: Designing a process.
- Automatic validation
Whilst the user designs a process, there might appear red markers around the elements, indicating that there are missing required parameters.
The elements must be properly configured, otherwise the list of errors (at the bottom) appears in red, showing the number of errors.
It is also possible to open the error list, by clicking on it, so it provides a better description of each error.
Once the problem is solved, the error automatically disappears.
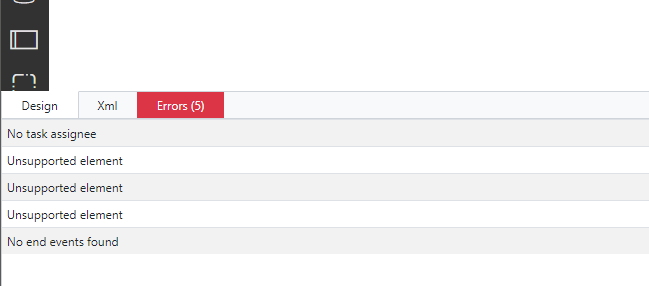
Figure 5: List of errors at the bottom
- Connecting services from the marketplace
When adding a service task, the Marketplace Browser automatically opens, letting the user to choose between any available service.
In the Marketplace Browser, each service describes its behaviour, so the user can choose the one that adjust to the user’s needs.
After selecting the service, it is added to the diagram, and validation errors appear indicating any required input or parameter to configure the service.
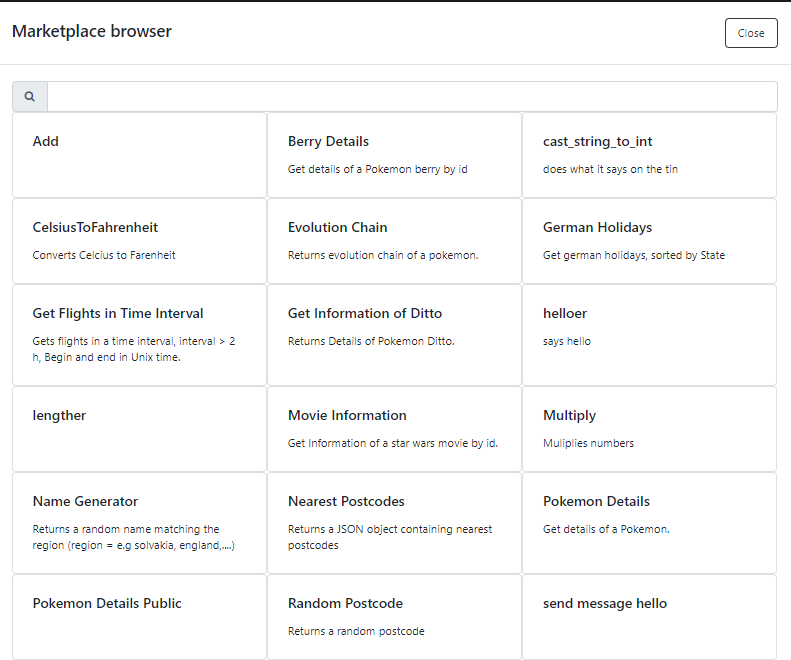
Figure 6: Marketplace browser
- Code Generator / XML View
At any time, pressing the Code tab, the user can see the auto generated NodeJS code that represents the process flow.
User tasks and long timers are skipped since these elements would stop the calling process when running the generated code.
Typescript blocks written in the Script Editor, are automatically converted to JavaScript.
The XML view shows the full XML structure of the process.
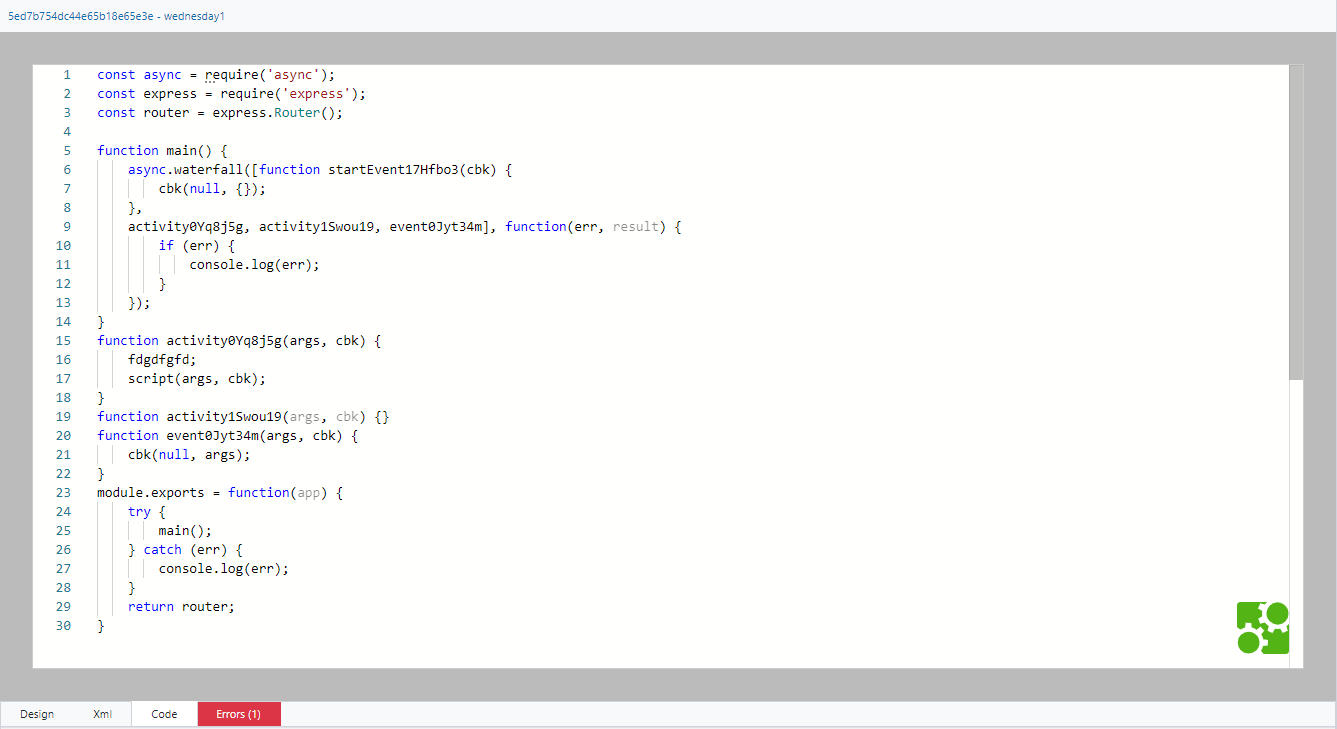
Figure 7: Code generated.
- User tasks management
When adding a service task, the properties panel shows the additional properties supported by this type of element.
Among others, the user can select the assignee of the task, so when in runtime, the task is automatically assigned to that user, when the process instance reaches that element.
The user can also select an existing form, previously created using the Forms Editor
The User Tasks main panel can be used in runtime to claim and complete tasks.
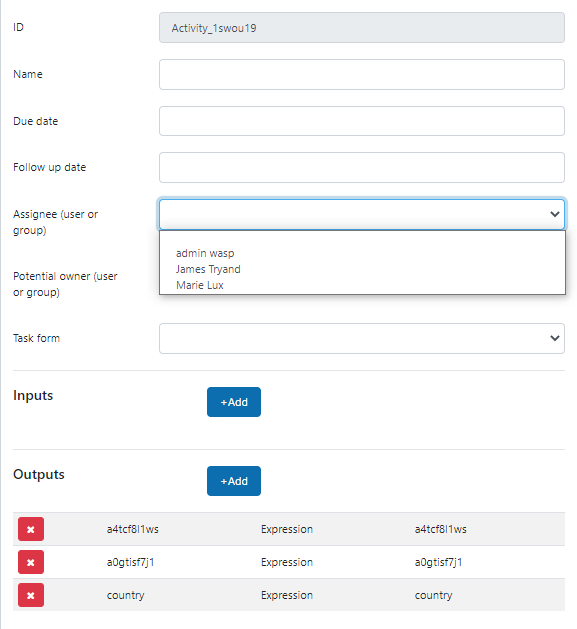
Figure 8: Properties panel for user task
- Publishing a process for Runtime
Once the process has been designed, the publish action makes it available for the process engine.
Only processes without errors (totally validated) can be published.
After they have been published, the Process Control Panel can be used to manage process instances.
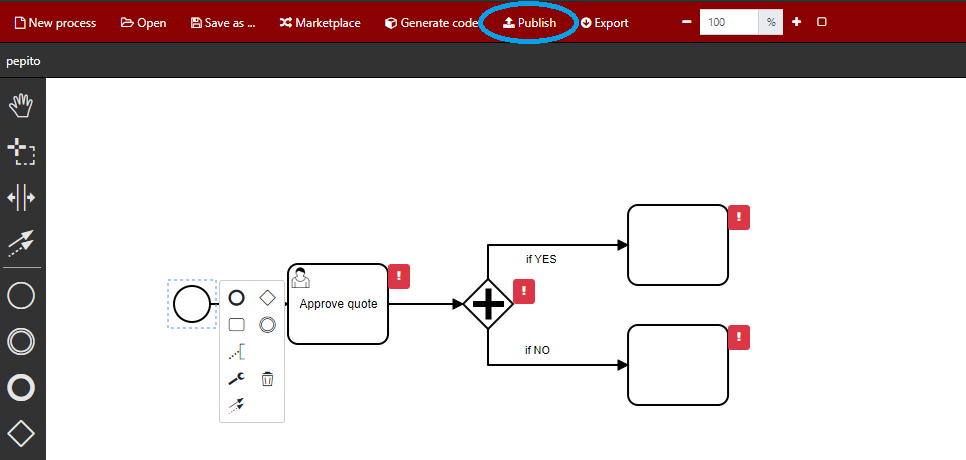
Figure 9: Publish action.
- Process Control Panel
Used for managing the start, resume, and stop process instances.
All processes published from the Process Designer appear here.
User can get metrics about each process, number of instances and problem.
Let us assume the following process is created in the Process Designer:
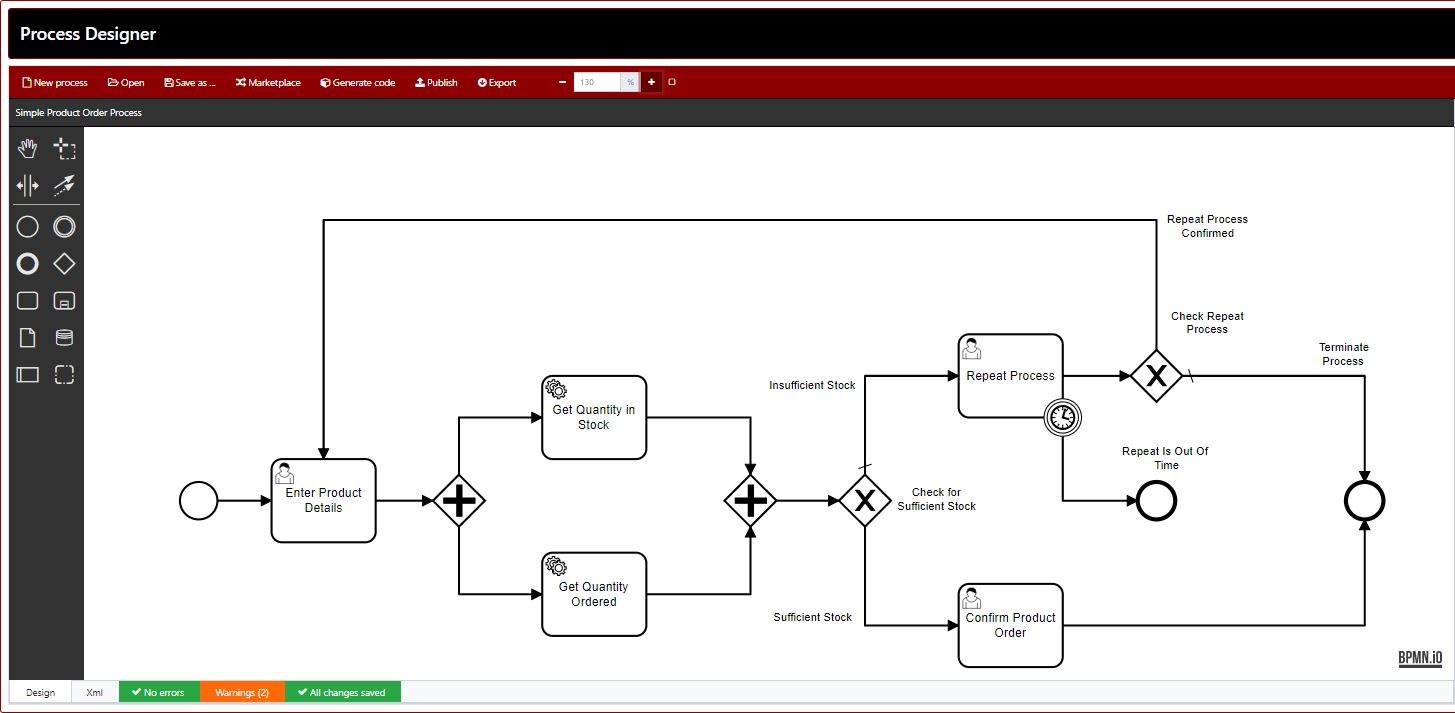
Figure 10: Simple Product Order Process
When the User published the process, it gets deployed to the Camunda Engine, and the details are displayed in the Control Panel, as shown below. At this point there are no running instances of the process.
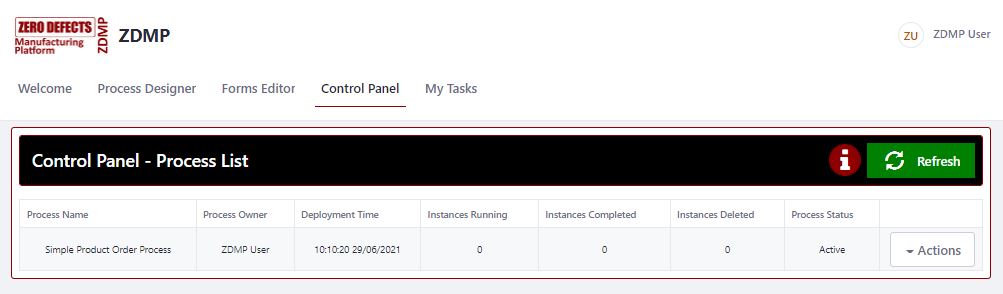
Figure 11: Process published to Camunda Engine
The User has a number of actions available for each deployed process:
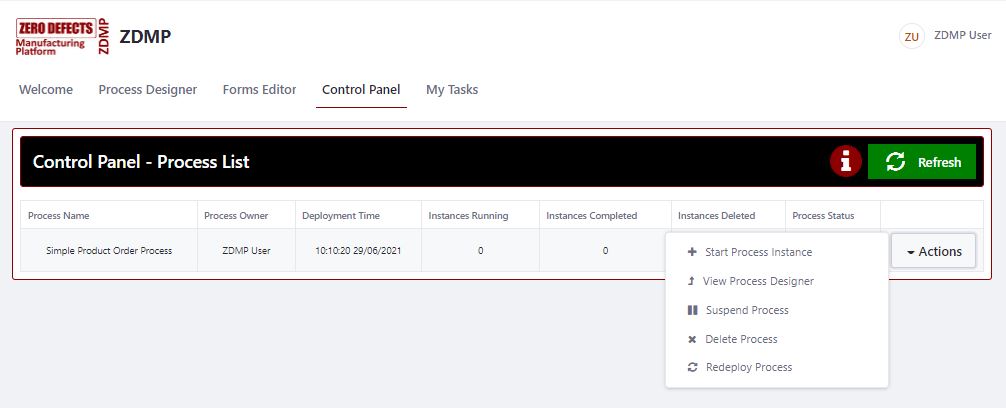
Figure 12: Actions for deployed Process
Deployed Process Actions:
Start Process Instance: This starts an instance of the process in the Camunda Engine
View Process Designer: This navigates to the Process Designer and automatically loads the BPMN process.
Manage Process Instances: This navigates to the Process Instance List and is only available if at least one instance has been started/deleted/completed.
Suspend Process: This marks the process as suspended and is only available if the process is currently active. It prevents any new instances being started.
Resume Process: This marks the process as active and is only available if the process is currently suspended.
Delete Process: This deletes the process in the Camunda Engine and is only available if no instances are currently running.
Redeploy Process: This redeploys the process in the Camunda Engine and is only available if no instances are currently running.
When the User starts an instance, then the Process List table gets updated, and the User can navigate to view the instance details.

Figure 13: Actions for started Instance.
When the User selects the ‘Manage Process Instances’ action, user is navigated to the Process Instance List. This displays status information on the active/deleted/completed instances of this process.
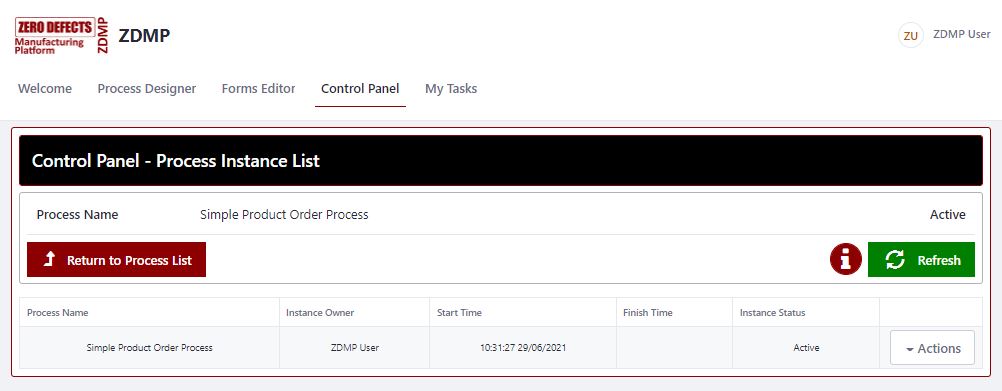
Figure 14: Process Instance List
The User has a number of actions available for each instance:
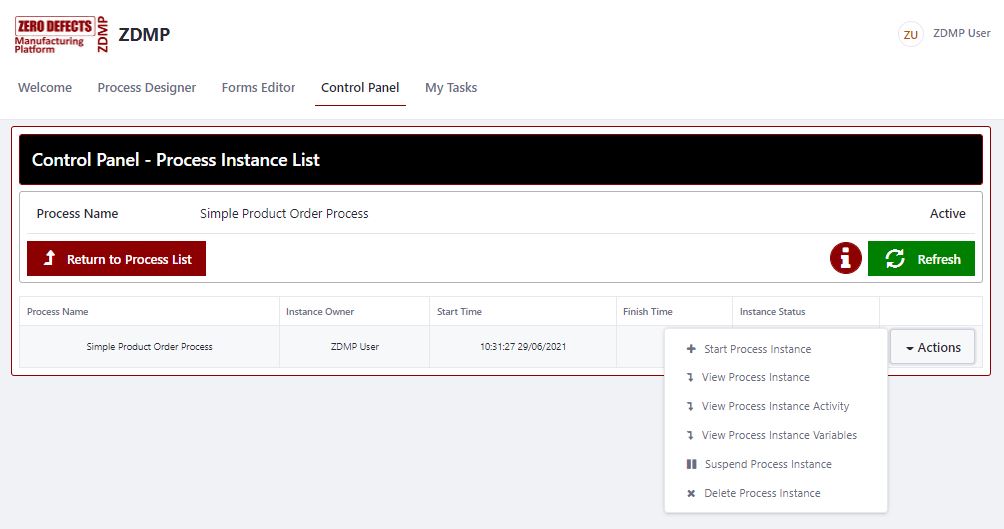
Figure 15: Process Instance Actions
Process Instance Actions:
Start Process Instance: This starts an instance of the process in the Camunda Engine
View Process Instance: This displays the current status of the process instance.
View Process Instance Activity: This displays the activity history of the instance in chronological order.
View Process Instance Variables: This displays the variables and their values currently available for this instance.
Suspend Process Instance: This marks the process instance as suspended and is only available if the process instance is currently active.
Resume Process Instance: This marks the process instance as active and is only available if the process instance is currently suspended.
Delete Process Instance: This deletes the process instance and terminates its execution in the Camunda Engine
When the User selects the ‘View Process Instance’ action, user is navigated to the following page. It displays the process in a BPMN format and shows the current status of the process instance.
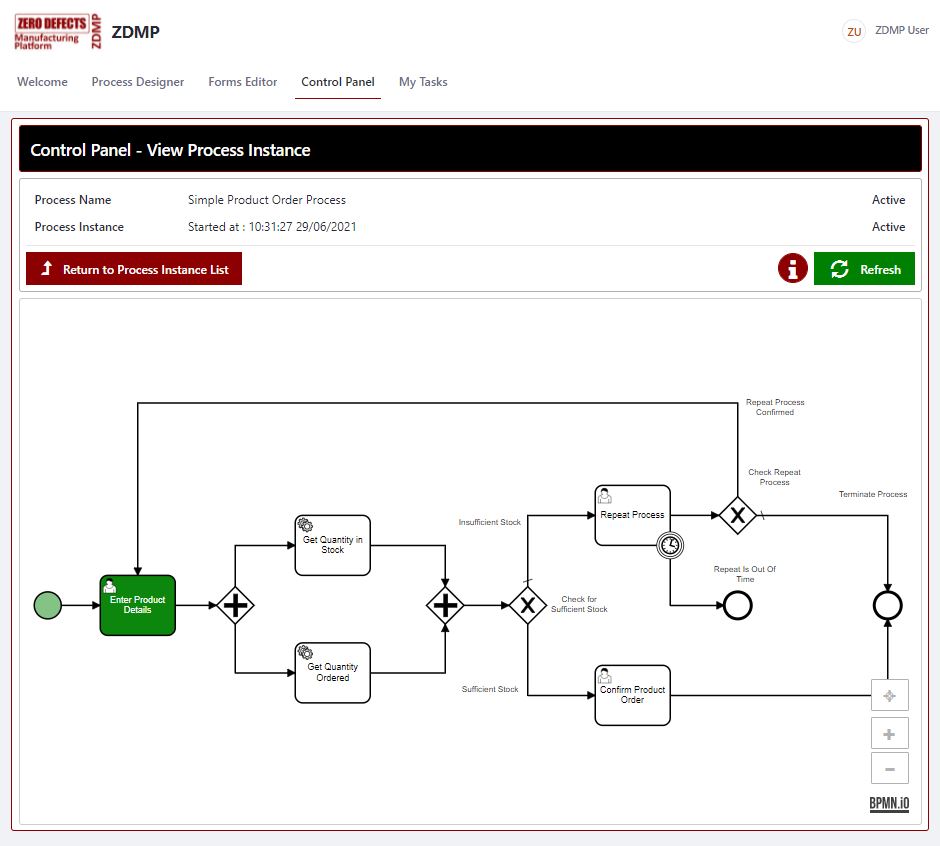
Figure 16: View Process Instance Status
Information is available for each of the User Tasks by clicking on the ‘User Task’ element.
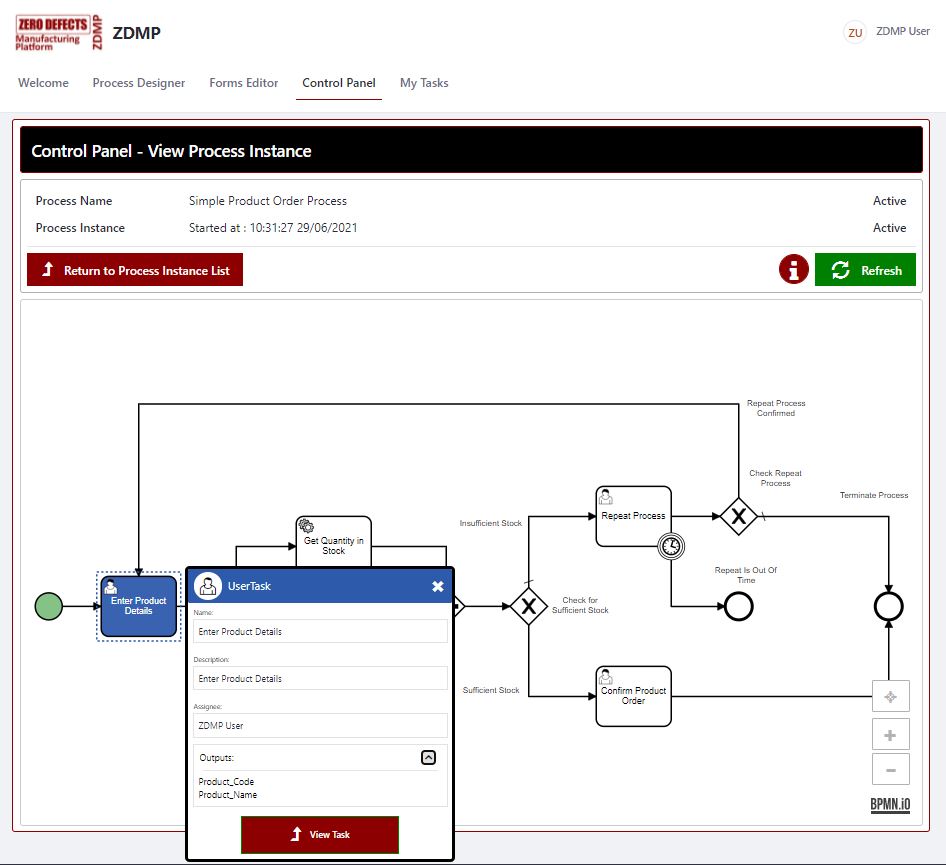
Figure 17: View User Task information
My Tasks:
Used for managing the tasks assigned to the specific User.
All tasks assigned the User appear here, whether they are active/deleted/completed.
User can execute active tasks, as well as view completed tasks and deleted tasks (tasks that were active when the process instance was deleted)
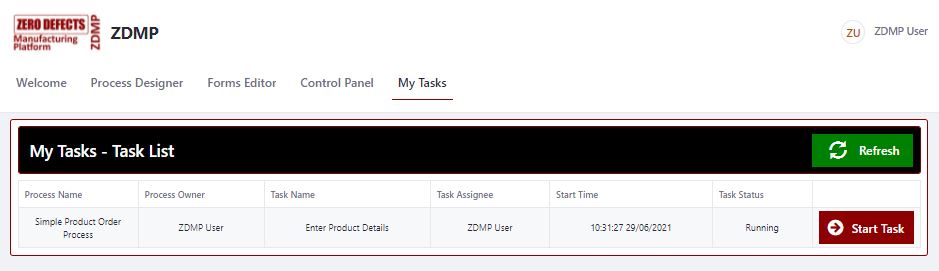
Figure 18: List of Tasks assigned to the current User.
When the user selects the ‘Start Task’ action user is navigated to the Task Form page, where the details of the task are displayed & where the User enters information required to complete the task.
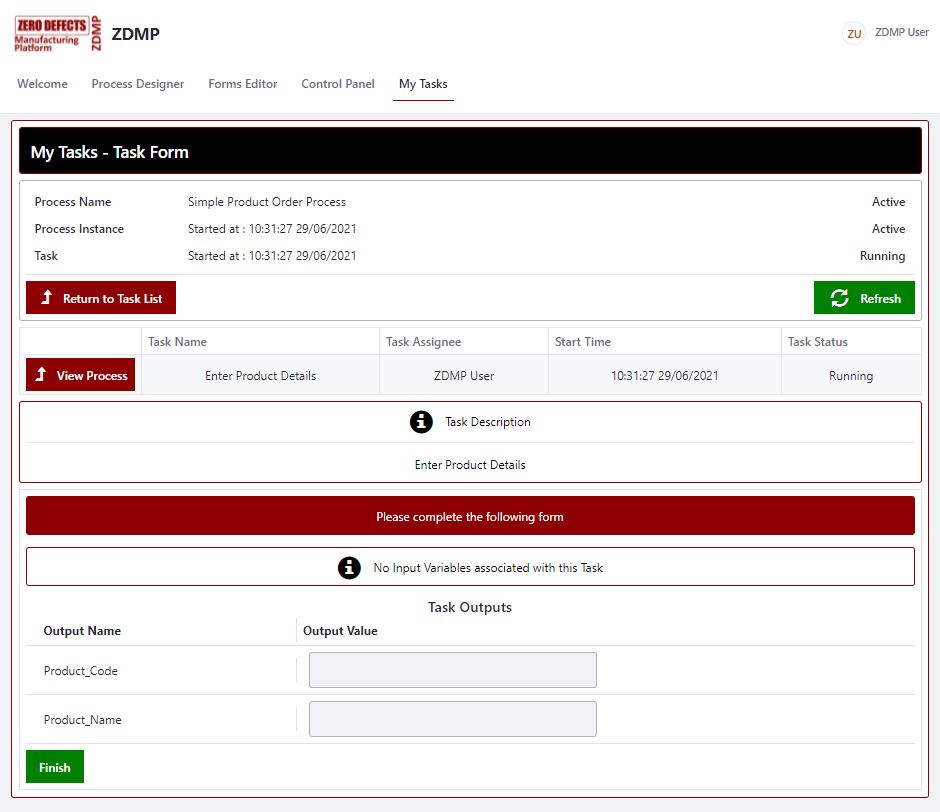
Figure 19: Task Form