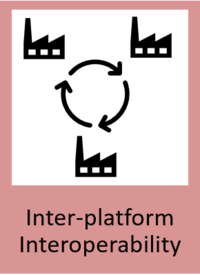
Inter-platform Interoperability
General Description
The Inter-platform Interoperability component’s aim is to link the ZDMP platform with other external platforms. This will, for example, include a layer to link data sources from different platforms and integrates security between the platforms to ensure appropriate access procedures across the platforms including connections to other instances of ZDMP.
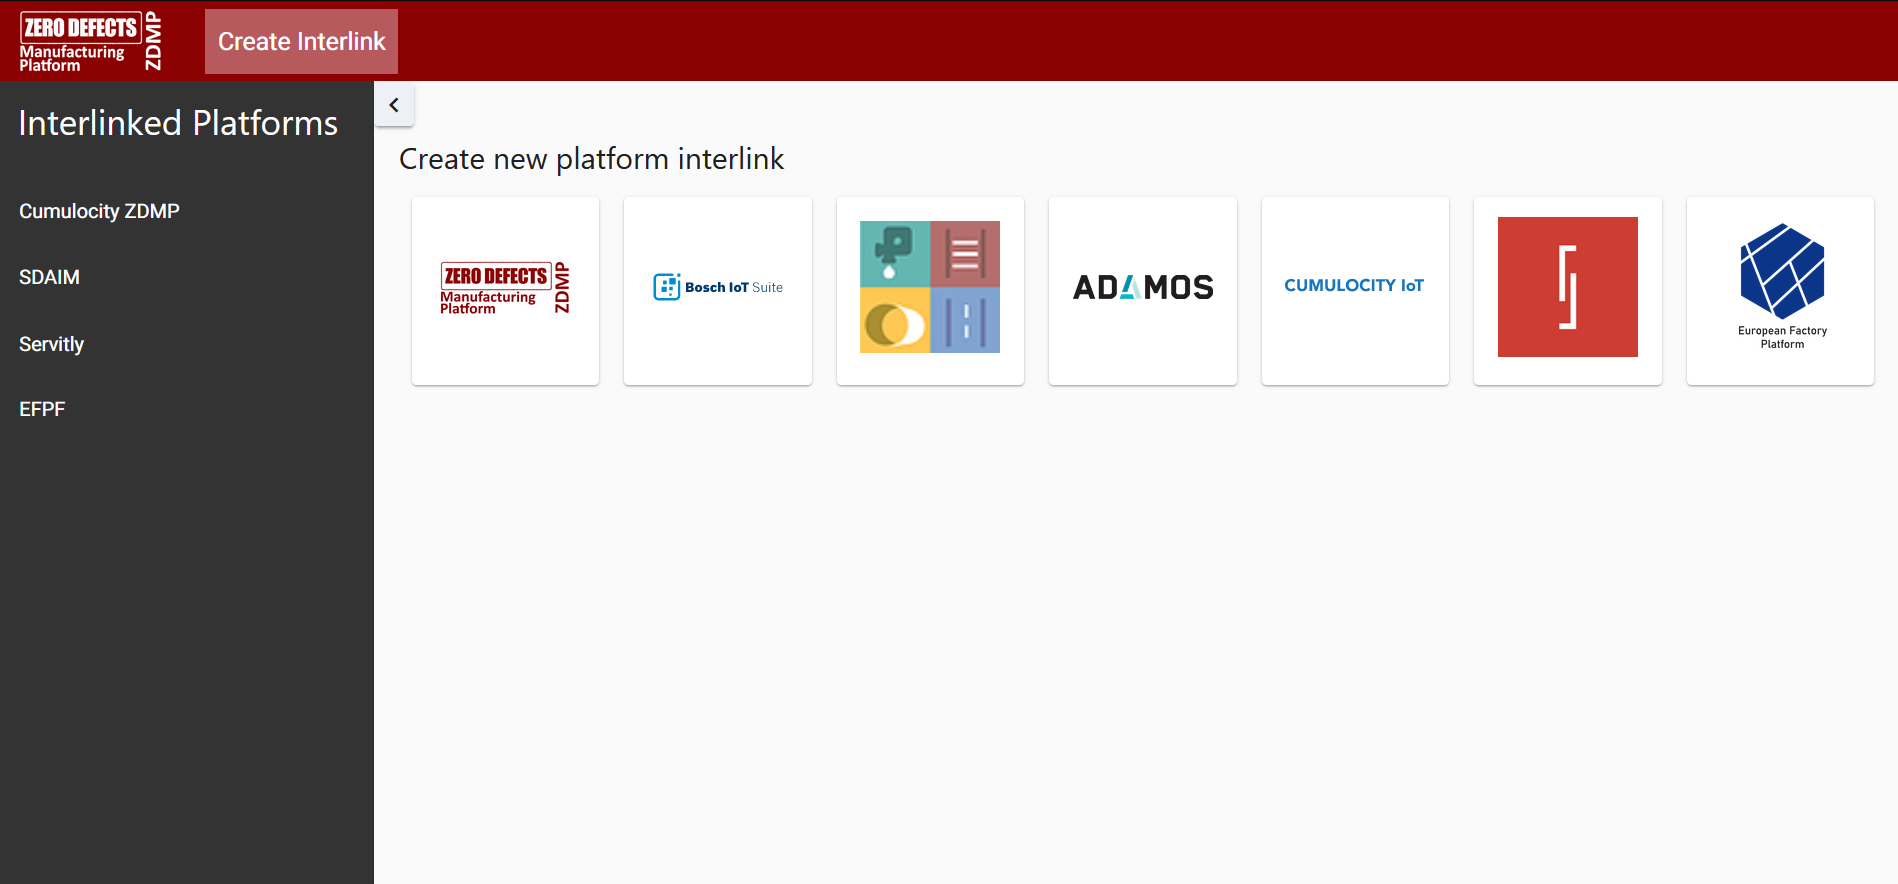
This component expects to link to the platform of the EU funded project, EFPF (formerly known as eFactory), the ADAMOS commercial IIoT platform, and with partner UOS-ITI’s and their platform SDAIM. Further platform linkages have been investigated during the project including interlinking with Bosch IoT, Cumulocity, and Servitly.
The component aims to manage three main concepts: Data, Marketplace, and Security. The EFPF project (a project concerning Lot-size-one manufacturing in the same call as ZDMP) also aims to integrate four platforms, vf-OS, DIGICOR, NIMBLE and COMPOSITION. This component follows the design of EFPF and creates a plugin for each platform to be integrated in order to create an amplifier effect.
| Resource | Location |
|---|---|
| X Open API Spec | N/A – The component does not provide a public API |
| Video | Link |
| Online documentation | Link |
Screenshots
The following images are illustrative screen shots of the component
Component Author(s)
| Company Name | ZDMP Acronym | Website | Logo |
|---|---|---|---|
| Software AG | SAG | www.softwareag.com |  |
| Information Catalyst for Enterprise | ICE | www.informationcatalyst.com |  |
| ASCORA GmbH | ASC | www.ascora.de |  |
Commercial Information
| Resource | Location |
|---|---|
| IPR Link | Marketplace (EFPF) |
| Marketplace Product | Link |
Architecture Diagram
The following diagram shows the position of this component in the ZDMP architecture
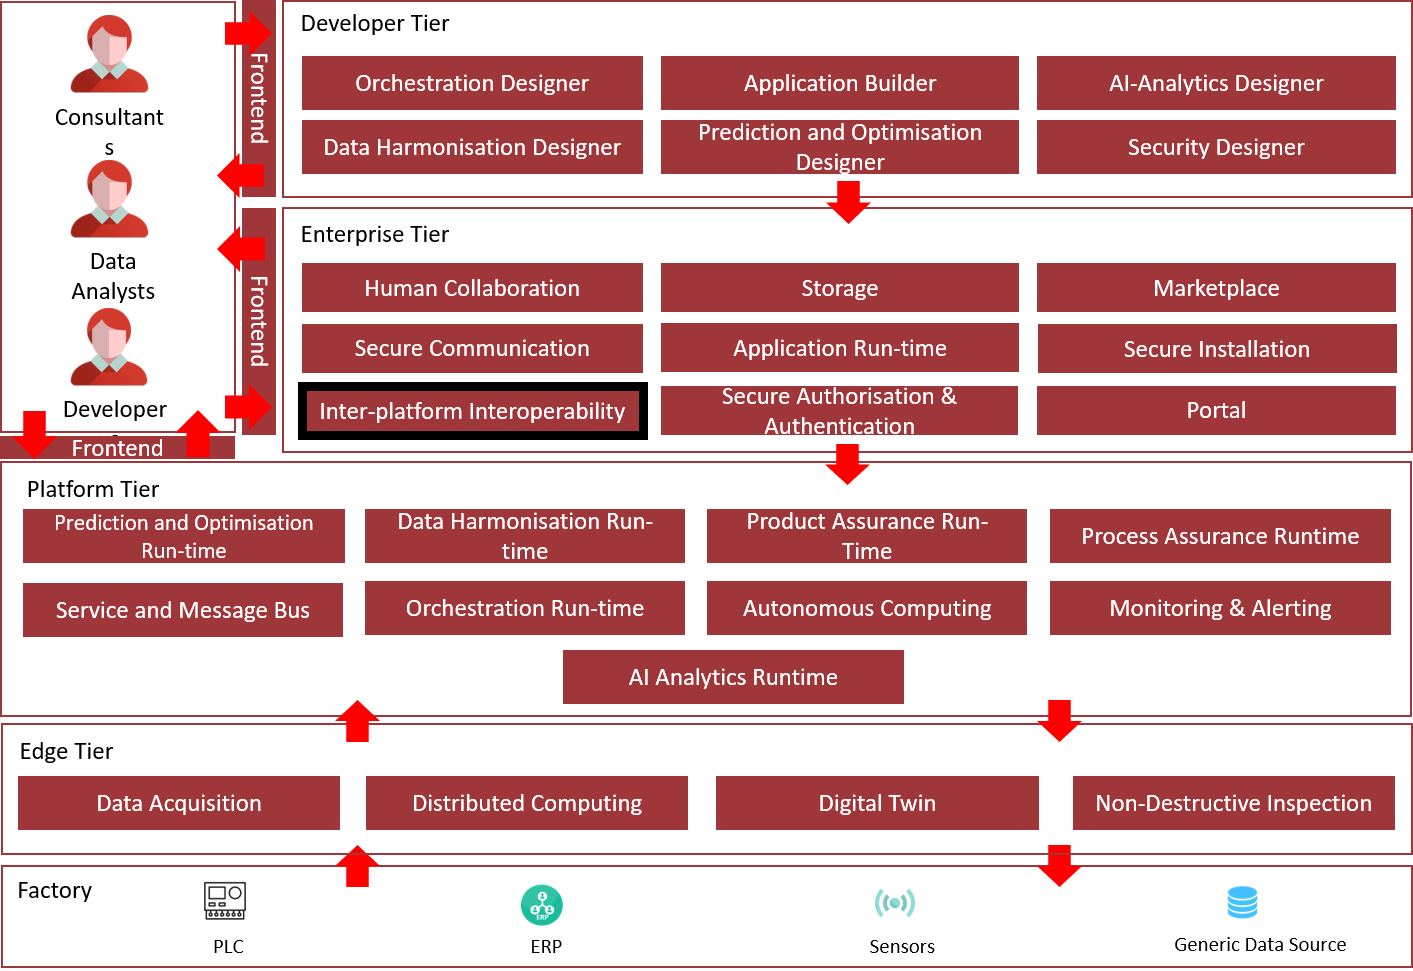
Figure 1: Position of Component in ZDMP Architecture
Benefits
Interconnectivity and interoperability of multiple ZDMP instances
Interconnectivity and interoperability with external platforms and projects including:
Bosch IoT
ADAMOS
SDAIM
Cumulocity
Servitly
EFPF Marketplace
Features
The T6.5 Inter-platform Interoperability component offers/will offer the following features:
Web UI for the administration and configuration of platform interlinks
Interconnection and interoperability of multiple ZDMP instances running on different machines
Interconnection with the Bosch IoT platform:
Access to Bosch IoT APIs from within ZDMP
Exchange of messages between Bosch IoT and ZDMP
Interconnection with UOS-ITI’s Real-time Analytics platform SDAIM including the exchange of events and alerts
Interconnection with the ADAMOS platform including the exchange of:
Device data and operations
Historical device data
End user information
Interconnection with the EFPF Platform:
Cross-platform marketing of zApps on EFPF marketplace
Access to applications available on the EFPF marketplace
System Requirements
The T6.5 Inter-platform Interoperability component has the following requirements:
2 CPUs*
2 GB RAM*
10 GB disk space*
Actual resource requirements depend on the number of active interlinks.
Associated ZDMP services
Required
Optional
Installation
The Inter-platform Interoperability component must be installed and operated through the ZDMP Application Run-time. Please follow these steps to install the component:
- Log into the Rancher UI of the Application Run-time
- Open the cluster and project where you want to deploy the component
Click on the “Launch” button in the top right corner to open the application catalogue
Click on the “zdmp-inter-platform-interoperability” application. The Rancher UI now shows you the configuration dialogue of the application along with further instructions explaining the different settings. An explanation of the settings is listed below. Please follow these instructions and finally hit the “Launch” button shown at the bottom of the dialogue. The application will now be deployed automatically.
Configuration overview
Services and Load Balancing
Ingress Configuration: Enable to create an ingress (proxy from the internet to the component).
Ingress Domain Name: Platform domain name. Adjust to domain configured for the installation.
ZDMP Tenant Name: Tenant name that should be included in the URL.
Container Images:
Use Default Images: Enable to retrieve the docker images from the ZDMP HCE Gitlab. Disable to configure a custom image source
Repository Location: URL to the custom image location (without any protocol)
Image name: Docker image name of the component in the repository.
Image Tag: Version tag of the docker image
Private Registry Settings
Private registry URL: Hostname of the image registry. Default is the HCE Gitlab
Private registry user: Username to authenticate with at the image registry
Private registry password: Password to authenticate with at the image registry
Private registry secret: Name of the Kubernetes Secret to store the registry credentials in. Default value should be used
Interlinking Configuration: Message Bus
App Service Type: ClusterIP is sufficient if used with ingress. NodePort is useful for local testing
Message Bus Backend Port: NodePort for the Messaging Backend component. Must not be in use.
T6.4 Message Bus Hostname: (Internal) Hostname of the Message Bus that must already be running
T6.4 Message Bus AMQP Port: AMQP Port of the Message Bus. Depending on the following SSL setting, the TLS-secured AMQP Port may need to be used
T6.4 Message Bus Username: Username to authenticate with at the Message Bus
T6.4 Message Bus Password: Password to authenticate with at the Message Bus
SSL/TLS connection to Message Bus: Enable if the connection to the Message Bus should be encrypted. Requires a valid SSL configuration at the Message Bus
Interlinking Configuration: API Gateway:
App Service Type: ClusterIP is sufficient if used with ingress. NodePort is useful for local testing
Platform Backend Port: NodePort for the Platform Backend component. Must not be in use
T6.4 API Gateway Scheme: Protocol to use for connecting to the API Gateway. Only use https if the Gateway has a valid SSL configuration
T6.4 API Gateway Hostname: (Internal) Hostname of the API Gateway. Must be already running
T6.4 API Gateway Port: Port of the API Gateway. Default value should be used
T6.4 API Gateway Username: Username to authenticate with at the API Gateway. Only change if changed in the API Gateway
T6.4 API Gateway Password: Password to authenticate with at the API Gateway. Only change if changed in the API Gateway
Auth Server Name: Name of the Authorization Server configured in the API Gateway
Full Access Application: Name of the Application configured for API Access in the API Gateway
T6.4 API Gateway Full Access Scope: Keycloak Scope used for Full API Access
Interlinking Configuration: Keycloak:
Keycloak Token URL: Tenant Token URL of the local Keycloak
Keycloak Client ID: Keycloak Client ID that should be used for API Access
Keycloak Client Secret: Keycloak Client Secret that should be used for API Access
Interlinking Frontend:
App Service Type: ClusterIP is sufficient if used with ingress. NodePort is useful for local testing
Frontend Port: NodePort of the Interlinking Web-Interface. Must not be in use
Interlinking Database:
Use local database: Enable if a Postgres Pod should be deployed. Otherwise, a shared Postgres must be available
App Service Type: ClusterIP is sufficient if used with ingress. NodePort is useful for local testing
Local Database Port: NodePort for the Postgres Pod. Must not be in use
Database username: Database user that should be created
Database password: Password for the new database user
Database name: Name for the local database
PostgreSQL database URL: URL to the shared Postgres database. Must include port and database name
PostgreSQL database Username: Username to authenticate with at the shared Postgres database
PostgreSQL database Password: Password to authenticate with at the shared Postgres database
Advanced settings:
Show advanced settings: Enable if a special configuration is required. The following settings will then become available
Gateway Wrapper API URL: URL to the API Gateway REST API
NGINX Server Name: Server name for the NGINX Frontend service
Platform Interlinking Backend URL: (Internal) URL to the Platform Interlinking Backend component
Message Bus Interlinking Backend URL: (Internal) URL to the Messaging Backend component
T6.4 Portal API URL: URL to the ZDMP Portal API
Message Bus HTTP Port: Port of the Message Bus HTTP API
How to use
The following sections describe the configuration of the different interlinking plugins through the T6.5 Inter-platform Interoperability Web UI.
Interlinking with other ZDMP instances
ZDMP can be interlinked with one or more other ZDMP instances to get access to their components and resources. The plugin supports component interlinking via REST APIs and Message Bus interlinking.
Step 1: Create the interlink
- To create an interlink, visit the “Create Interlink”-tab and select the ZDMP icon
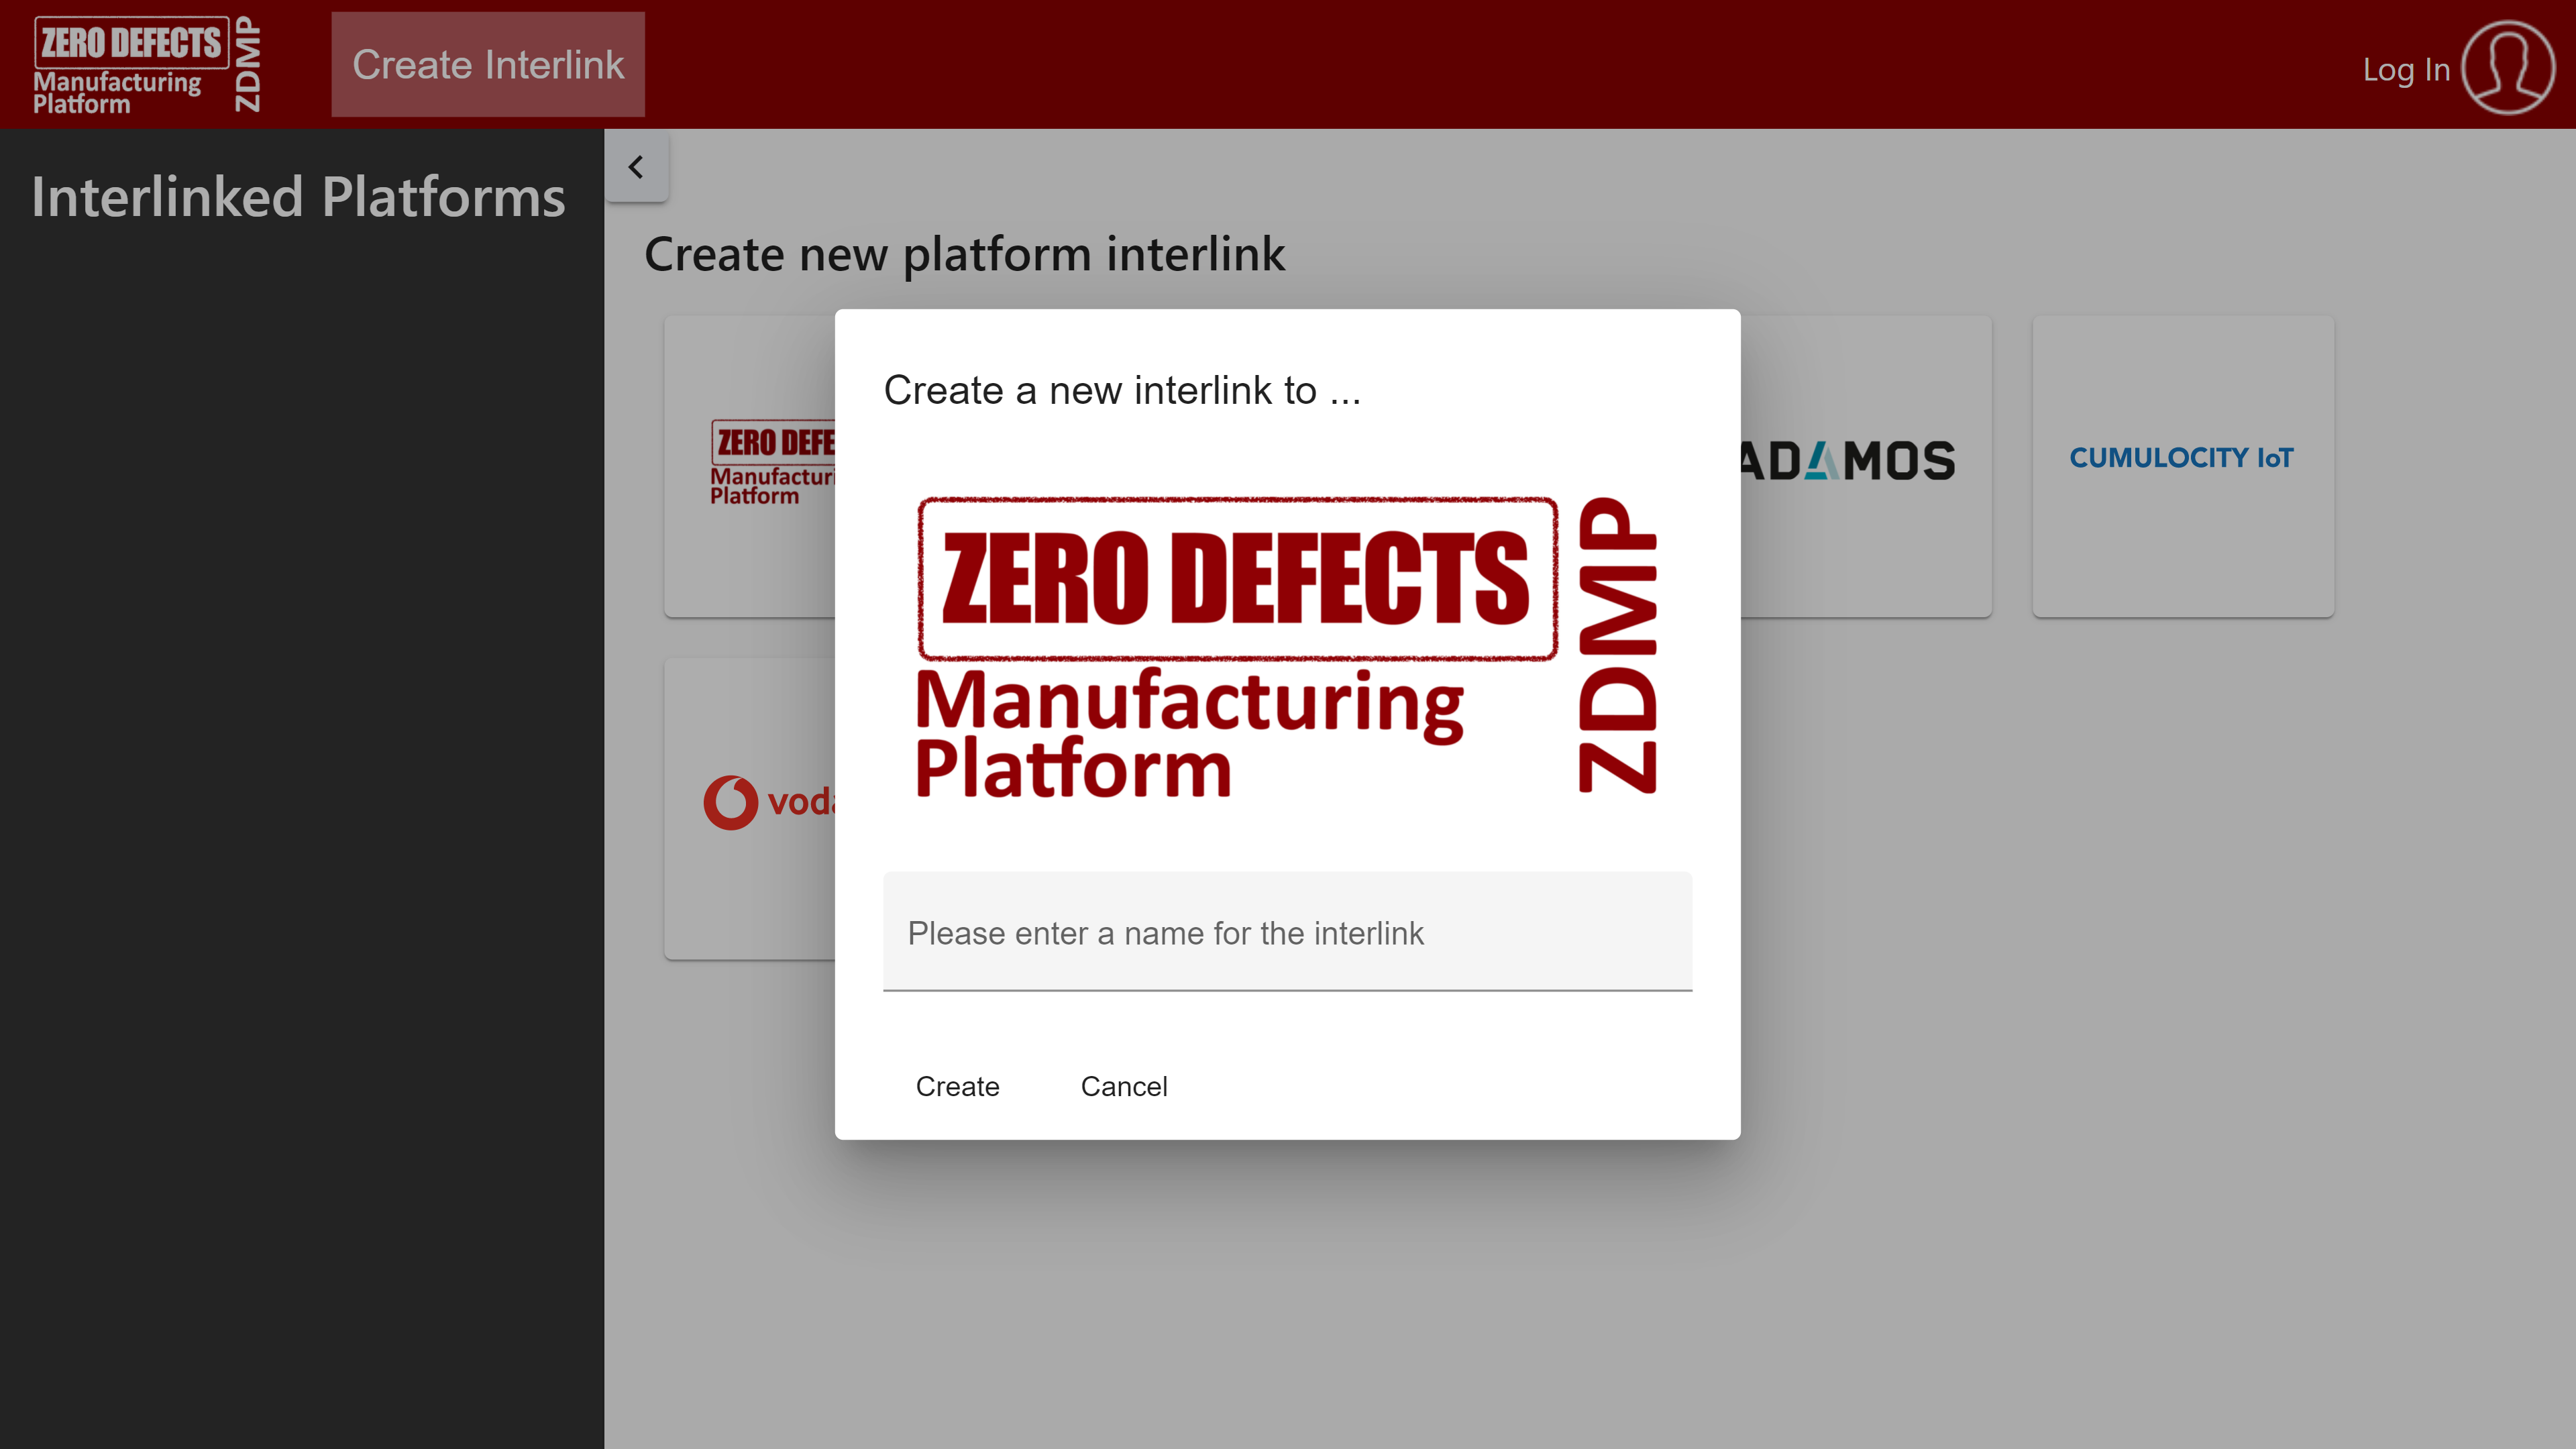
Figure 2: ZDMP-to-ZDMP Interlink creation dialogue
Enter a name for the interlink. It will be used to identify the interlinked resources
Click on “Create”
You will be redirected to the settings page of the new interlink.
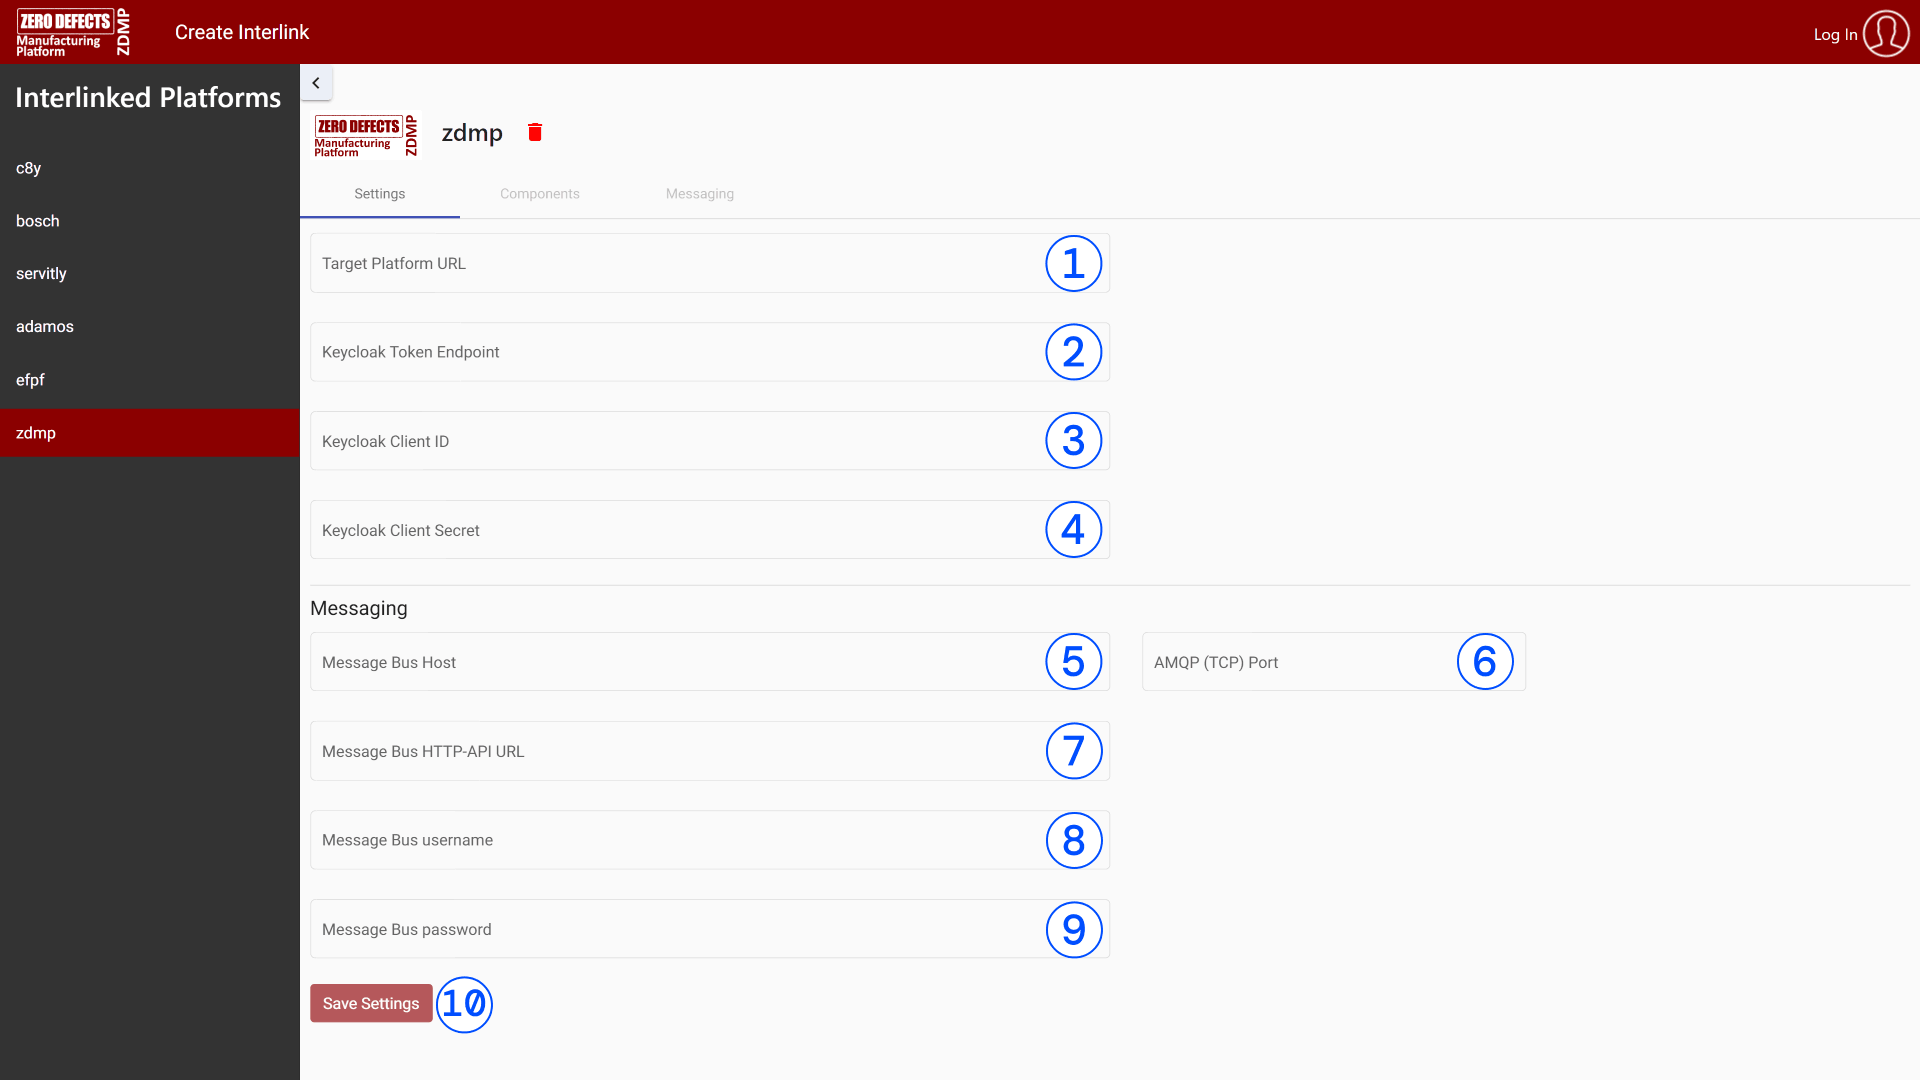
Figure 3: ZDMP Interlink settings
Enter the URL to the Interlinking Backend of the target ZDMP instance. eg https://interlinking-frontend-zdmp.platform.zdmp.eu/pbackend/
Enter the URL to the Keycloak token endpoint of the target ZDMP instance.
eg https://keycloak-zdmp.platform.zdmp.eu/auth/realms/testcompany/protocol/openid-connect/token
Enter the ID of the Keycloak Client that should be used to access the target ZDMP instance. eg MY_CLIENT_ID
Enter the Secret of the Keycloak Client that should be used to access the target ZDMP instance.
The following fields are only required if one wants to use the message interlinking feature
Enter the Host on which the message bus of the other ZDMP instance is running. eg msgbus1-zdmp.platform.zdmp.eu
Enter the corresponding AMQP port of the message bus. eg 5671
Enter the URL to the HTTP interface of the message bus of the other ZDMP instance. eg https://msgbus1-zdmp.platform.zdmp.eu/api/
Enter the message bus username
Enter the corresponding password
Click on “Save Settings” to complete the setup
Step 2: Interlink components
The “Components”-tab of the interlink properties page shows the available components of the target platform. To interlink one of the shown components, click on the switch next to its name and wait for the status indicator to become green. Afterwards, the interlinked component can be accessed through a REST API exposed by the T6.4 Services API Management using the following endpoint schema:
https://{APIGatewayBaseURL}/{interlinkName}-{componentName}/{resource}
To disable a specific component, interlink, simply turn the corresponding interlinking switch off.

Figure 4: Component Interlinking screen
Step 3: Interlink Message Bus
The “Messaging”-tab of the interlink properties page allows to configure a bidirectional interconnection between the ZDMP Message Bus and the Message Bus of the target ZMDP instance.
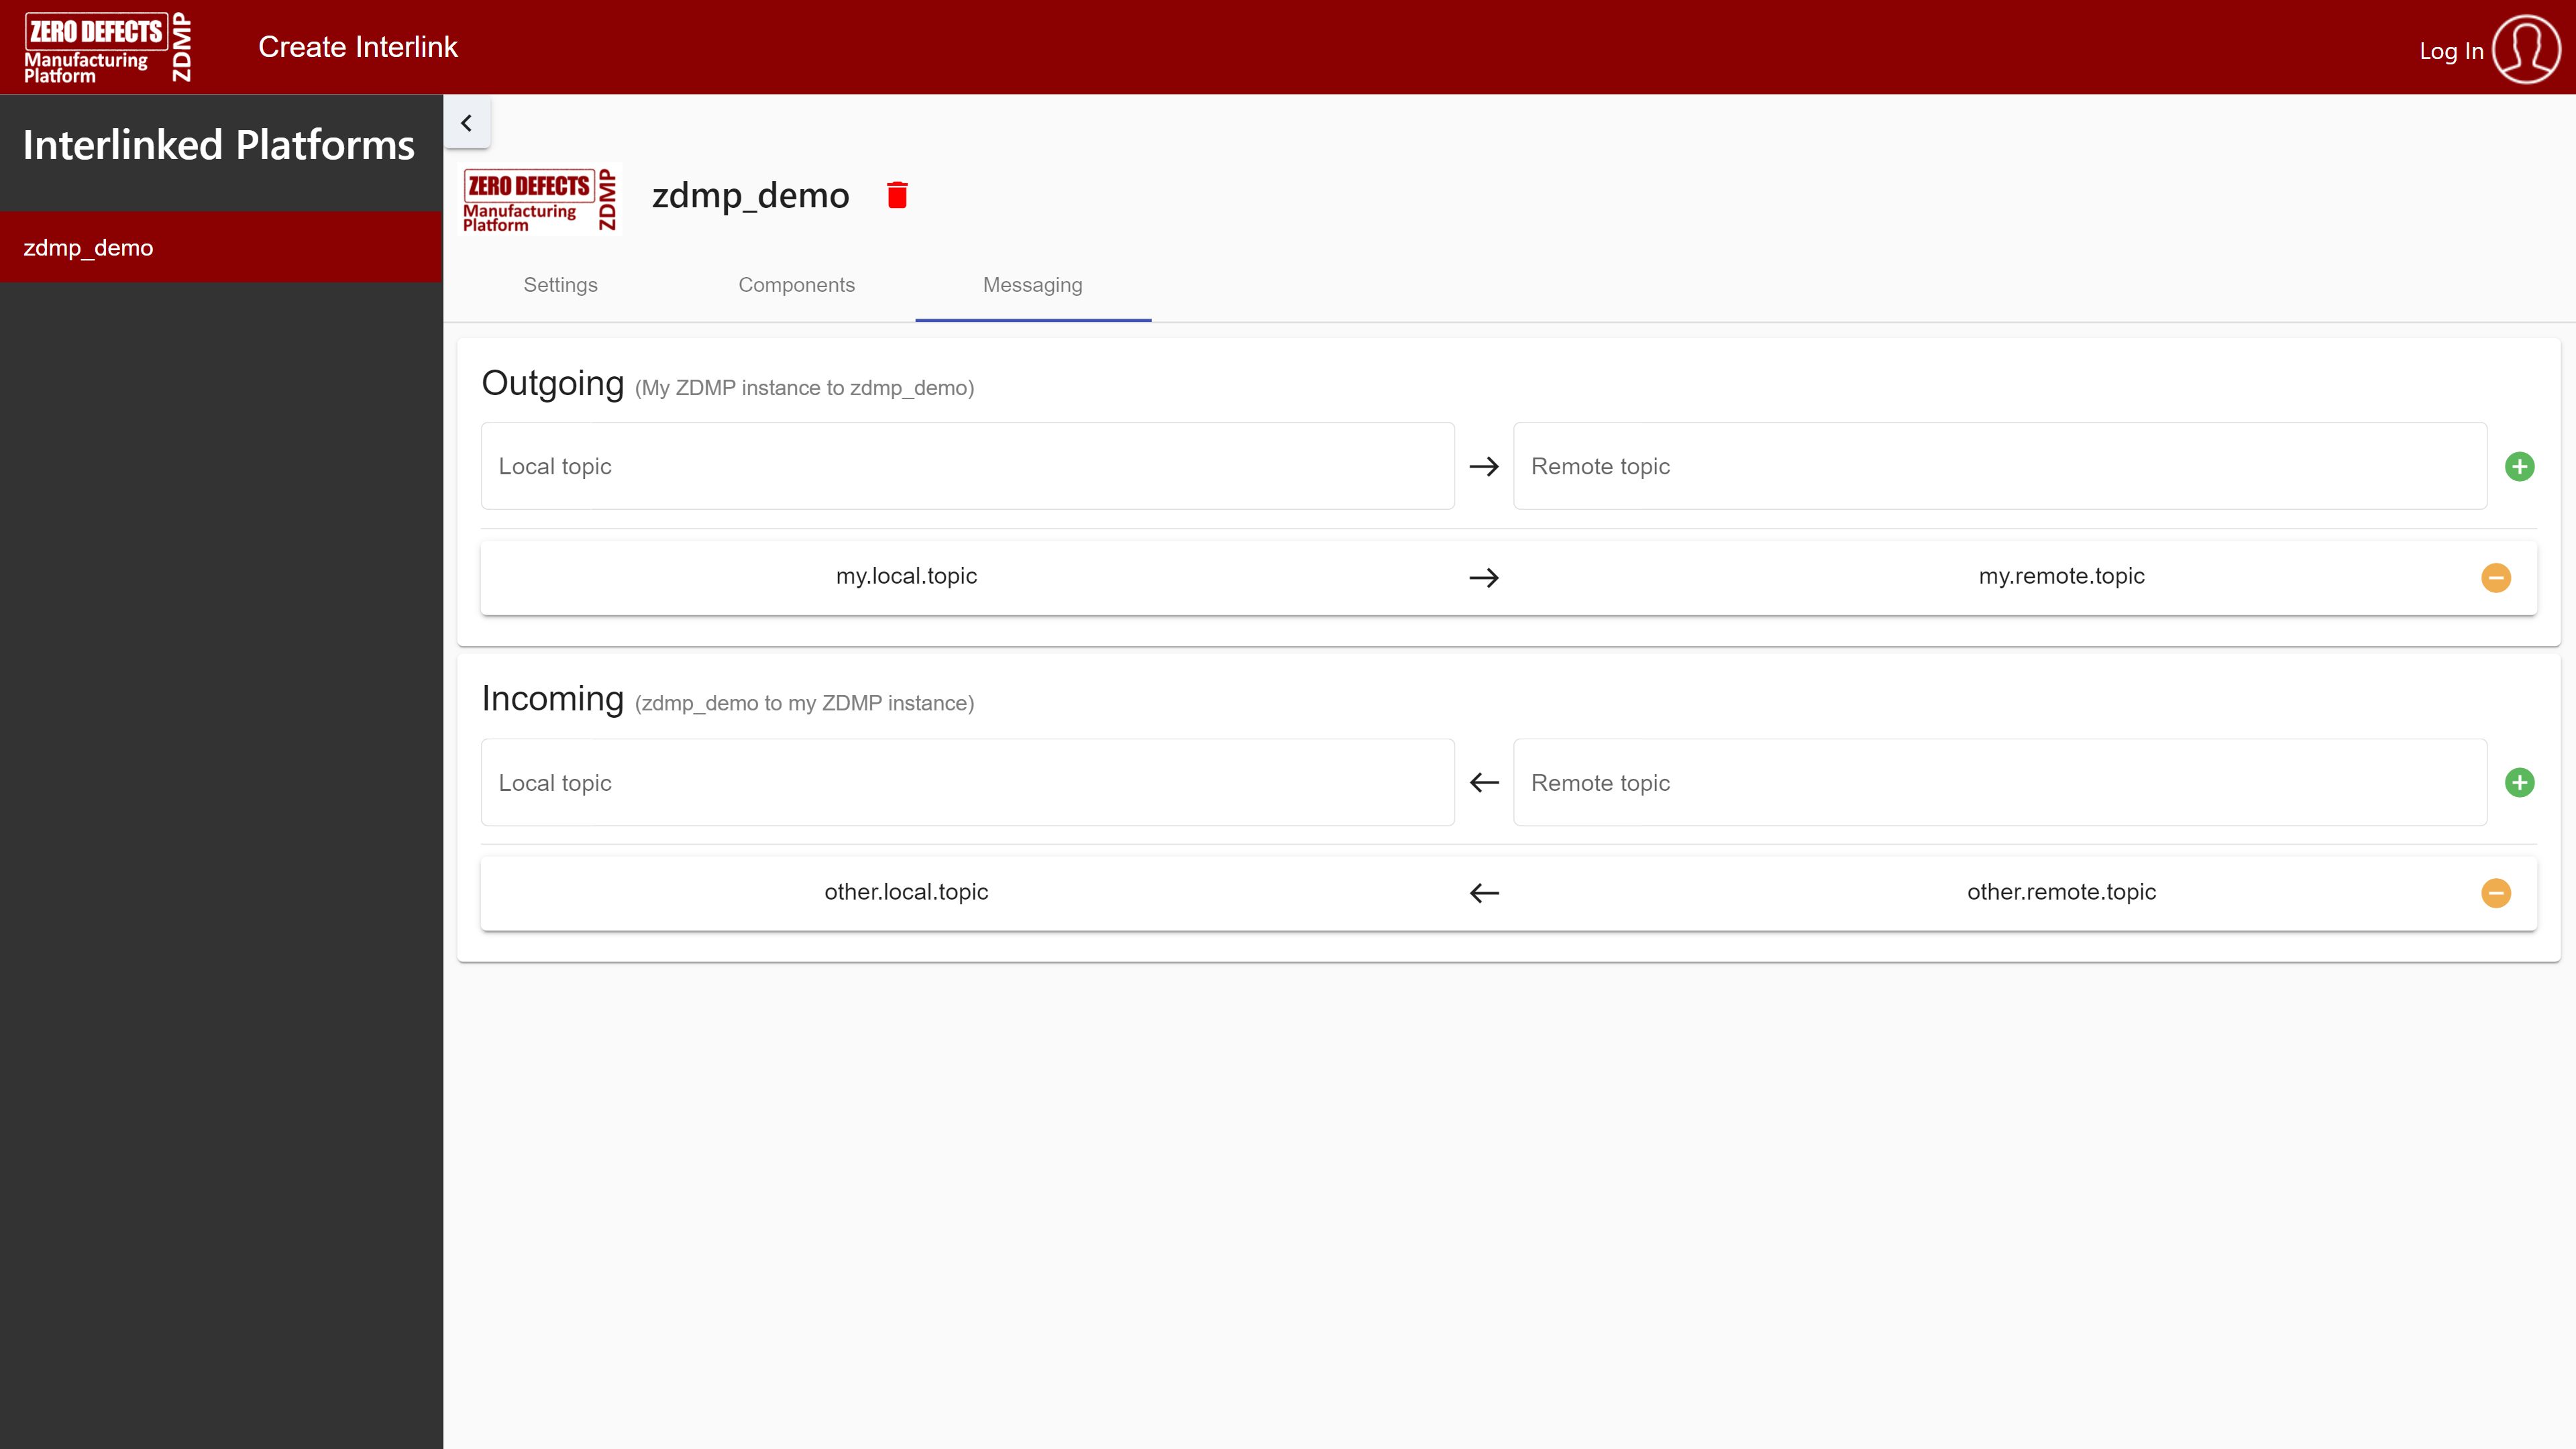
Figure 5: Message Bus Interlinking screen
**
**
Decide whether to forward outgoing messages (from your own ZDMP instance to the remote ZDMP instance) or incoming messages (from the remote ZDMP instance to your own)
Enter the local topic, to or from which messages should be forwarded on your local message bus. If there are active topics on your local message bus, the field will give you the choice to directly select one
Enter the remote topic, from or to which messages should be forwarded on the remote message bus. If there are active topics on the remote message bus, the field will give you the choice to directly select one
Click the green button to add the interlink
When you want to delete an interlink, click the yellow button next to it
Interlinking with Bosch IoT
The Bosch IoT interlinking plugin allows to connect ZDMP with one or more Bosch IoT tenants. It provides access to Bosch IoT REST APIs and device telemetry and event data.
Step 1: Create the interlink
To create the interlink, visit the “Create Interlink” tab and select “Bosch IoT Suite”.
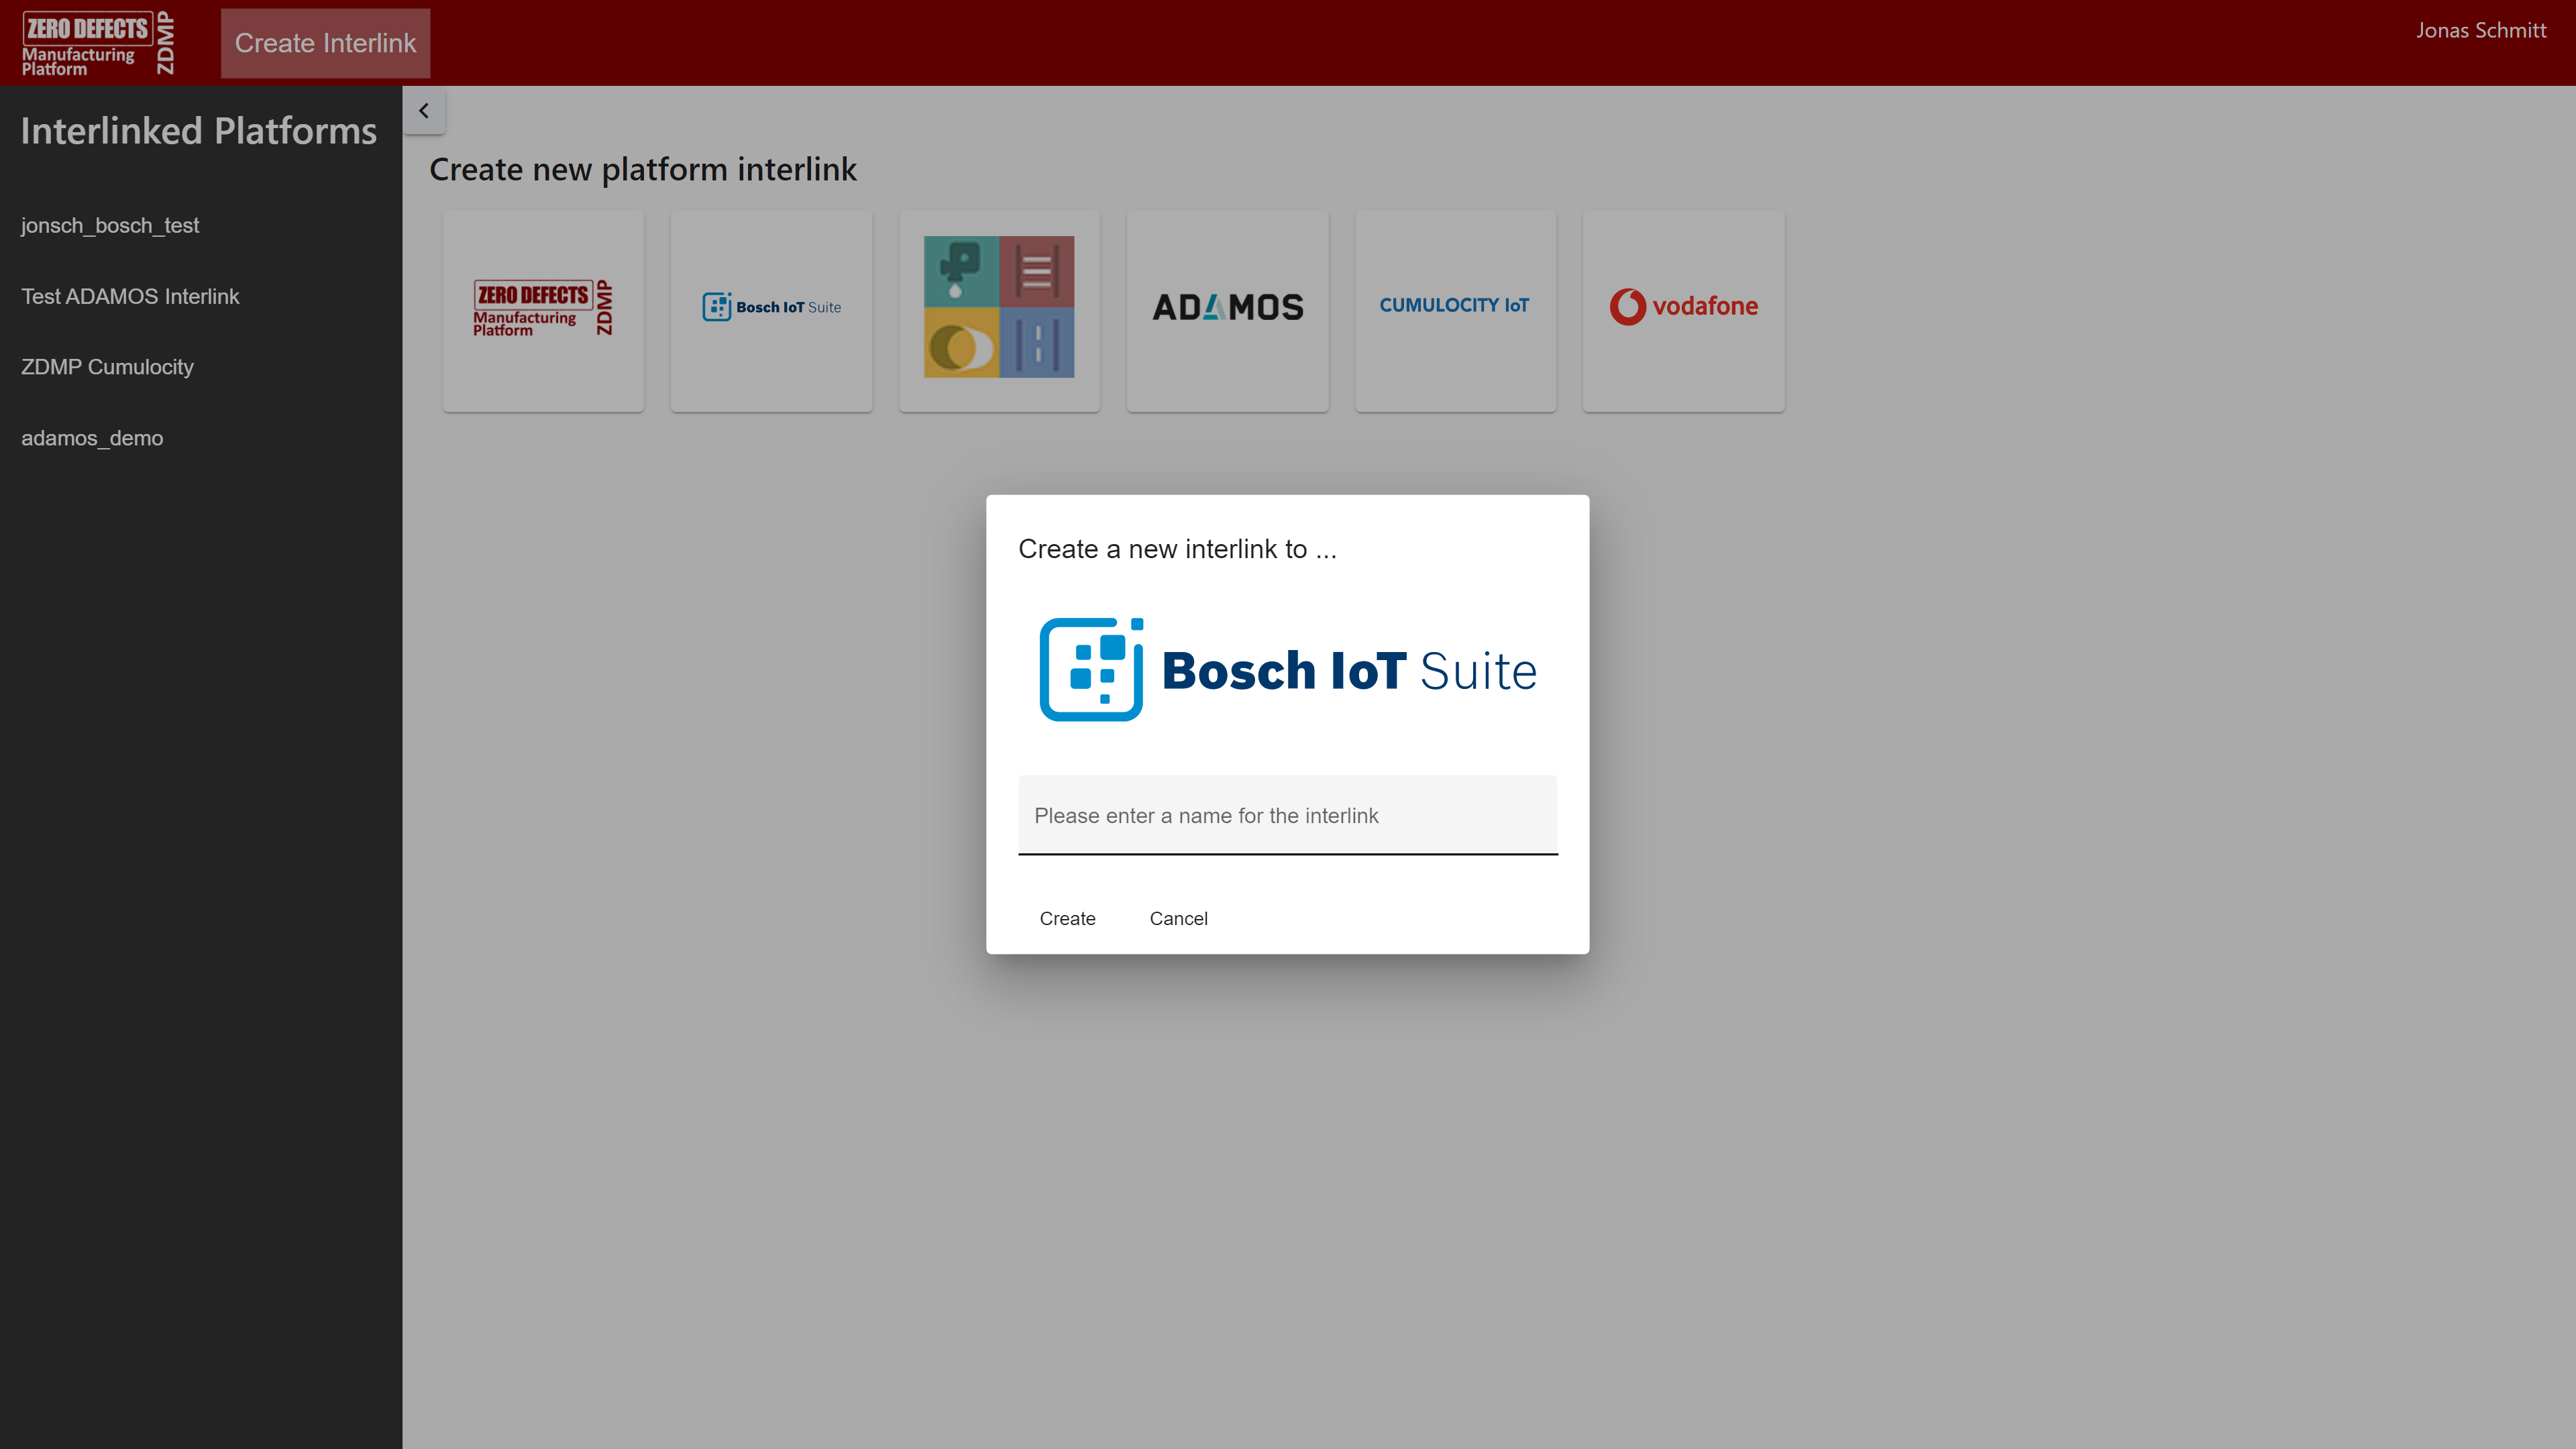
Figure 6: Bosch IoT Interlink creation dialogue
Enter a name for the interlink. It will be used to identify the interlinked resources
Click on “Create”
You will be redirected to the Settings page of the new interlink.

Figure 7: Bosch IoT Interlink settings page
- If your Bosch IoT Suite subscription is running in Hybrid mode, check the “Hybrid Endpoint for Device Provisioning” checkbox
Select the region your Bosch IoT Things service is running in. You find this information in the Service Subscriptions overview in the Bosch IoT account interface
Enter the Things solution ID of your Bosch IoT subscription. You find this information by clicking on “Access credentials” in the Service Subscriptions overview in the Bosch IoT account interface. The field name is “things.solution_id”
Enter the Client ID of an OAuth 2 client authorized for full-access to IoT Manager. If you want to use the authentication features by accessing the Bosch APIs through the ZDMP platform, the client needs to be authorized for the additionally required scopes. Such client can be created in the Bosch IoT Account interface
Enter the Client Secret of the OAuth 2 client
Enter the scopes of the OAuth 2 client. These can be obtained by clicking on “Use” next to the respective client in the Bosch IoT Account interface and then selecting “HTTPS” under “Fetch Access Token Examples”. The required value can be found in the Request window. Copy the bold-printed part after “&scope=” into the field
Click on “Save Credentials” to complete the setup
Step 2: Activate API-interlinking
To use the REST-APIs provided by the Bosch IoT Suite, it is required to activate them in the “Components” tab of the interlink properties page. Click on the switch next to the API name to activate the corresponding API. Once the status indicator turns green, the API is ready to use through the T6.4 Services API Management component.
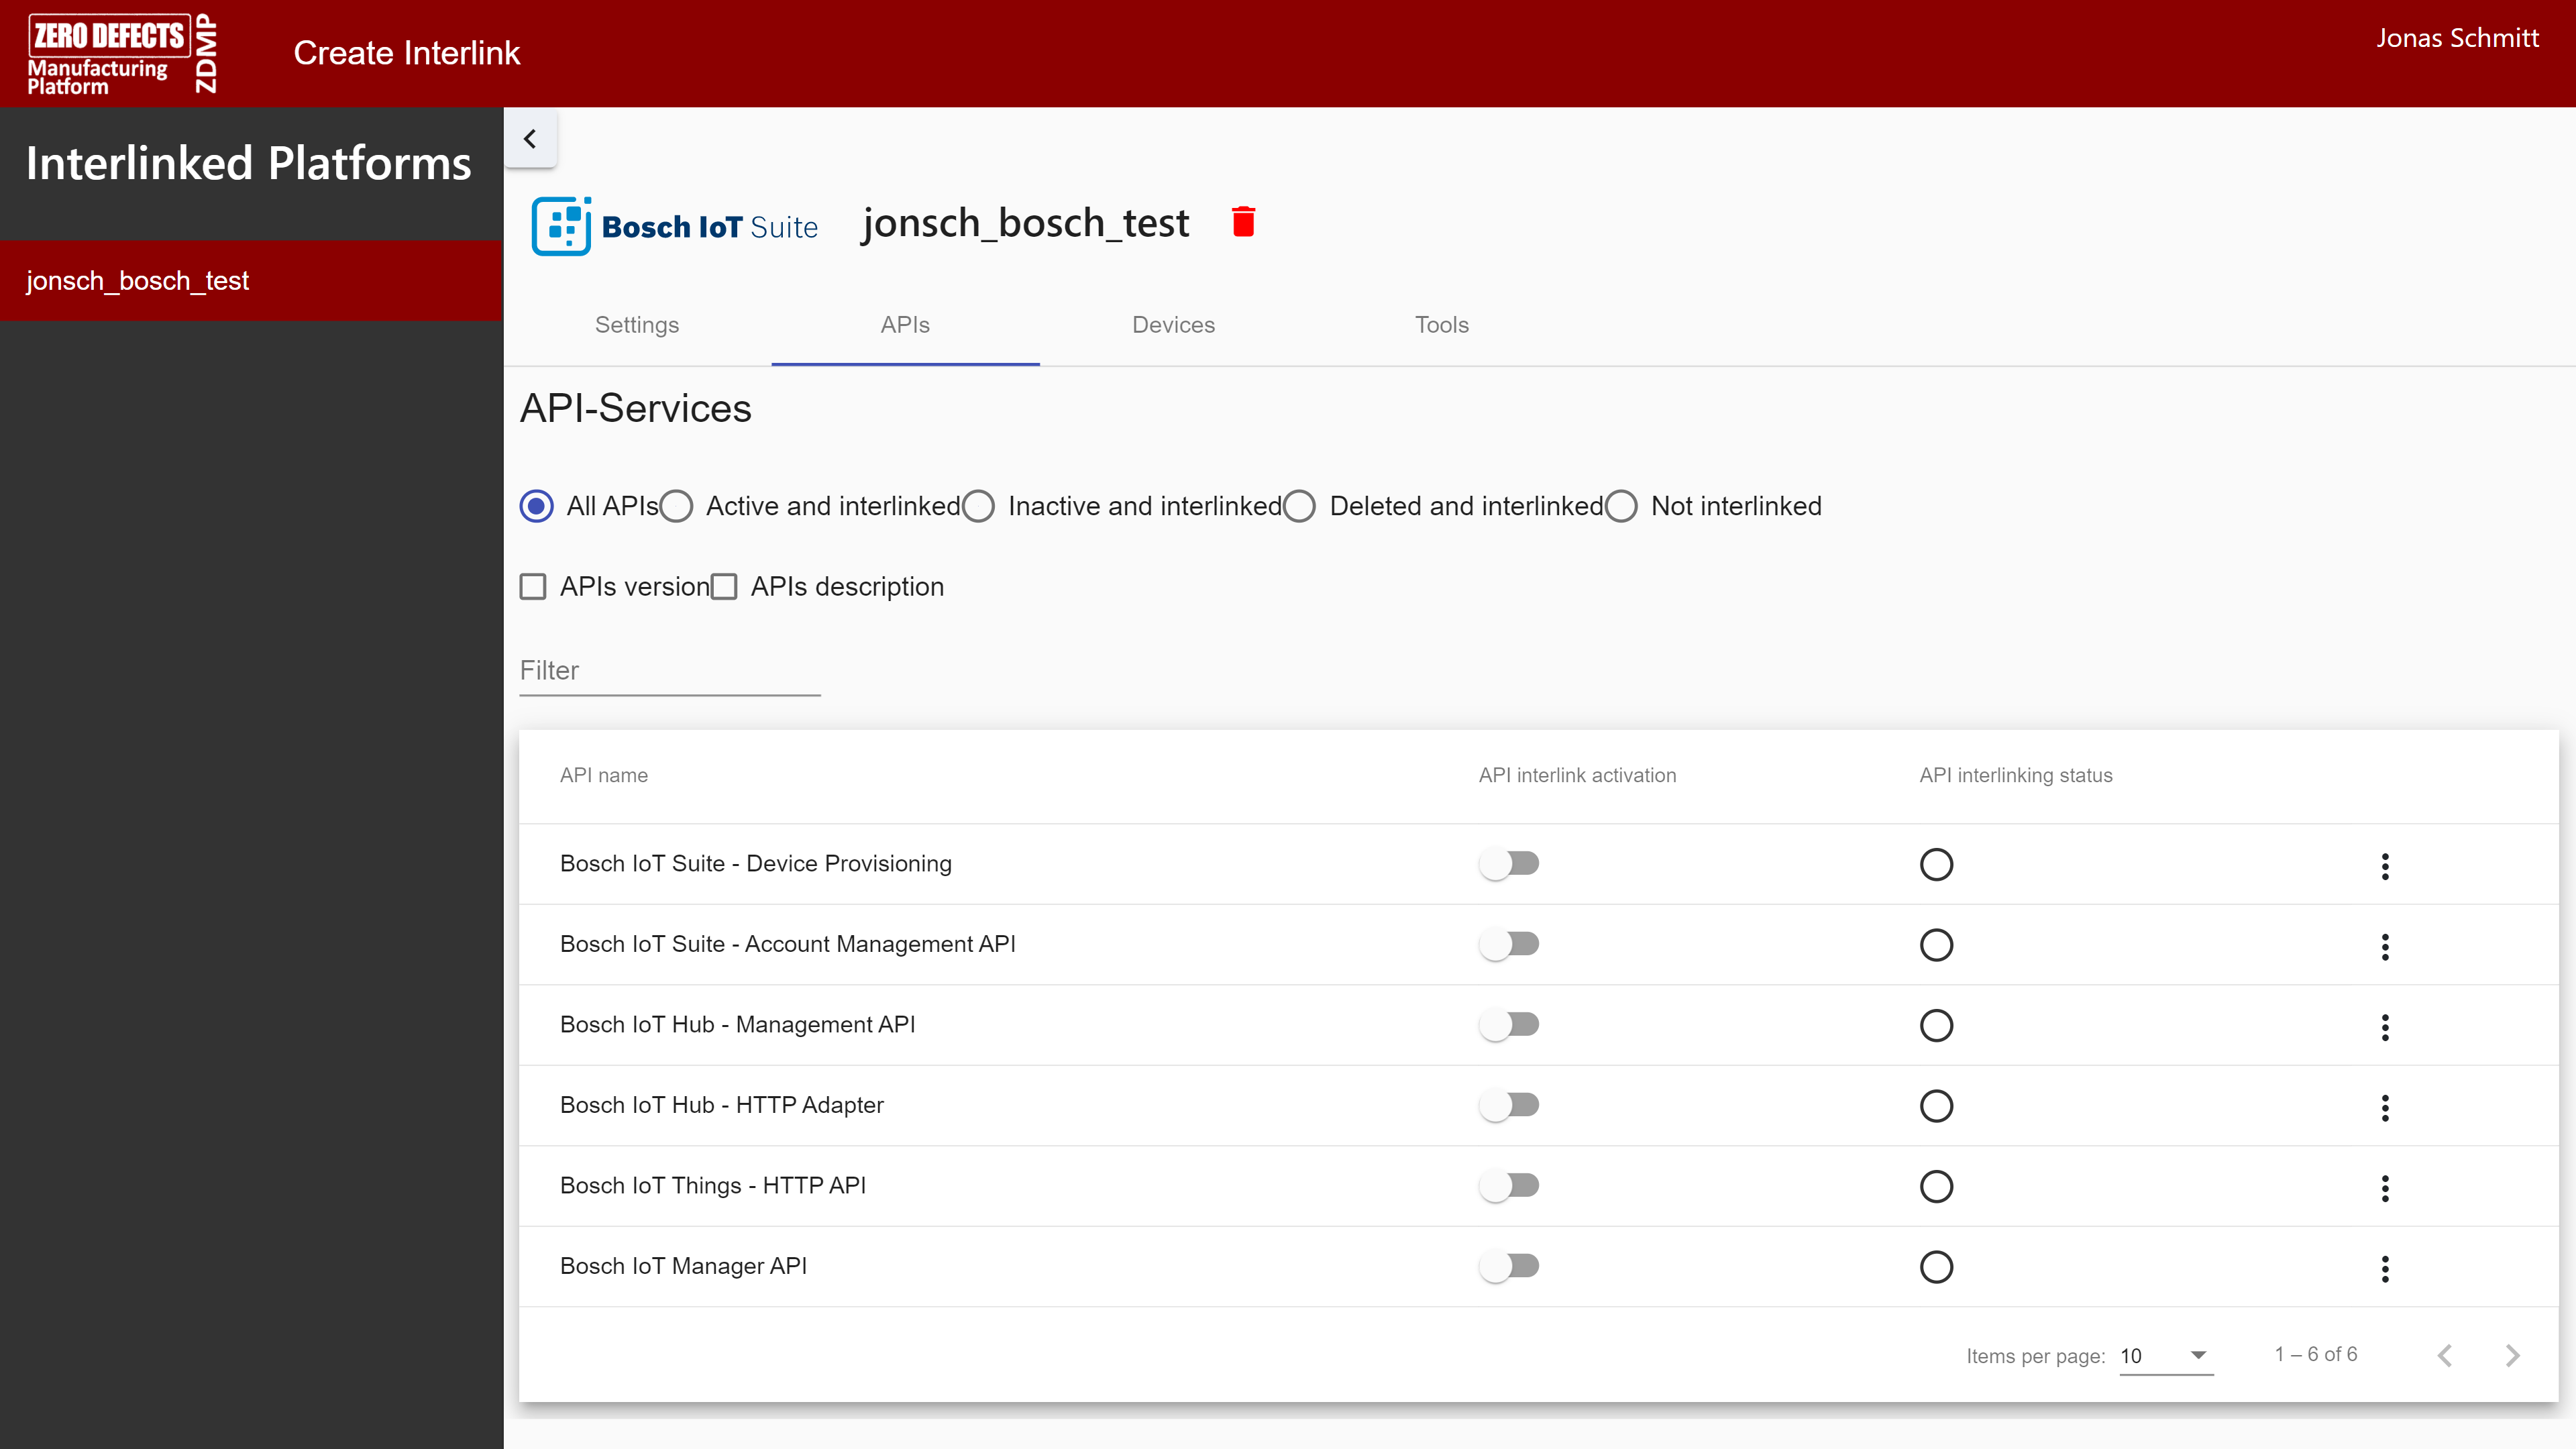
Figure 8: Bosch IoT Interlink - API interlinking screen
Step 3: Activate device interlinking
- The interlinking platform supports forwarding telemetry and event messages from Bosch IoT Suite to the ZDMP message broker. To use this functionality, it is required to activate the “Bosch IoT Manager API” and “Bosch IoT Things – HTTP API” in the “Components”-tab. If they are not already activated, click the switch next to the respective entry and wait for the status indicator to become green

Figure 9: Bosch IoT Interlink - status of the Bosch APIs
- Now switch to the “Devices” tab
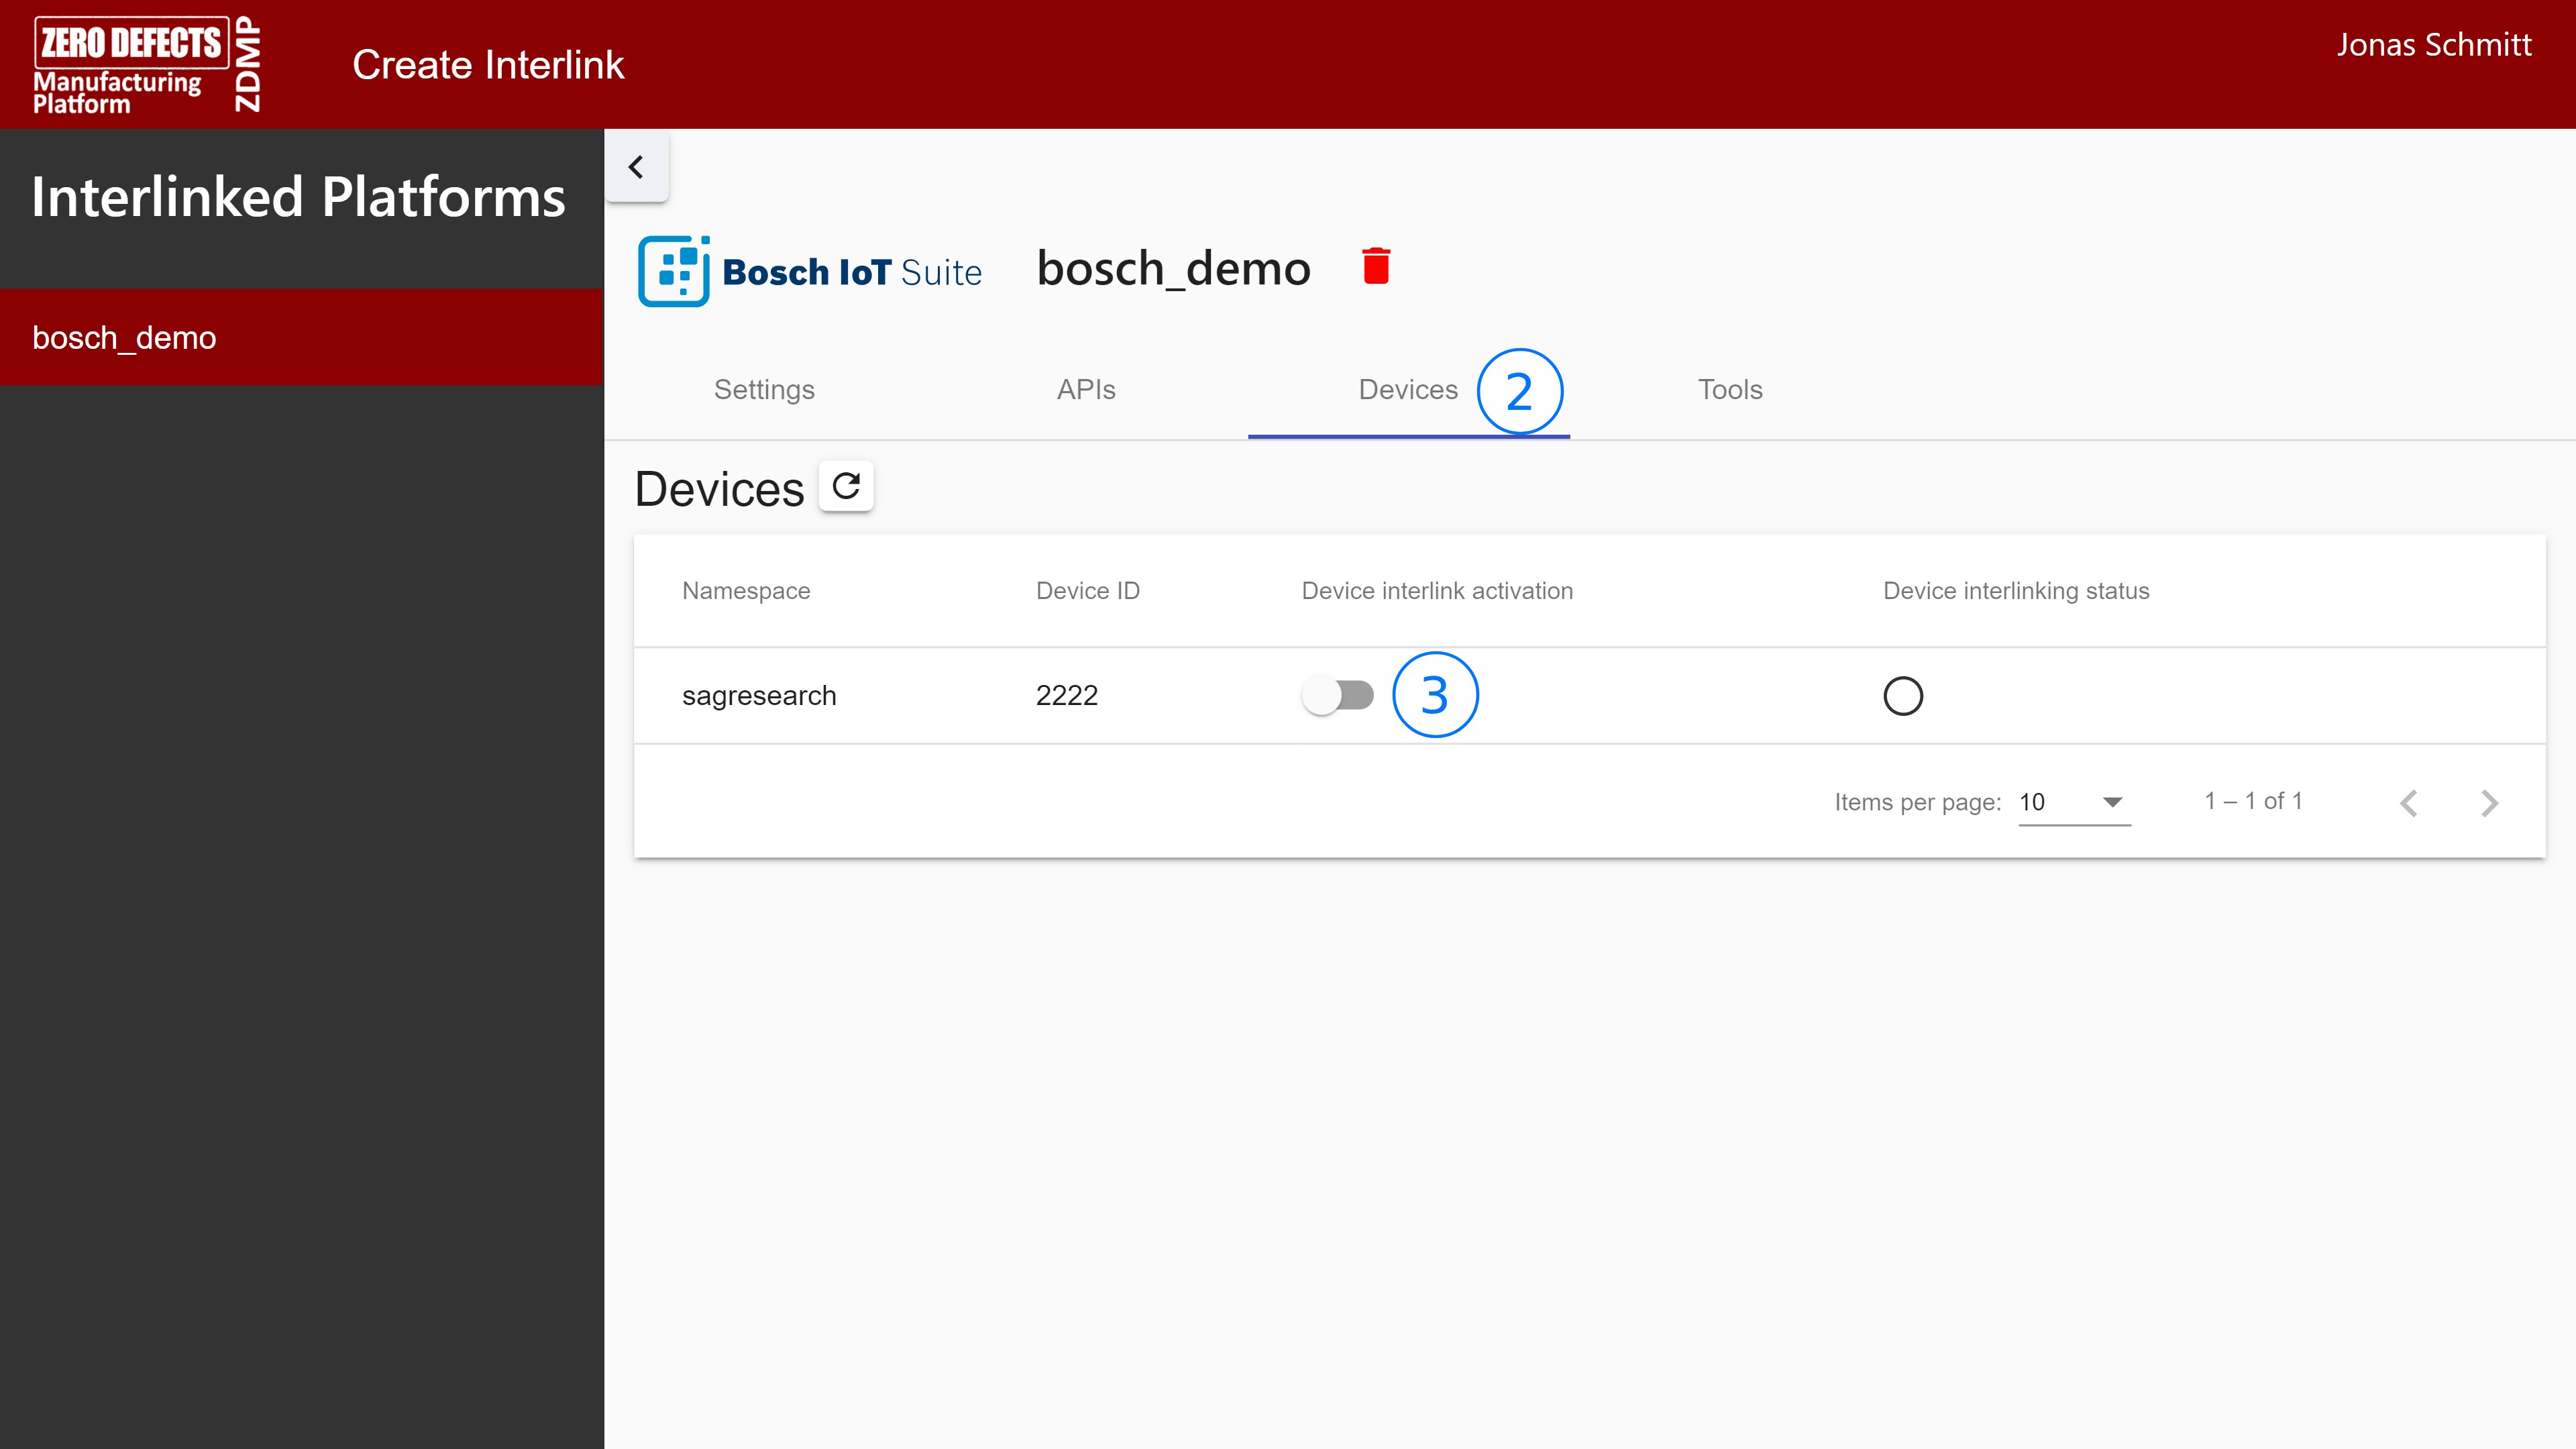
Figure 10: Bosch IoT Interlink – device overview
- To activate the message forwarding for a specific device, click the switch next to it and wait for the status indicator to become green. The messages will be forwarded to the following Message Bus topics:
Telemetry: interlink/{interlinkName}/telemetry/{deviceID}
Events: interlink/{interlinkName}/events/{deviceID}
Note: interlinkName is the name configured in the initial setup. In the example screenshot (Fig. 10) it is “bosch_demo”. deviceID consists of the namespace (configured in Bosch IoT Suite) and the actual device ID separated by a colon. In the example screenshot it is “sagresearch:2222”
Interlinking with SDAIM
The SDAIM interlinking plugin allows to connect ZDMP with one or more SDAIM instances. It allows to exchange information between ZDMP and SDAIM via AMQP messaging. In particular, the plugin allows ZDMP to subscribe to events and alerts generated by the SDAIM instance for further processing.
Step 1: Create the interlink
To create the interlink, visit the “Create Interlink” tab and select “SDAIM”.
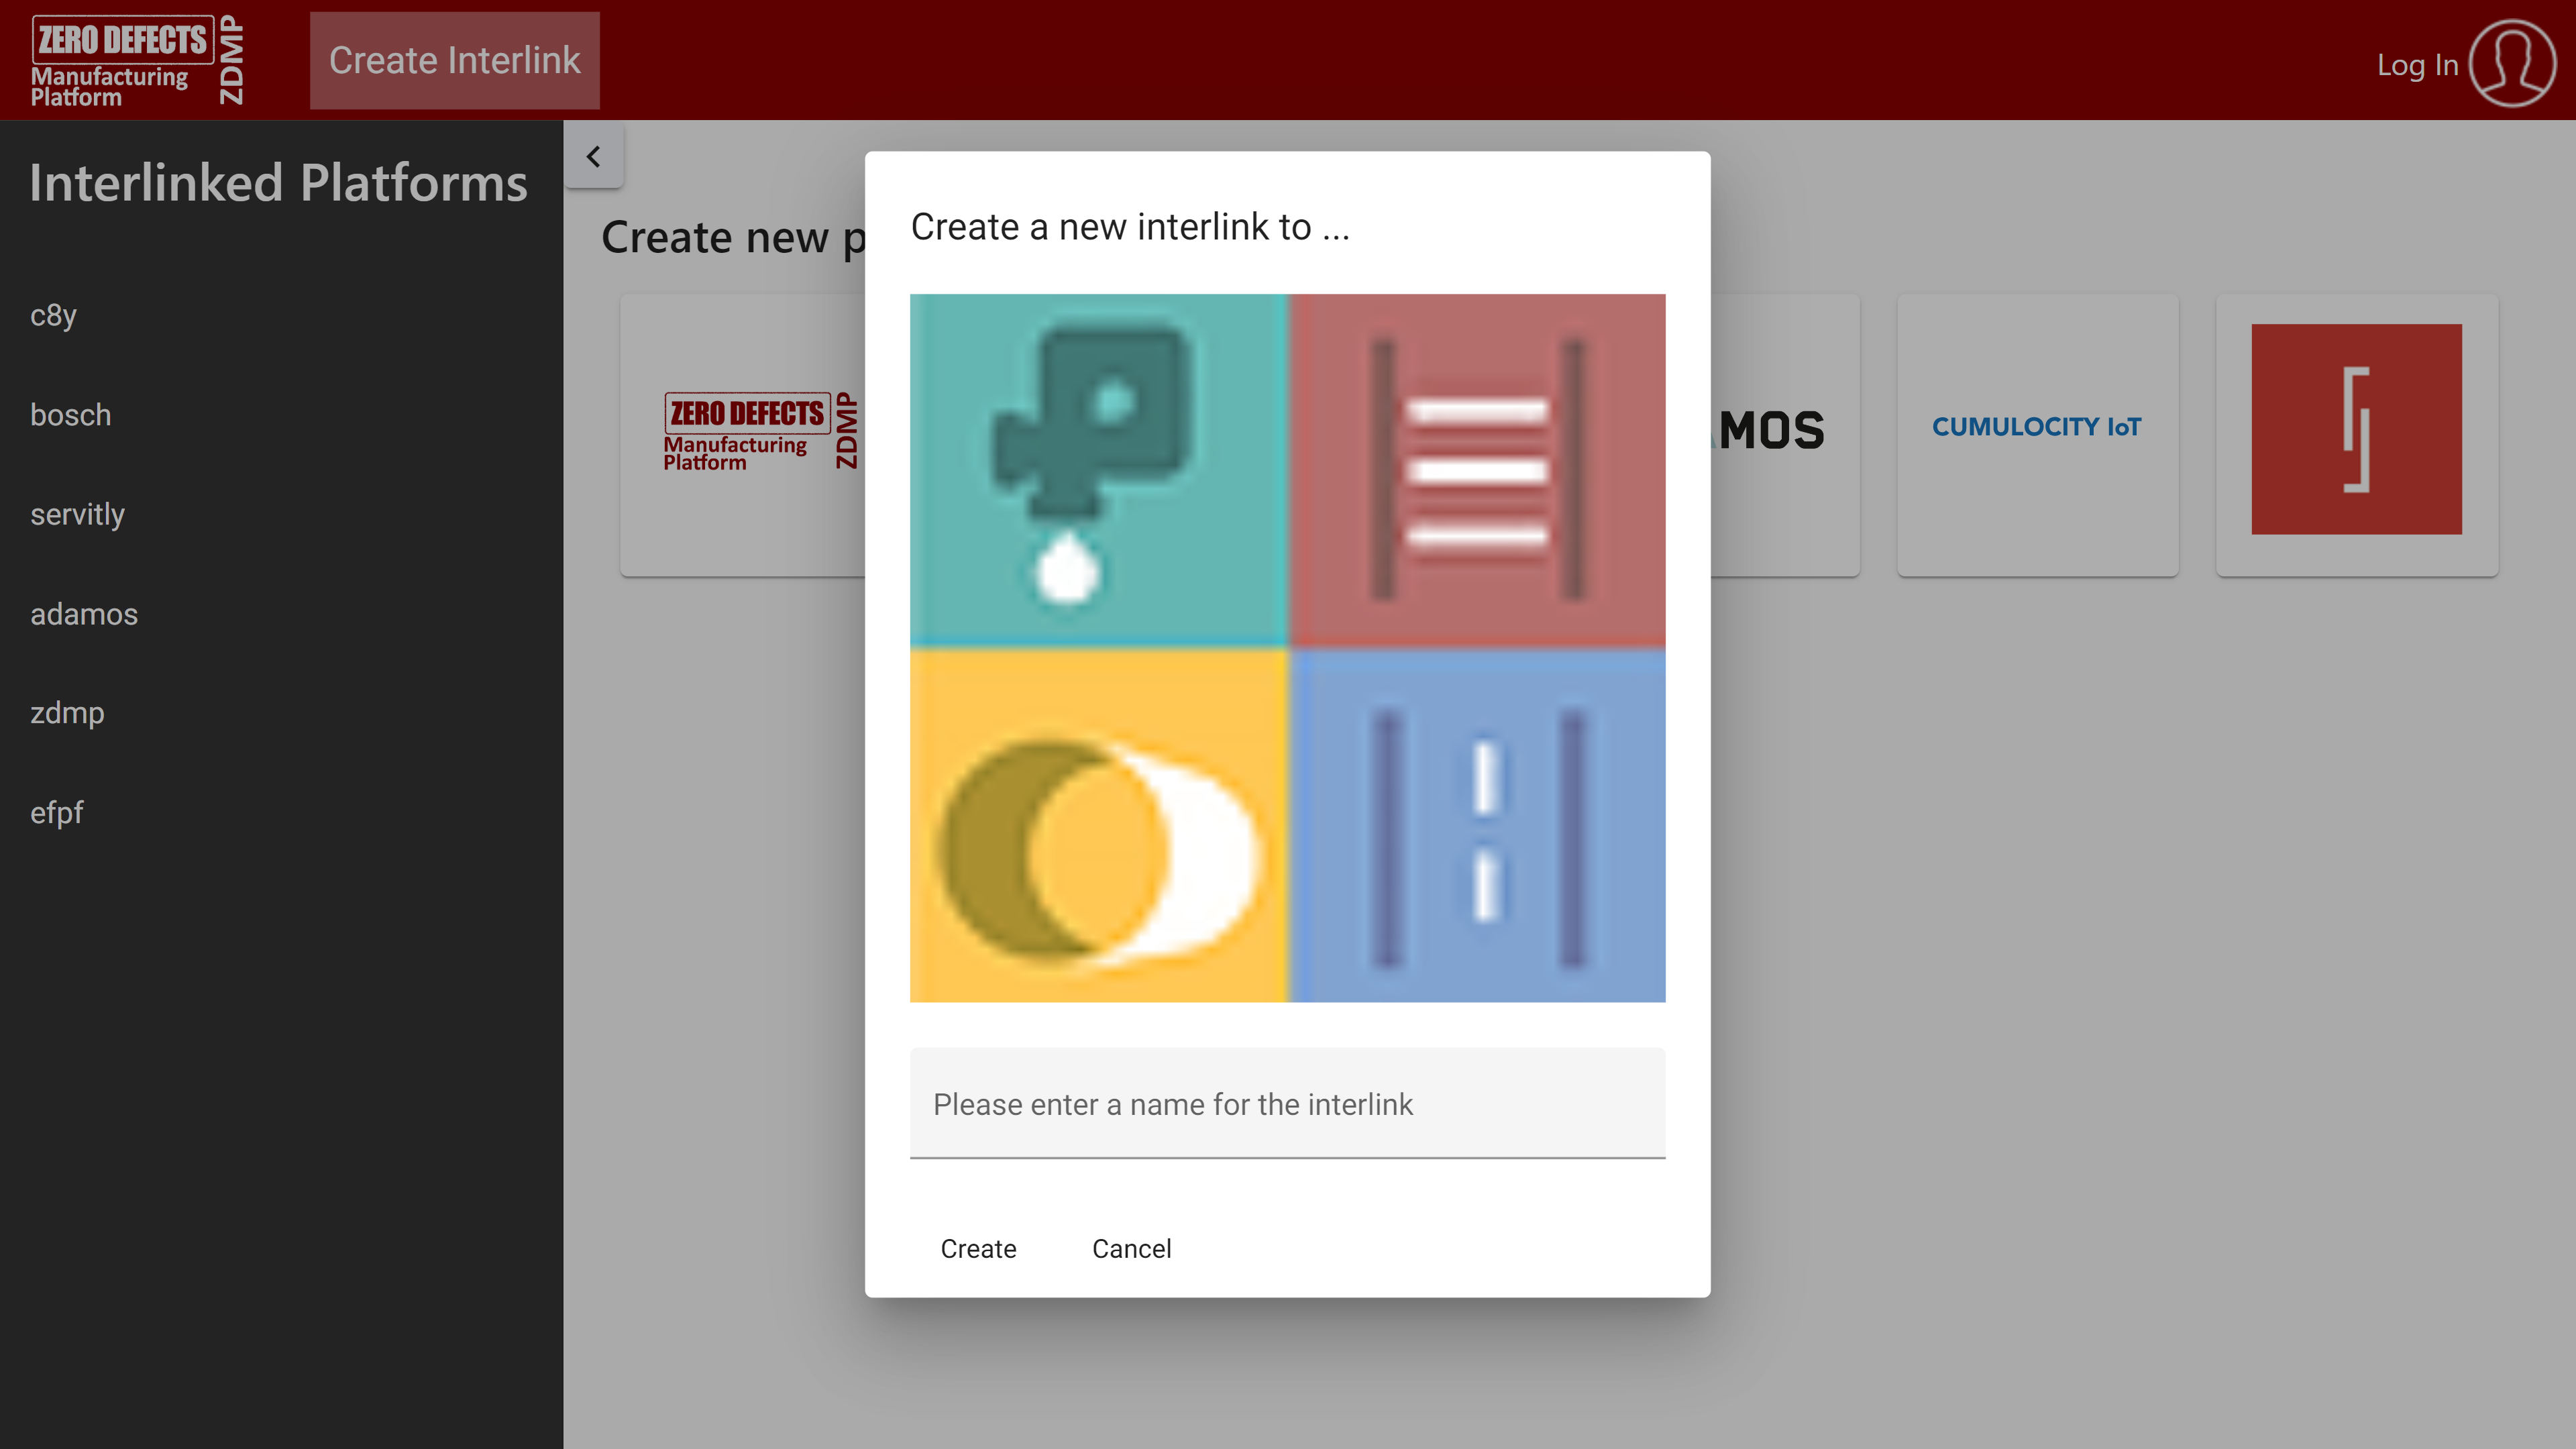
Figure 11: SDAIM Interlink creation dialogue
- Enter a name for the interlink. It will be used to identify the interlinked resources
Click on “Create”
You will be redirected to the settings page of the new interlink.
Step 2: Configure the SDAIM instance and credentials
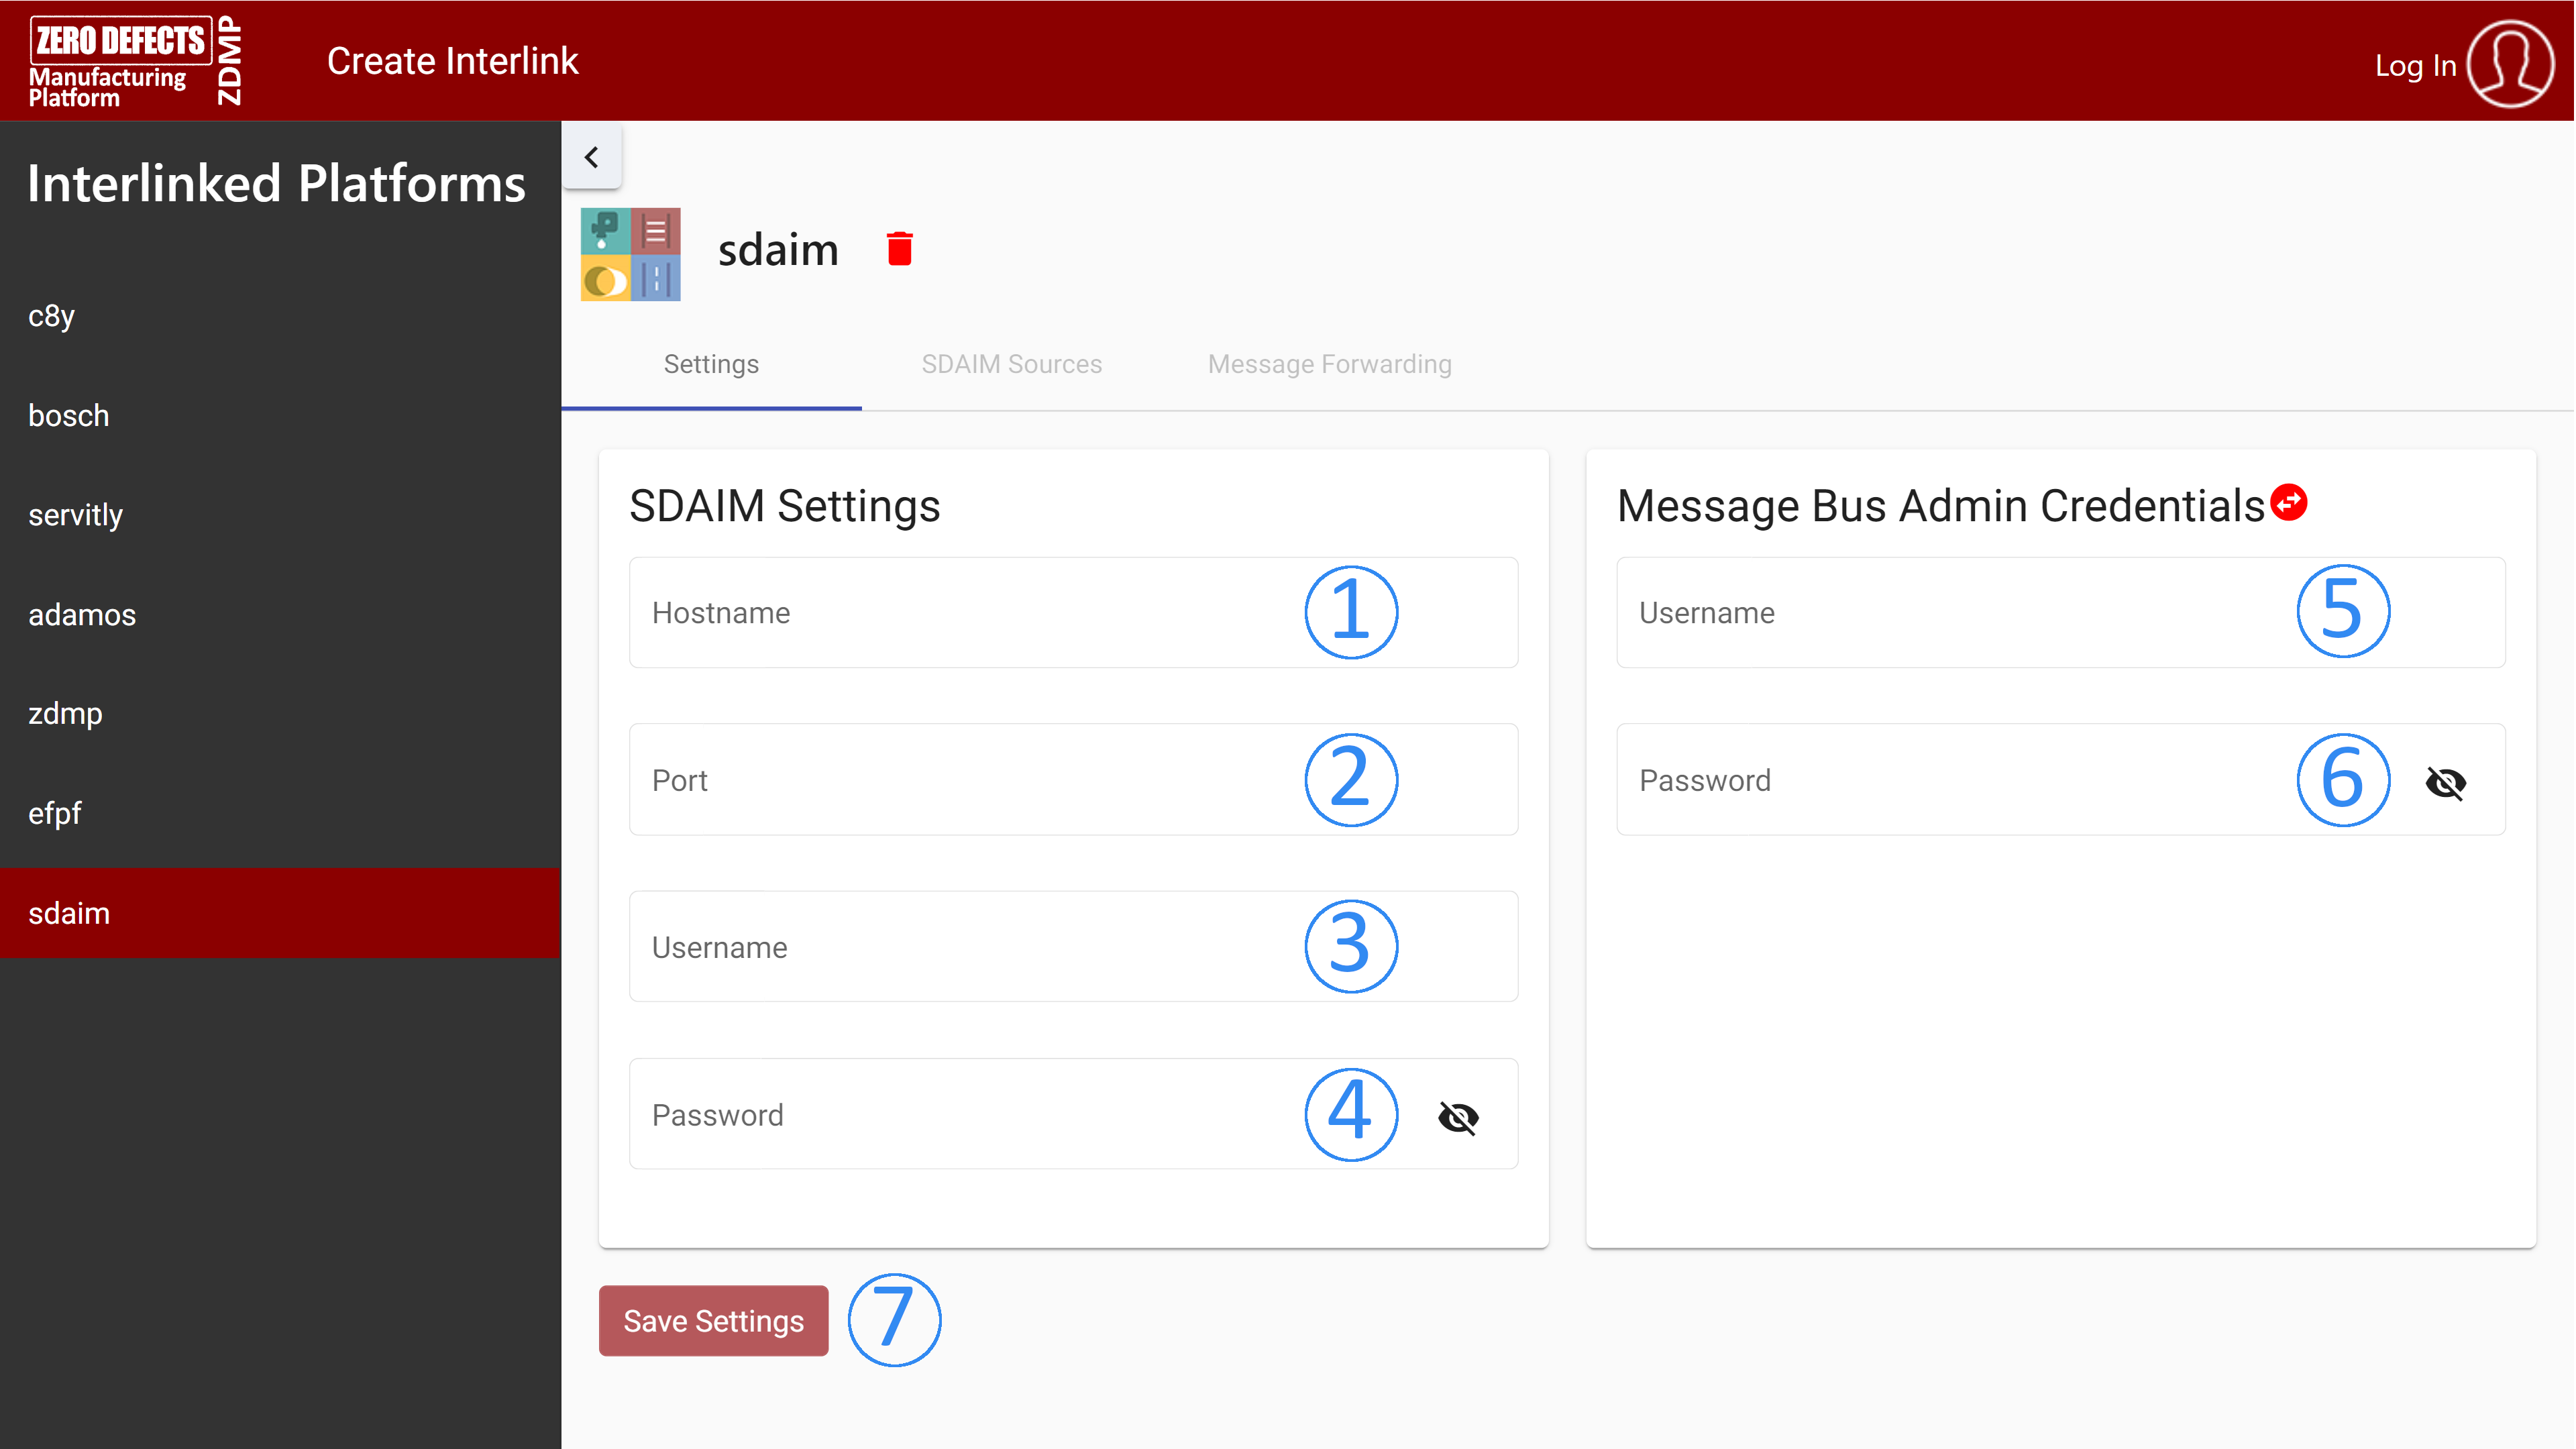
Figure 12: SDAIM Interlink settings page
- Enter the hostname of the target SDAIM instance
Enter the AMQP port of the target SDAIM instance
Enter the SDAIM username that will be used for establishing the AMQP connection
Enter the password of the specified user
Enter the ZDMP Message Bus username that will be used for accessing the Message Bus
Enter the password of the specified Message Bus user
Click on “Save settings” to complete the setup
Step 3: Configure the SDAIM Sources
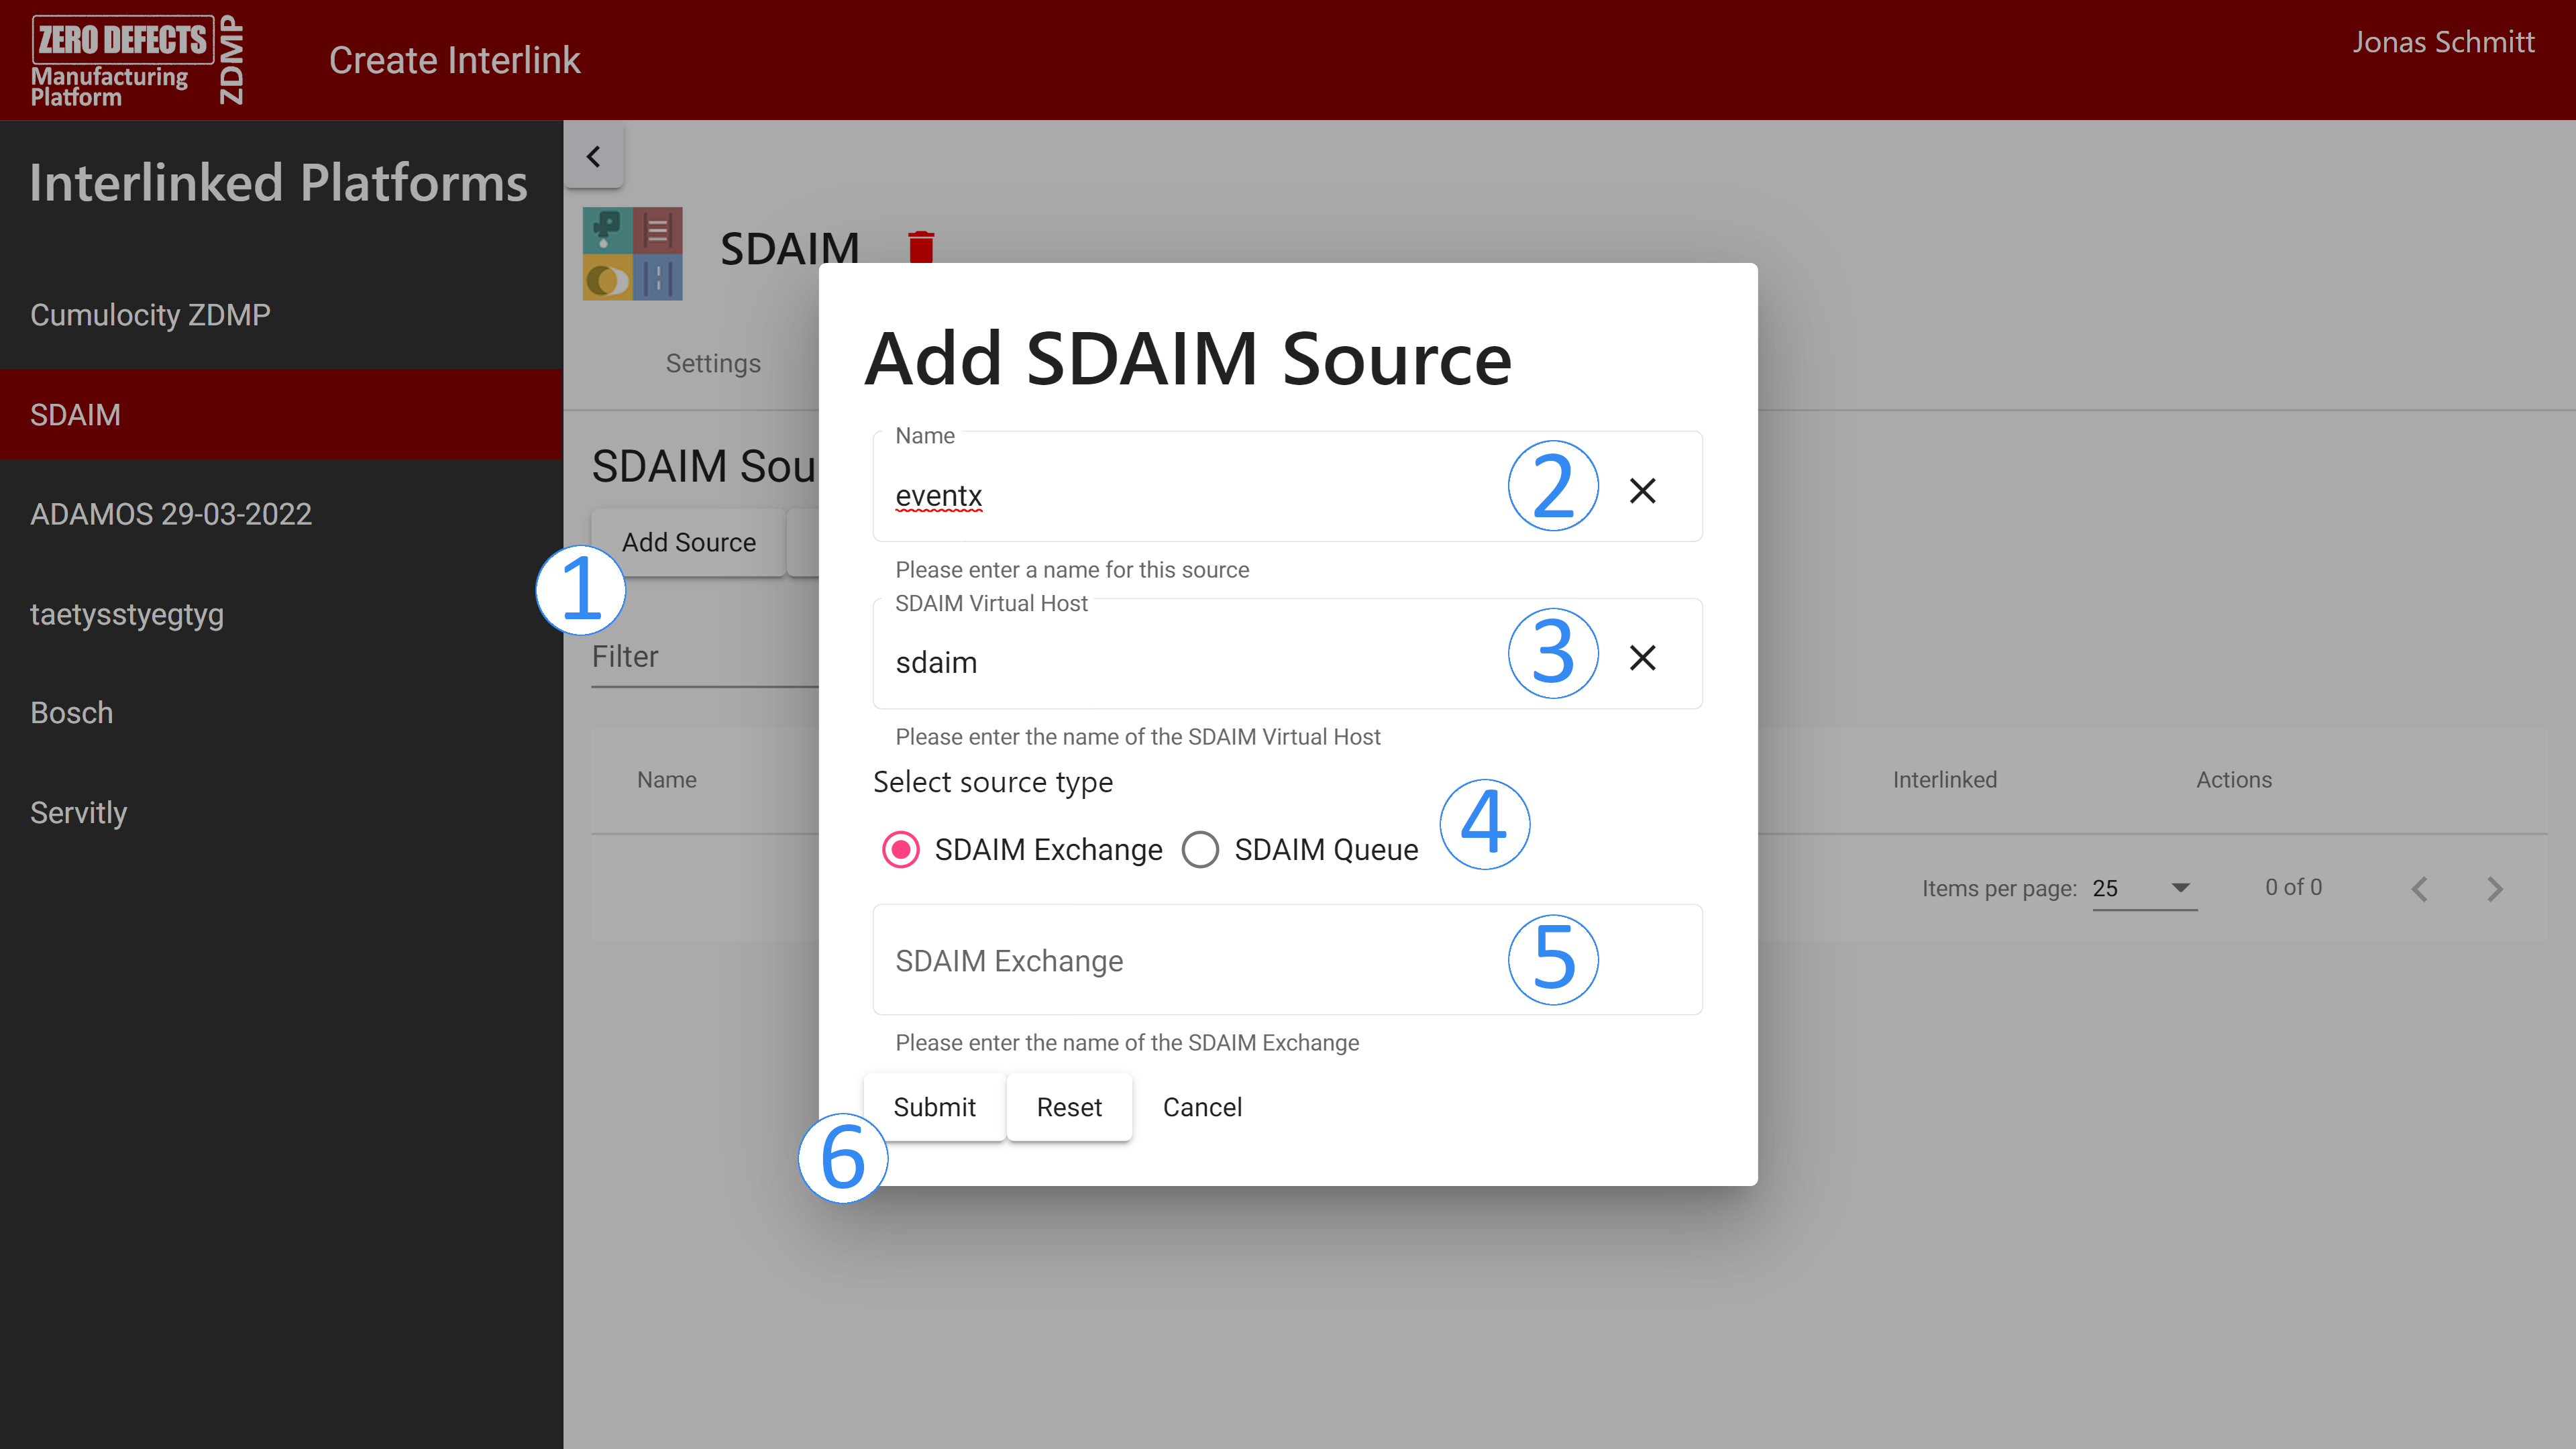
Figure 13: SDAIM Interlink SDAIM Sources page
After saving the plugin settings, the “SDAIM Sources” tab becomes available. Here you need to add the SDAIM sources (virtual host + exchange or queue) that you want to interlink with.
- Click on “Add Source” to define a new source
Enter the name of the SDAIM source. This label identifies the source in the SDAIM interlinking plugin
Enter the name of the virtual host
Choose the type of the source – exchange or queue
Enter the name of the exchange or queue
Click on “Submit” to complete the setup
After all desired SDAIM sources have been added, switch to the Message Forwarding tab.
**
**
Step 4: Configure the Messaging Forwarding
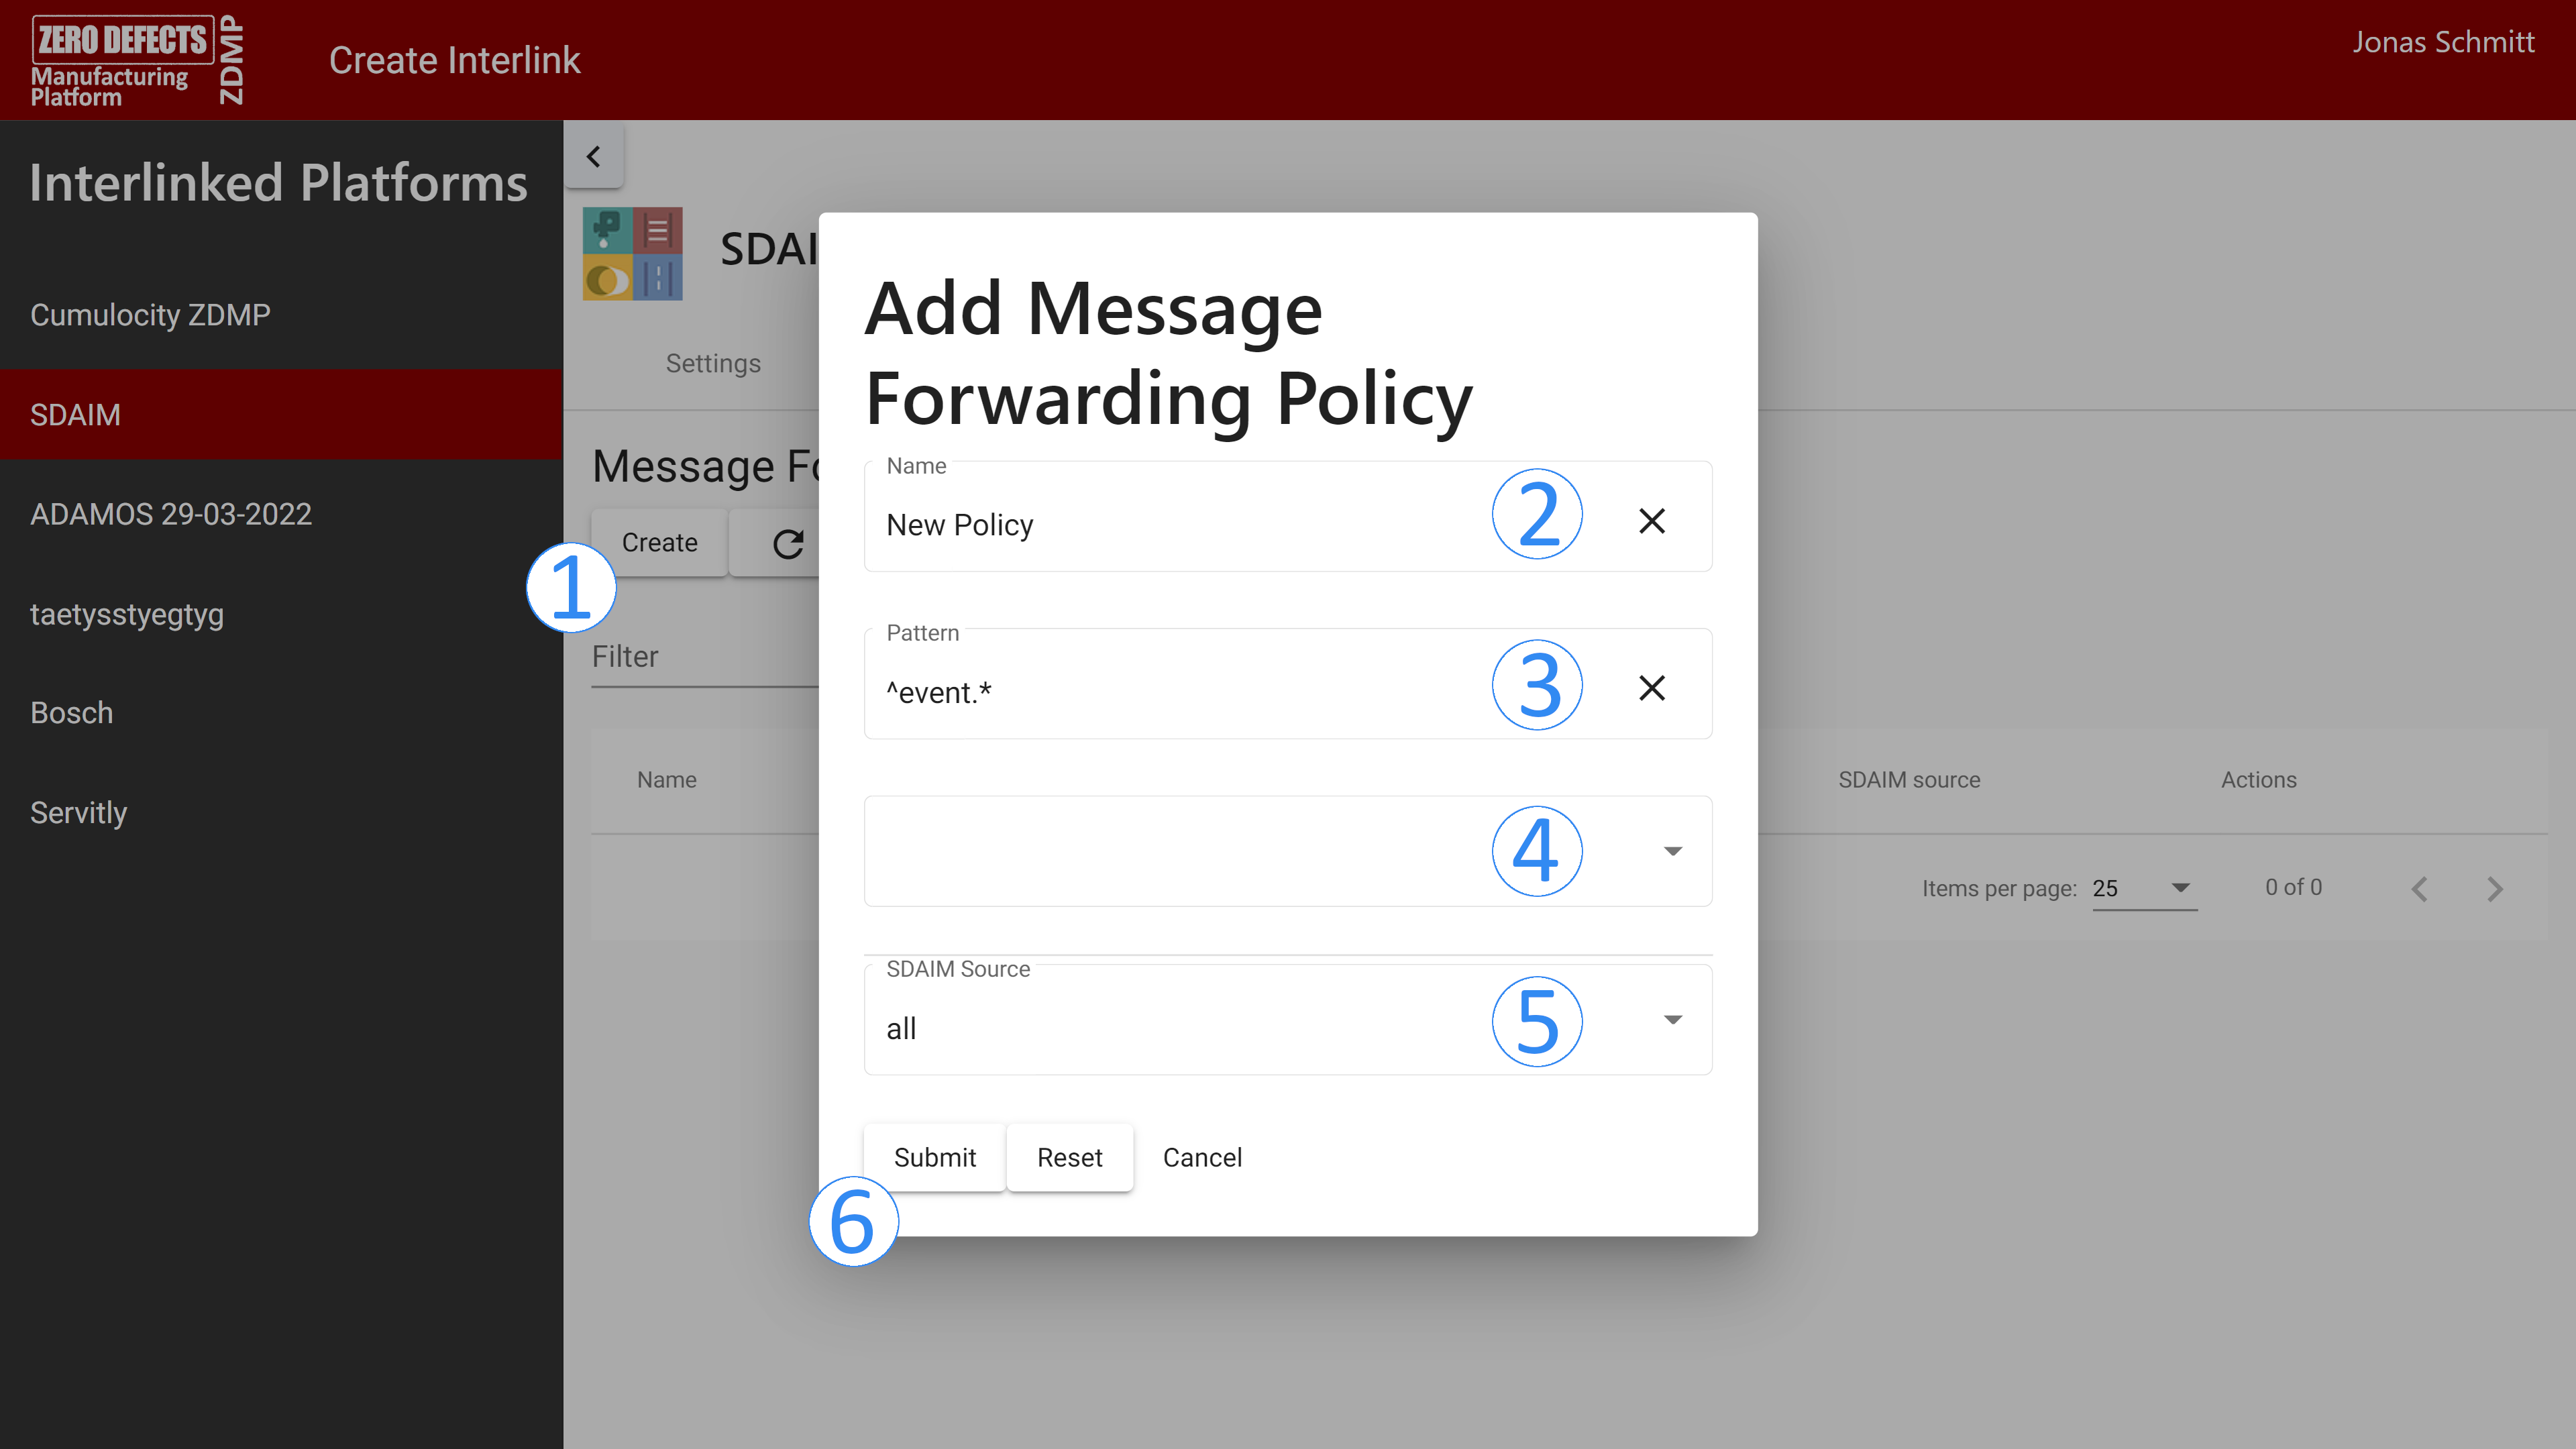
Figure 14: SDAIM Interlink Message Forwarding page
The Message Forwarding tab is used to define which SDAIM data shall be forwarded to ZDMP.
- Click on “Create” to define a new Message Forwarding Policy
Enter the name of the policy. This label identifies the policy in the SDAIM interlinking plugin
Enter the regex pattern matching the desired target SDAIM name
Choose the type of the source (exchange, queue, both) the regex shall be applied to
Choose to which defined SDAIM source this new Message Forwarding policy shall be applied to
Click on “Submit” to complete the setup
The configured alerts and events will now be published to the ZDMP Message Bus following the same topic structure as in SDAIM.
Interlinking with ADAMOS
The ADAMOS interlinking plugin allows to connect ZDMP with one or more ADAMOS tenants. It provides access to ADAMOS REST APIs, updates from machines configured in ADAMOS Machine Book and measurements and events from devices connected to the Cumulocity instance coming with ADAMOS.
Step 1: Create the interlink
- To create the interlink, visit the “Create Interlink” tab and select “ADAMOS”
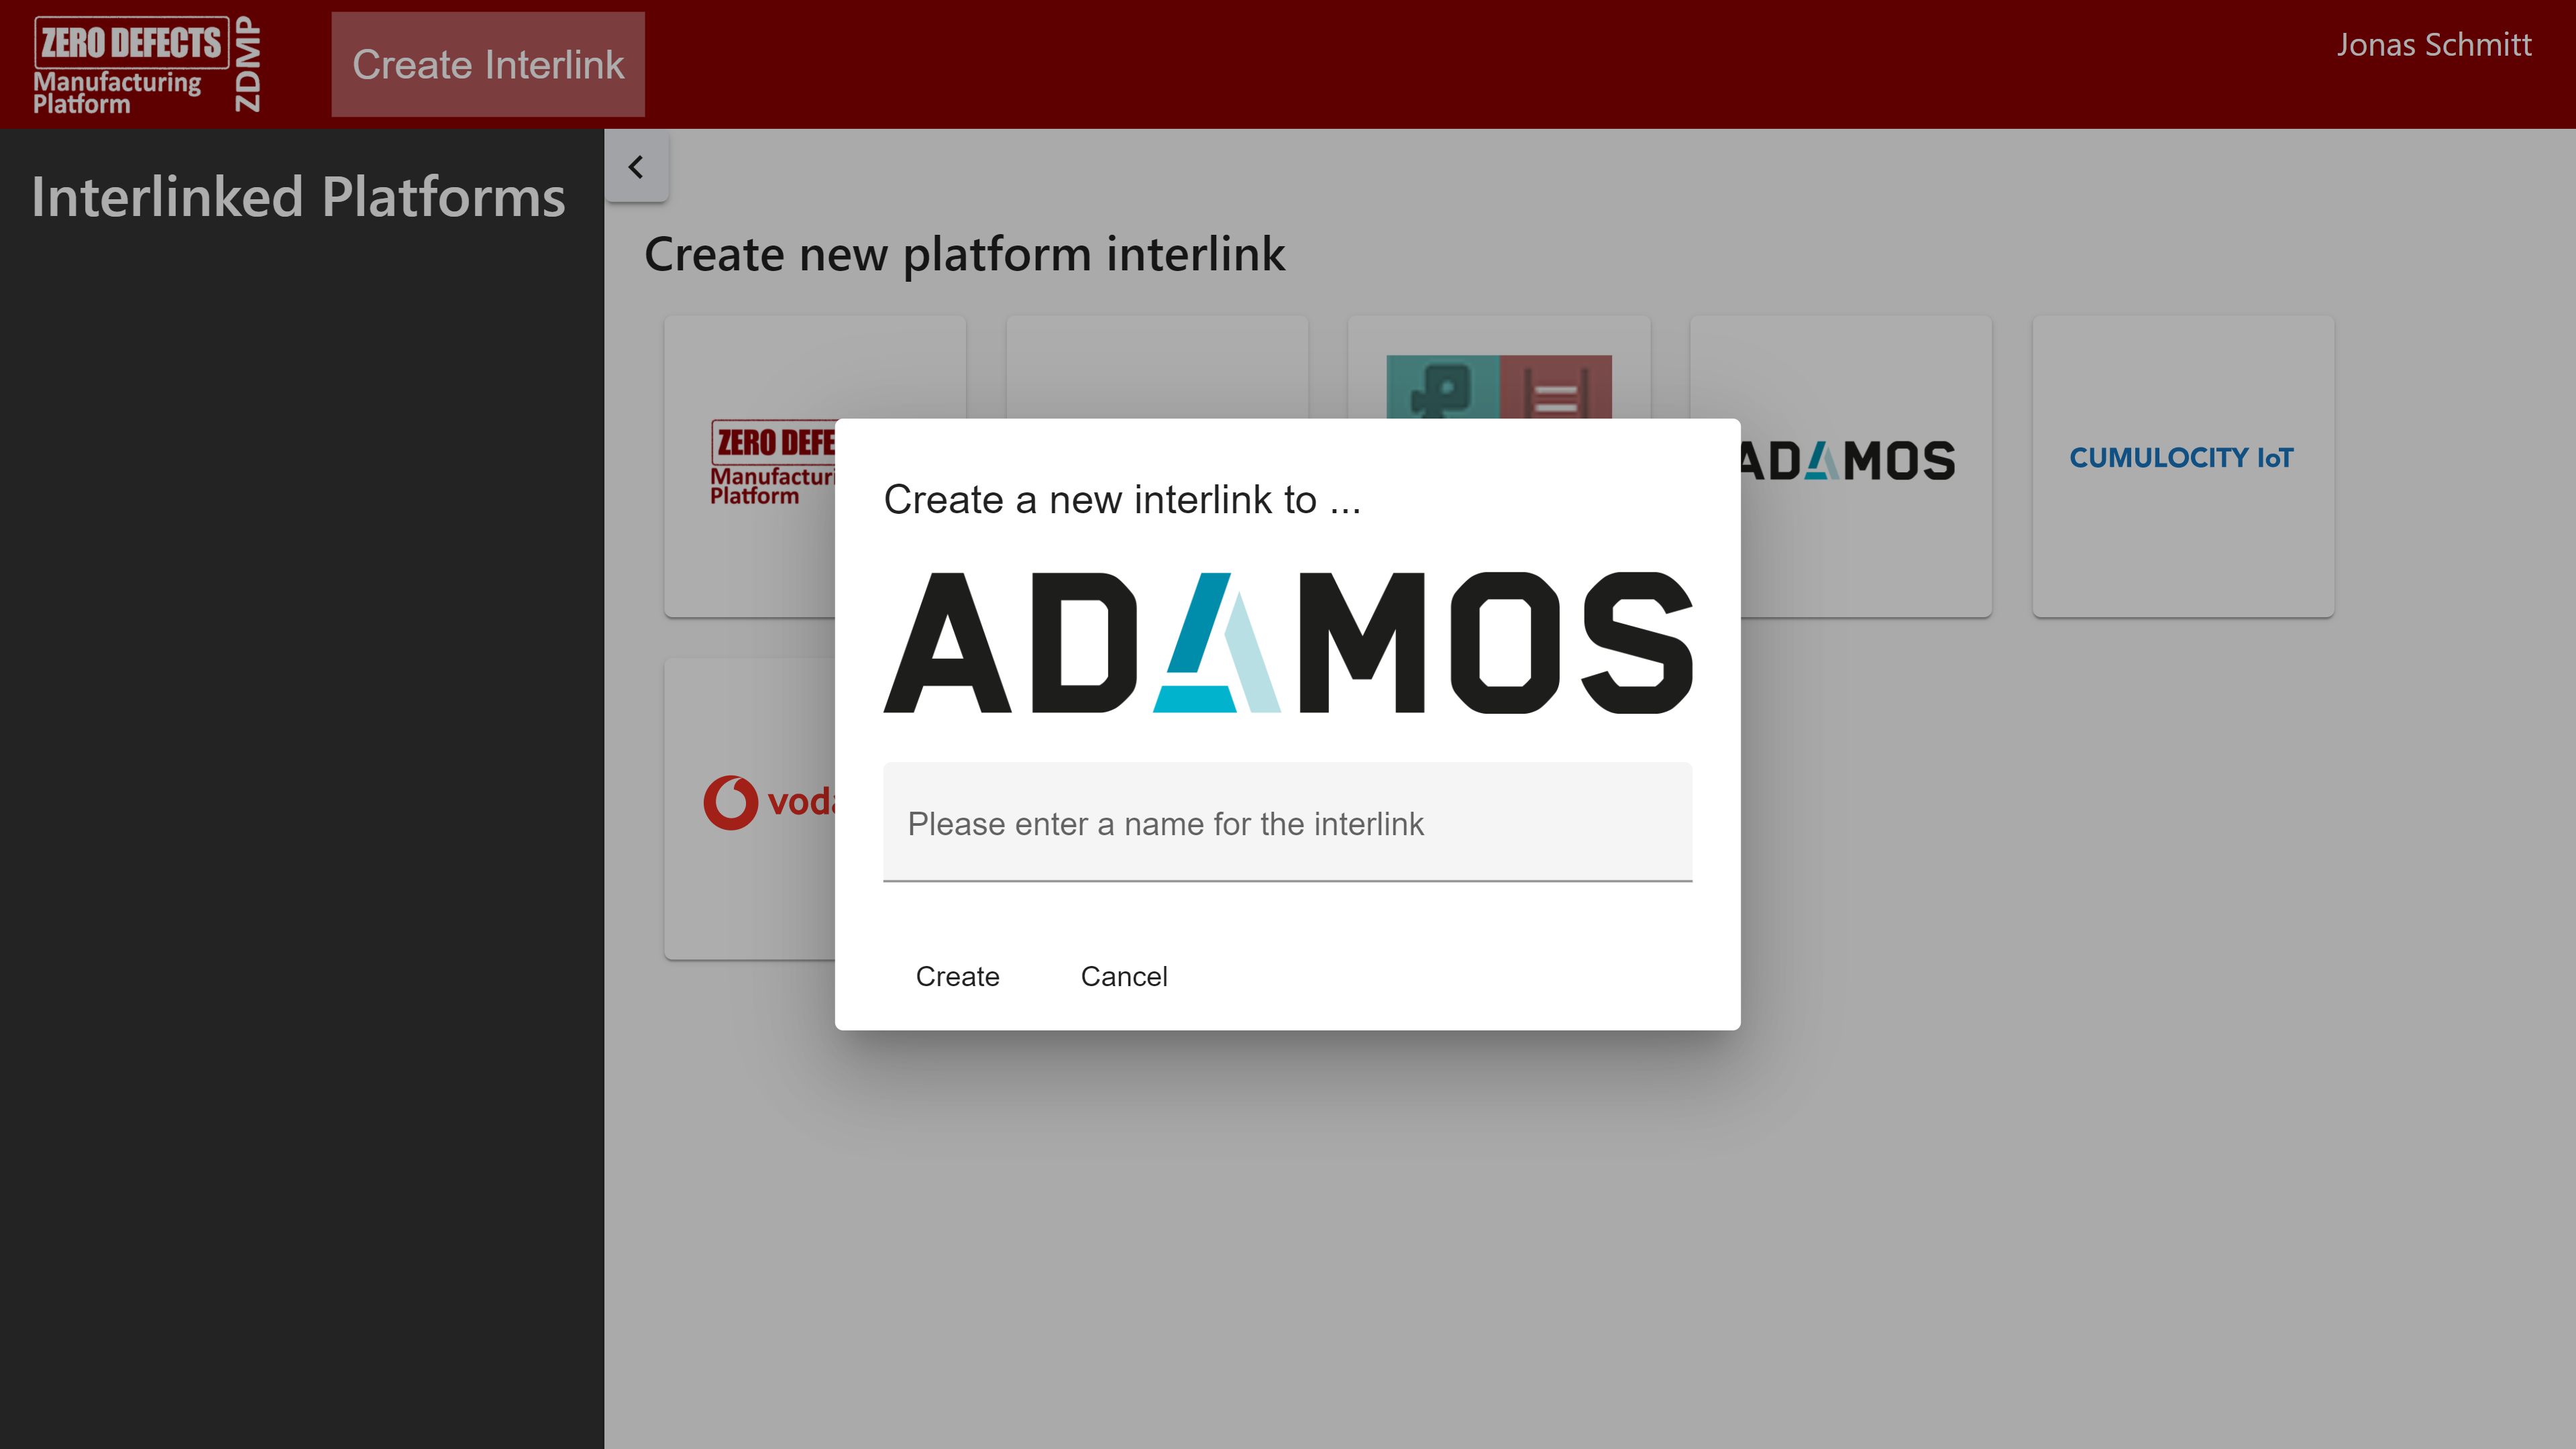
Figure 15: ADAMOS Interlink creation dialogue
- Enter a name for the interlink and click on “Create”
Step 2: Authorize ZDMP to access ADAMOS
To allow ZDMP to automatically access ADAMOS services, it is required to grant ZDMP access to your ADAMOS tenant. This is done via subscribing to an ADAMOS application in the ADAMOS Store.
Note: Due to this being a work-in-progress, the application is only available in the non-Production environment of ADAMOS. Also, the authorization request has to be manually accepted by a ZDMP administrator.
Visit the ADAMOS Store at https://adamos-store.dev
Search for ZDMP
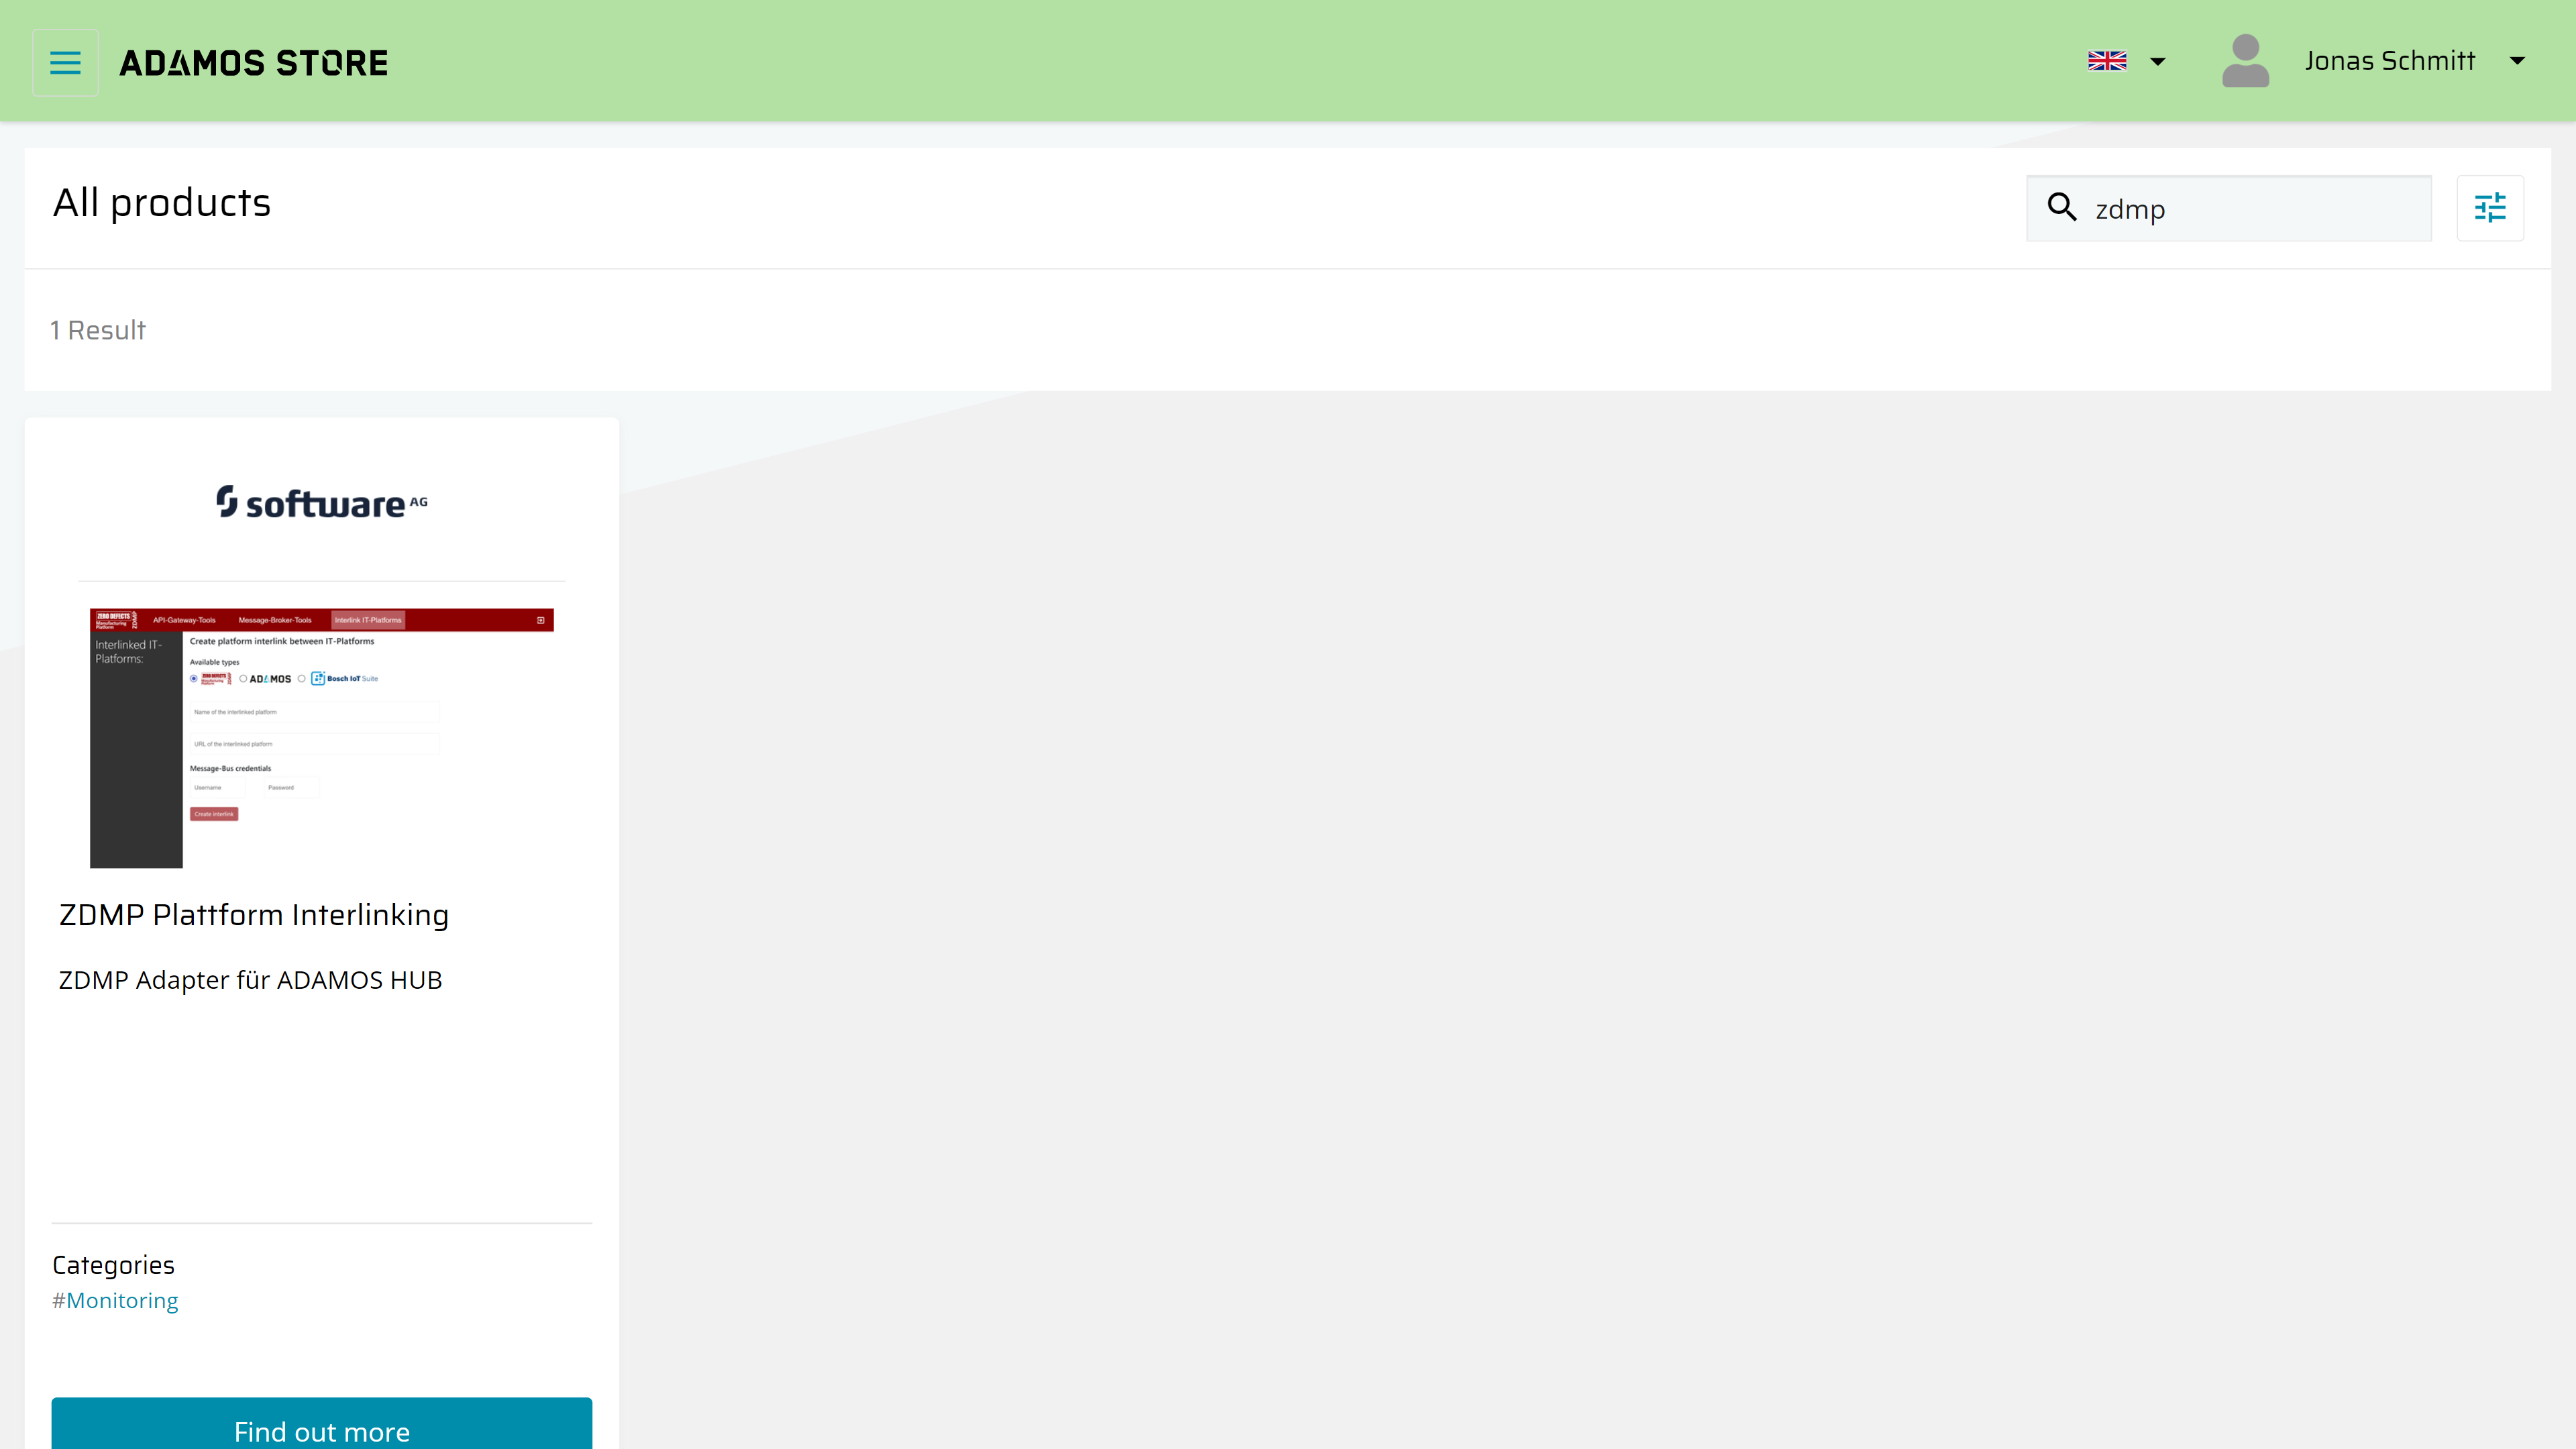
Figure 16: ADAMOS Store website
Click “Find out more” at the result “ZDMP Plattform Interlinking” by Software AG
On the next page, click on “Order now” and then click “Find out more” on the only edition available. Then click “Order now” in the revealed box
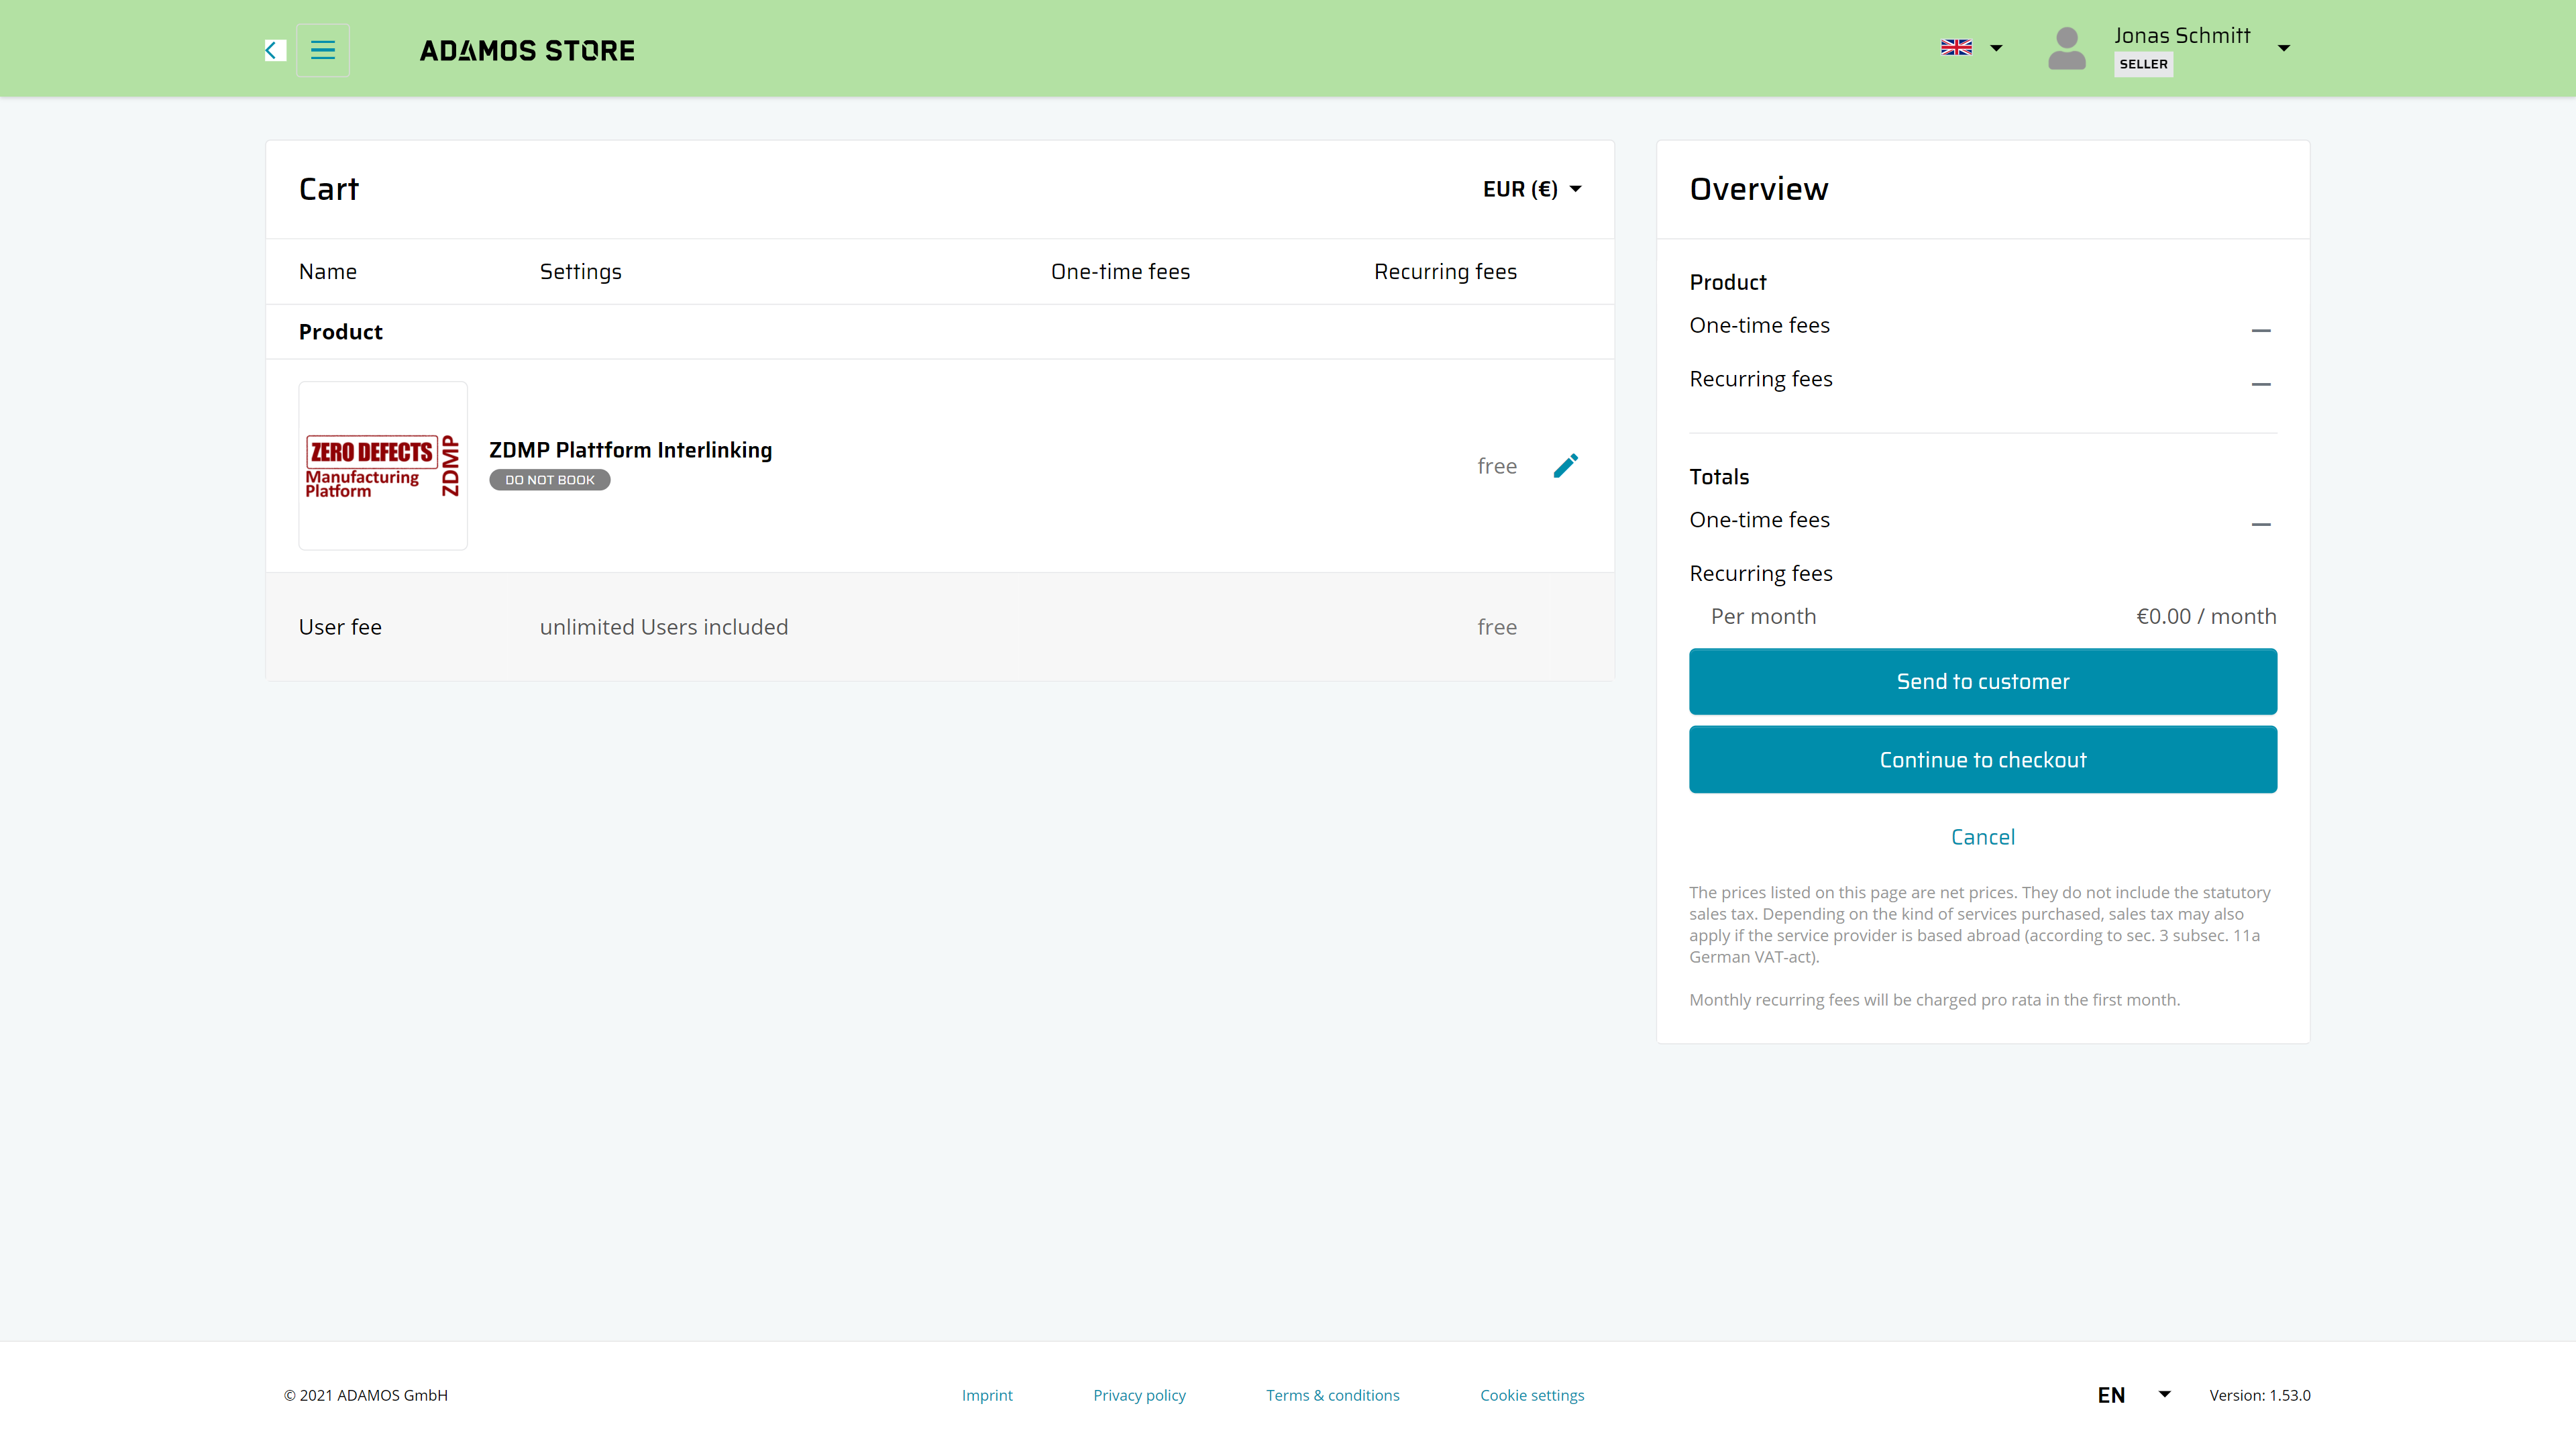
Figure 17: ADAMOS Store cart overview
You will be redirected to the cart. There click on “Continue to checkout”
You will be redirected to the order summary. Read the terms & conditions and check the checkbox to accept them
Click on “Order now” to finalise the order
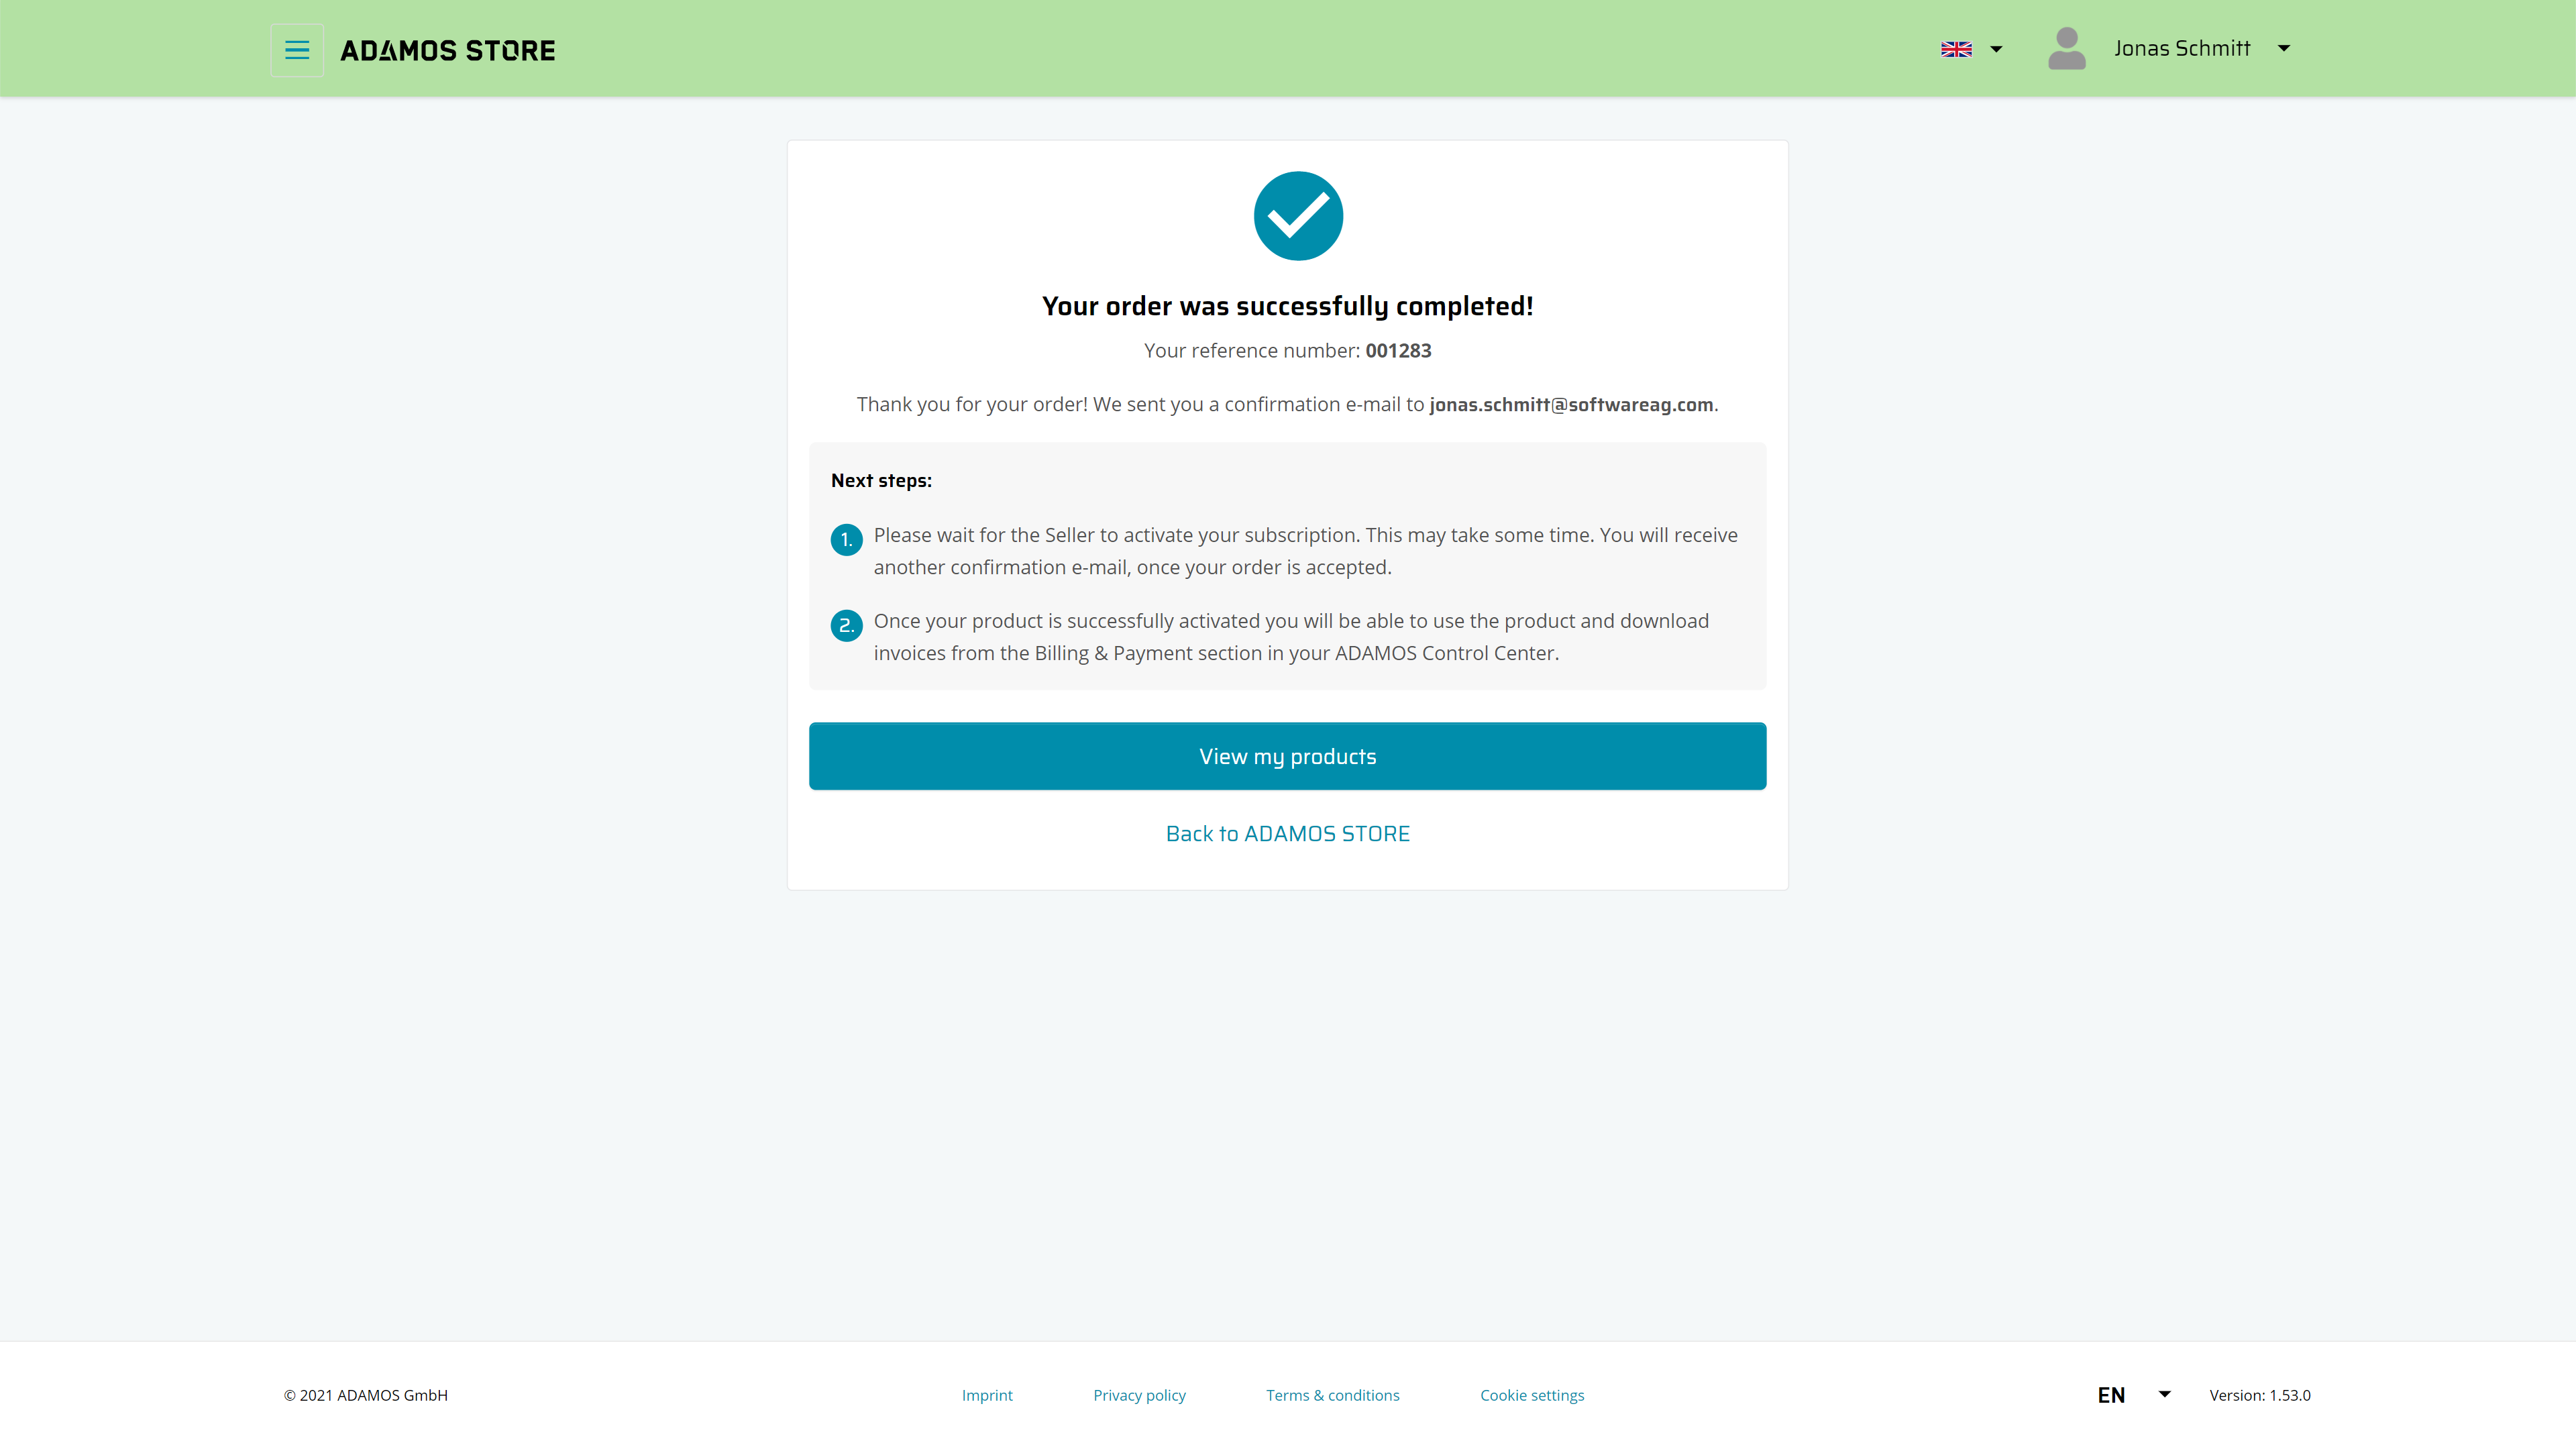
Figure 18: ADAMOS Store Order confirmation
If everything was successful, you will be presented an order confirmation
Now contact an ZDMP administrator to approve the connection. They will then provide you with the required credentials for the following steps
Step 5: Configure the interlink
Return back to the Interlinking component and select your ADAMOS interlink in the sidebar
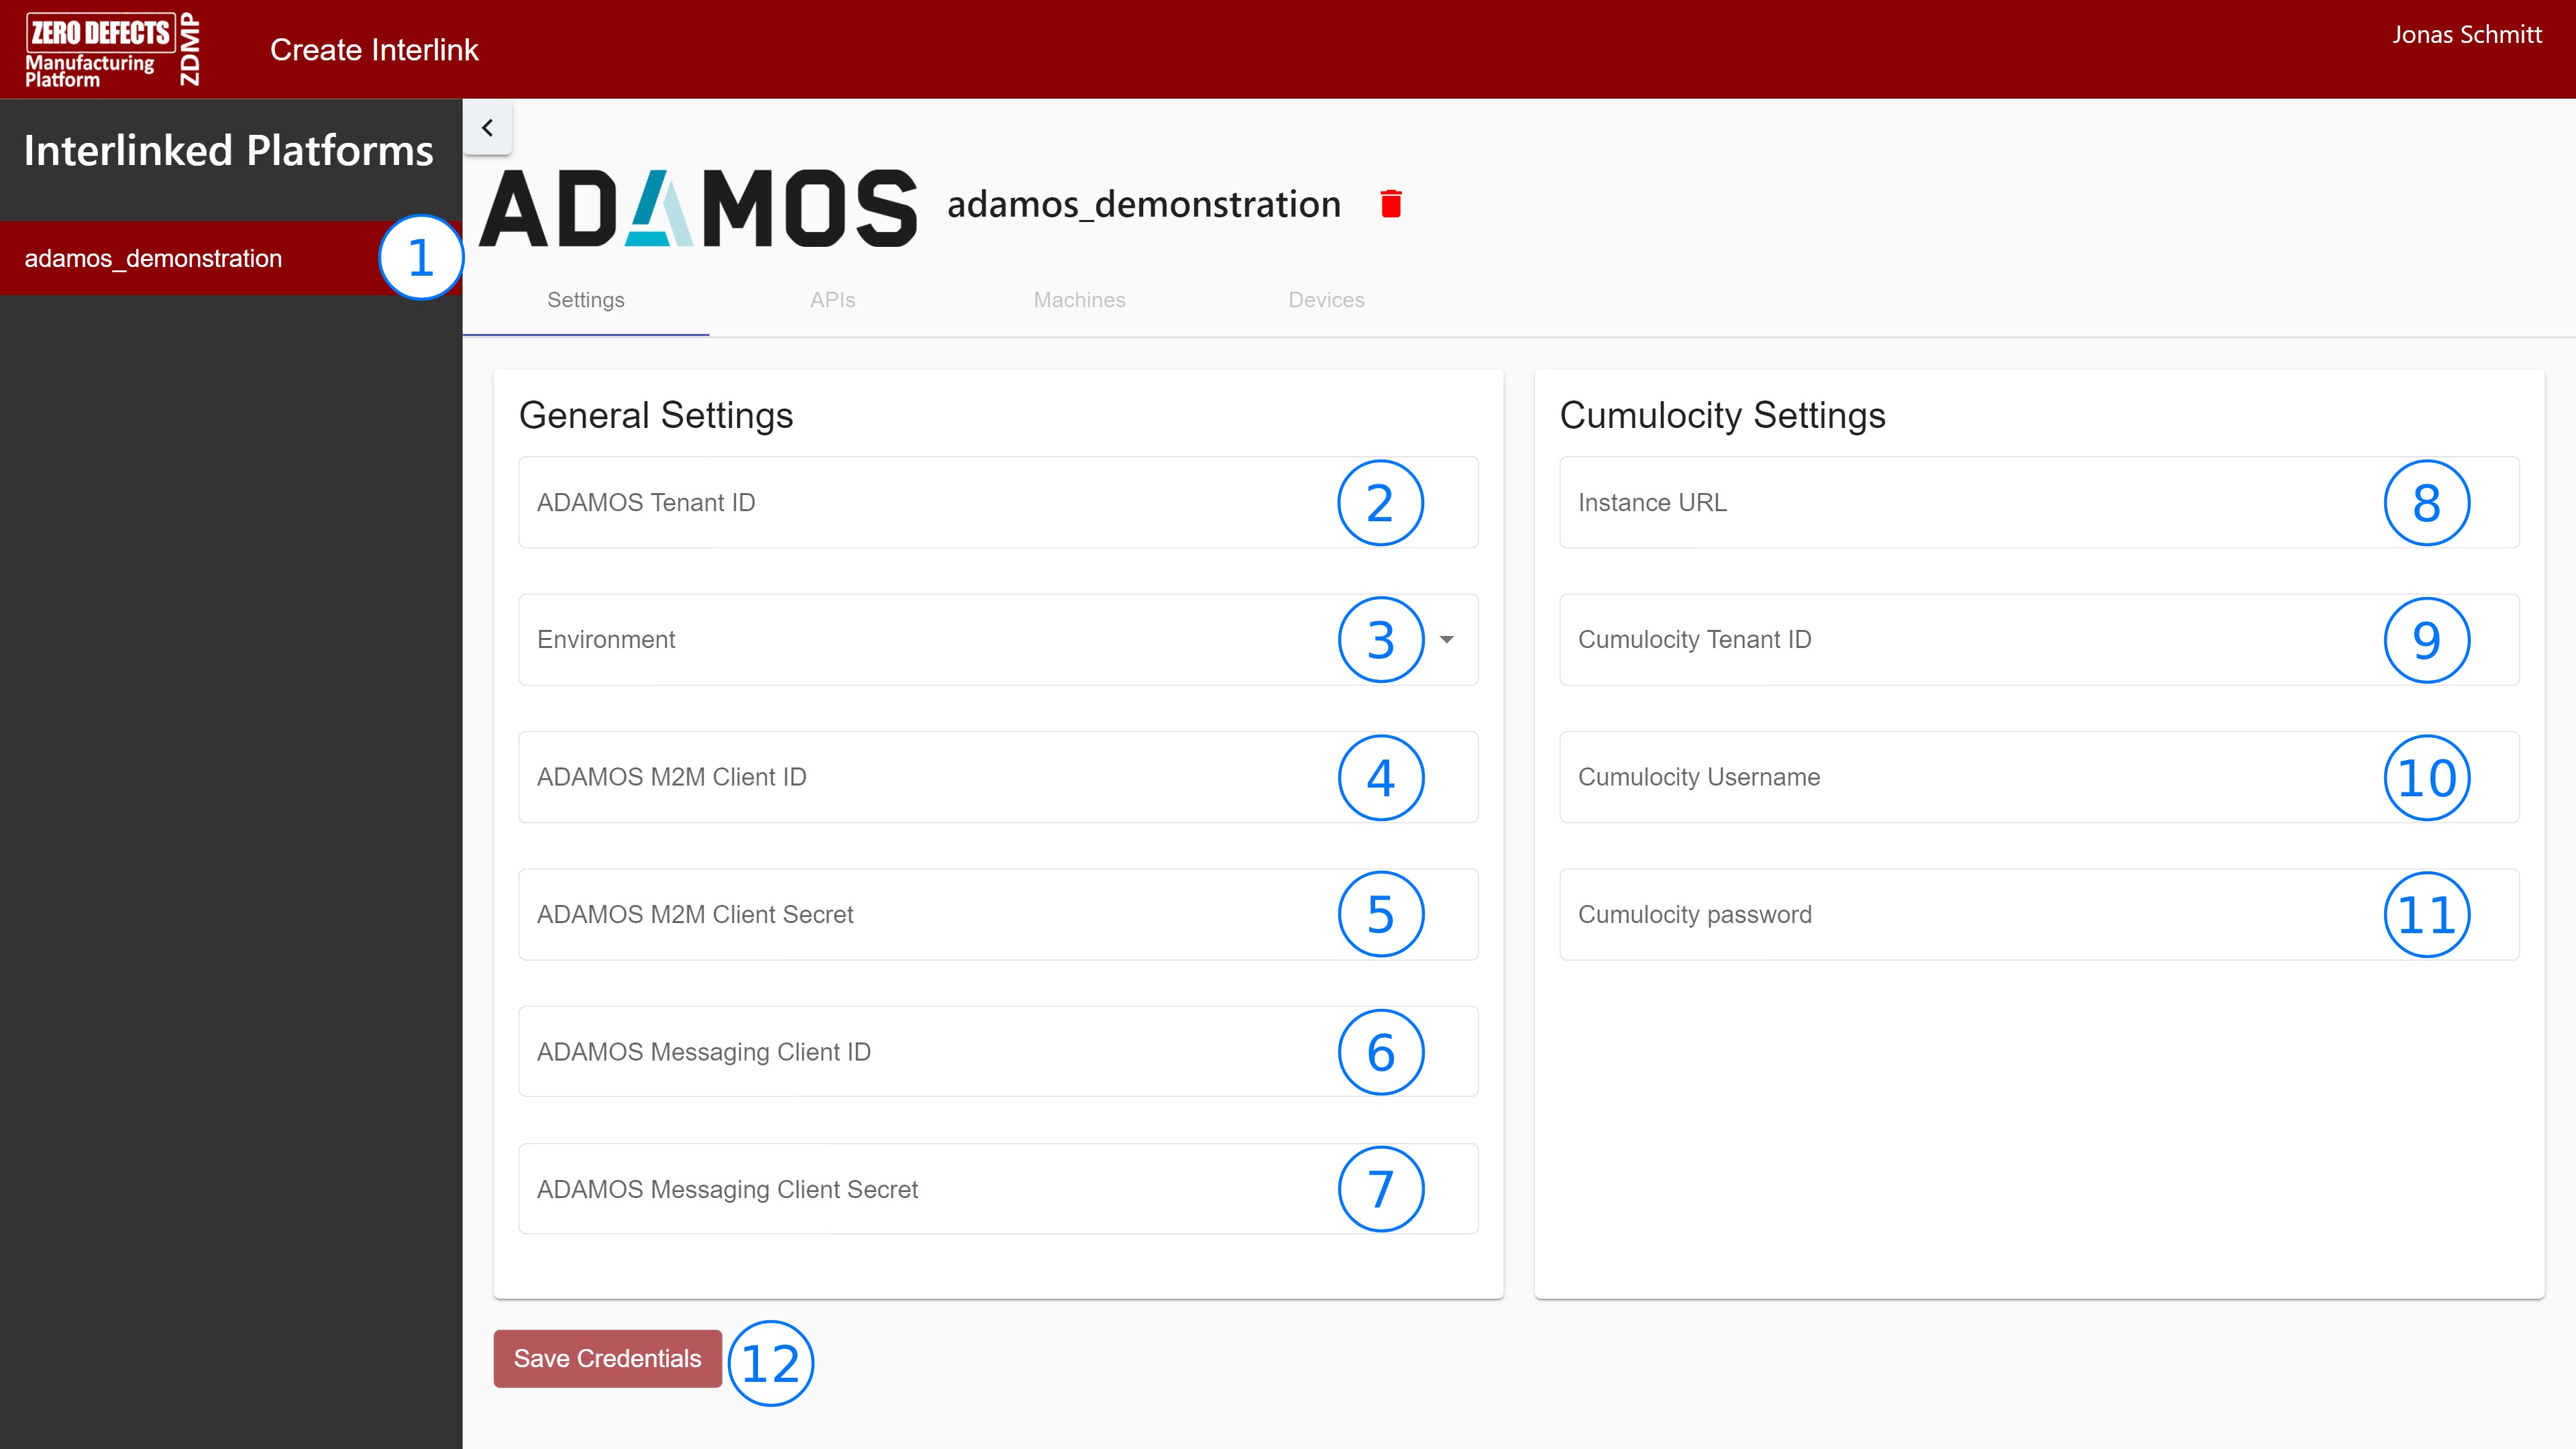
Figure 19: ADAMOS Interlink settings page
Enter the tenant ID of your ADAMOS tenant. This information can be found under “My Organization” in the Control Center of ADAMOS HUB. The field is labelled “Internal tenant ID”
Choose the environment in which your ADAMOS tenant is running
Enter the M2M client ID provided by your ZDMP administrator
Enter the M2M client secret provided by your ZDMP administrator
Enter the messaging client ID provided by your ZDMP administrator
Enter the messaging client secret provided by your ZDMP administrator
Enter the URL of your Cumulocity instance provided by ADAMOS. eg “https://mytenant.adamos-dev.com”
Enter the tenant ID of your Cumulocity instance. This information can be found by logging into your Cumulocity instance and then clicking on the user icon in the upper-right corner
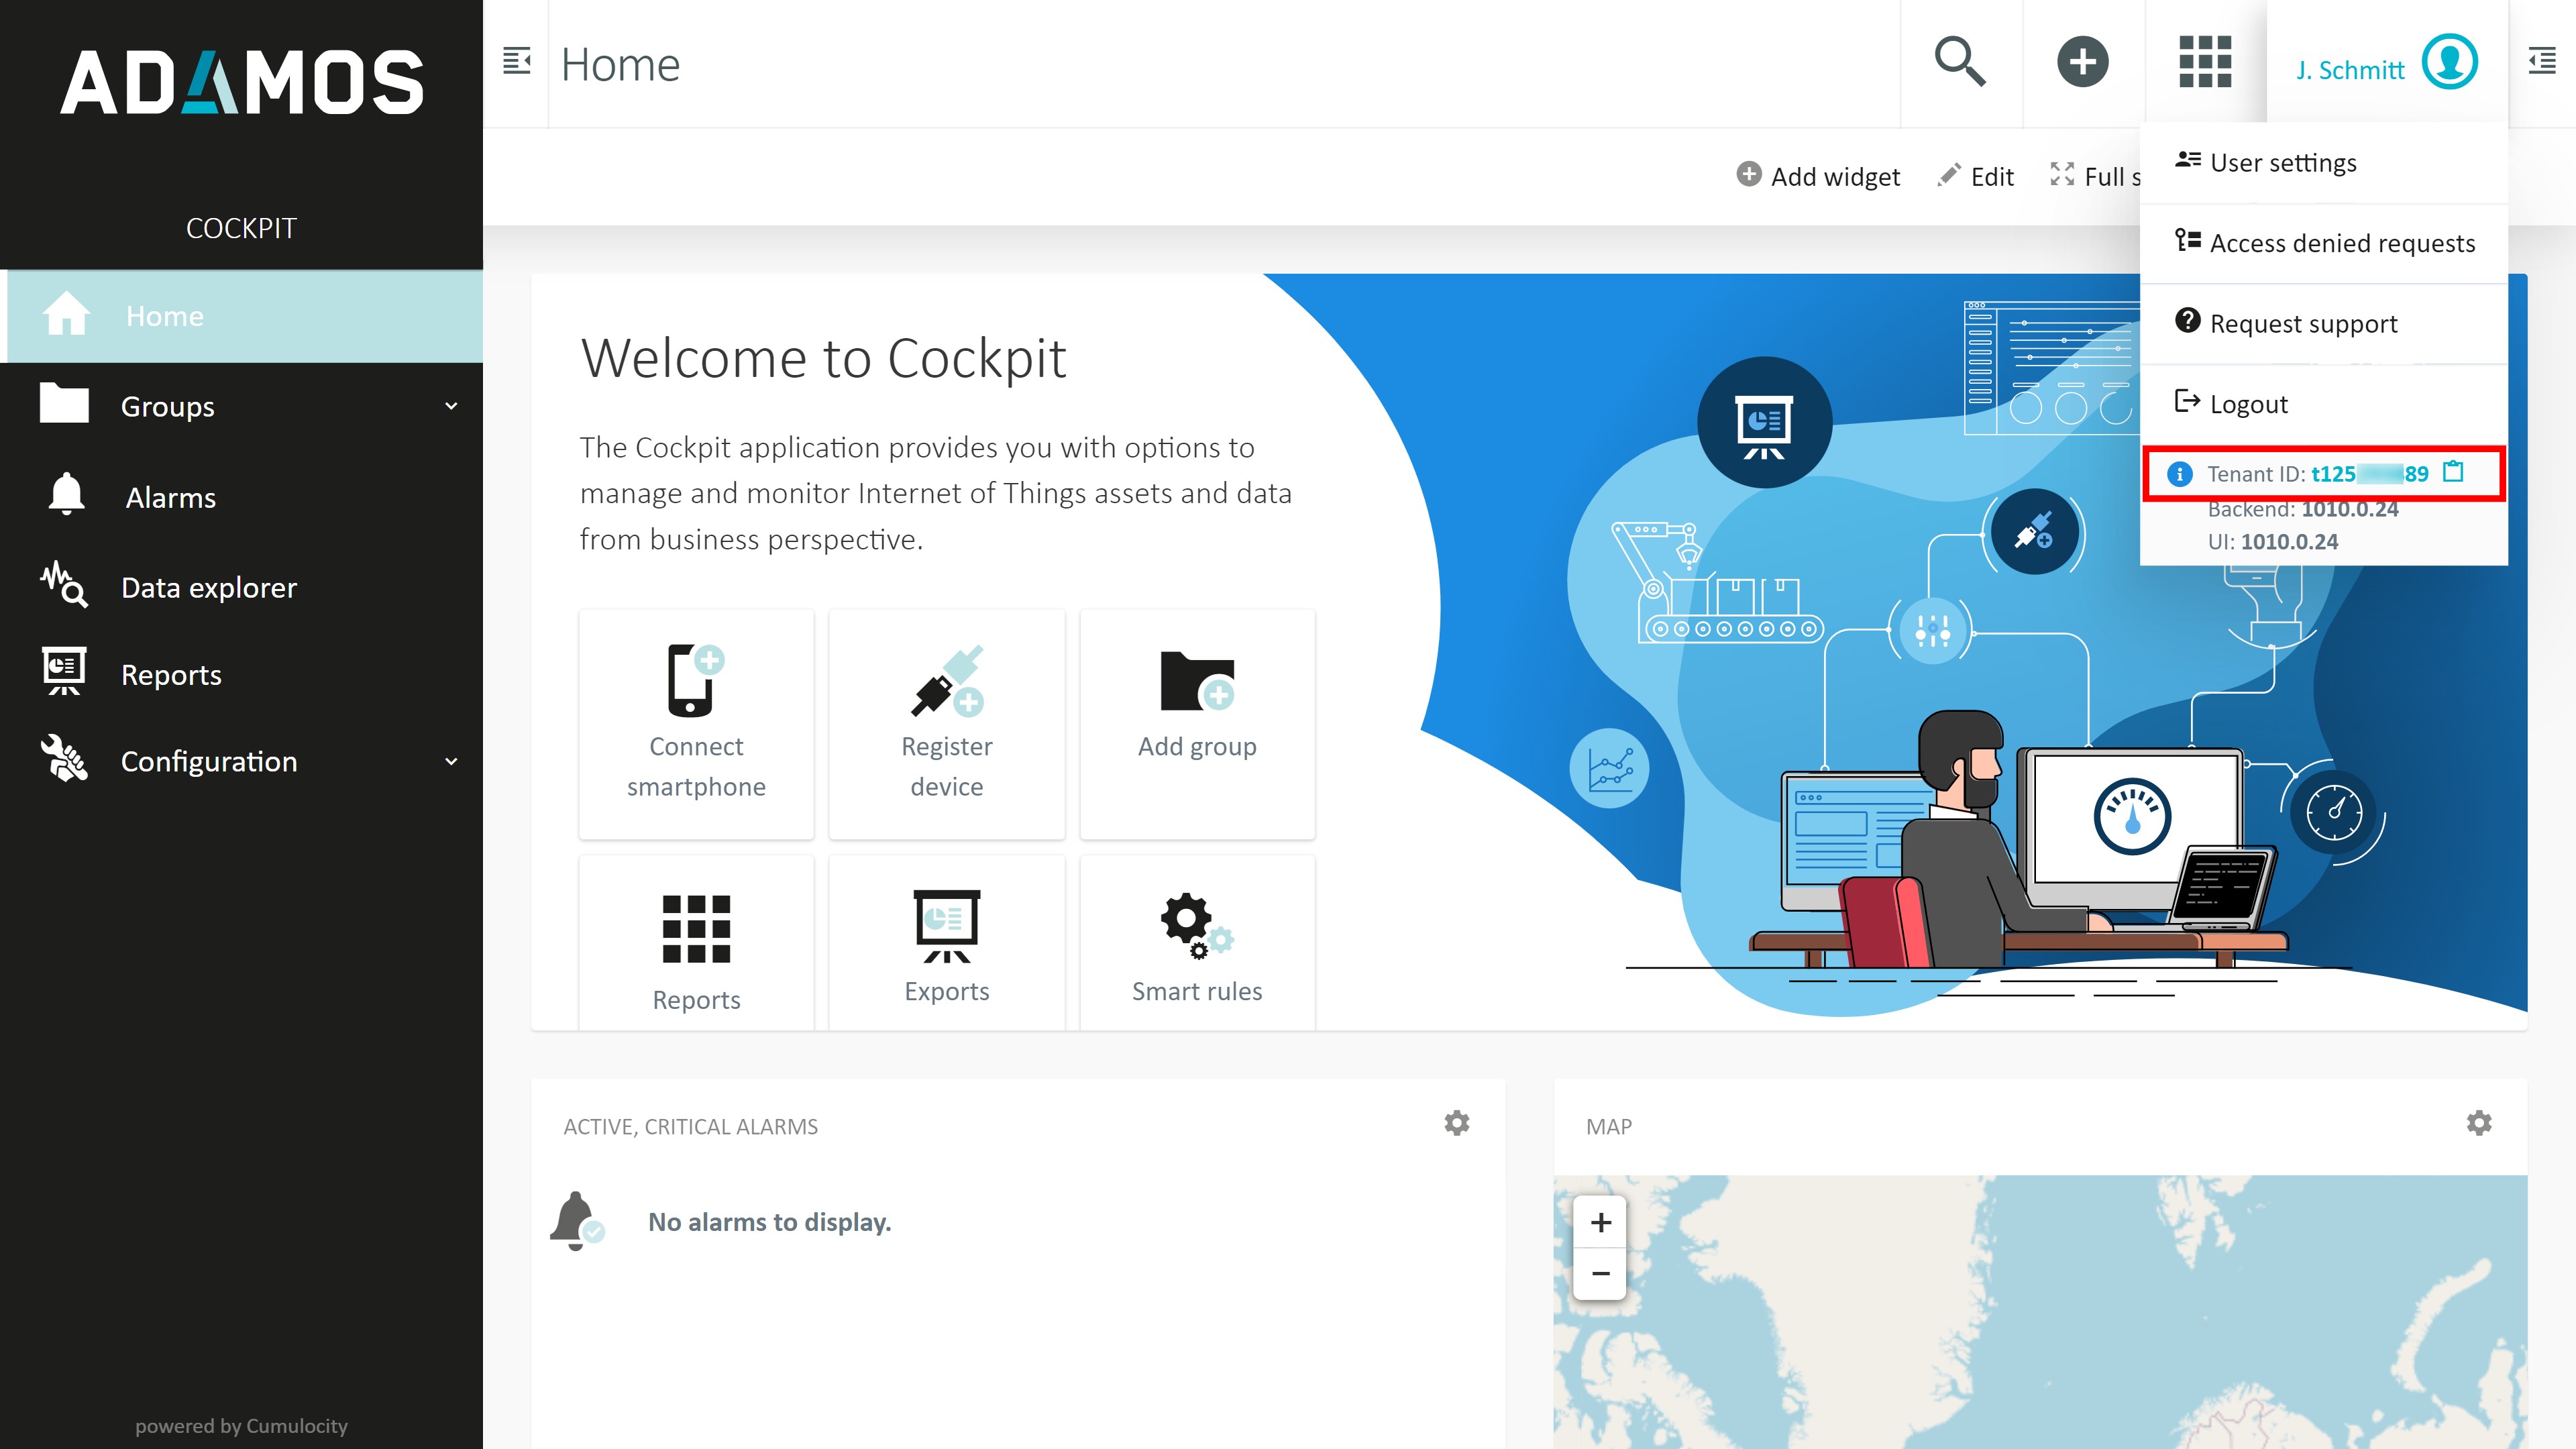
Figure 20: ADAMOS Cumulocity Tenant ID location
Enter the username for your Cumulocity instance
Enter the corresponding password for your Cumulocity instance
Click on “Save credentials” to complete the setup
Step 4: Activate API-interlinking
To use the REST-APIs provided by ADAMOS, it is required to activate them in the “APIs” tab of the interlink properties page. Click on the switch next to the API name to activate the corresponding API. Once the status indicator turns green, the API is ready to use through the T6.4 Services API Management component.
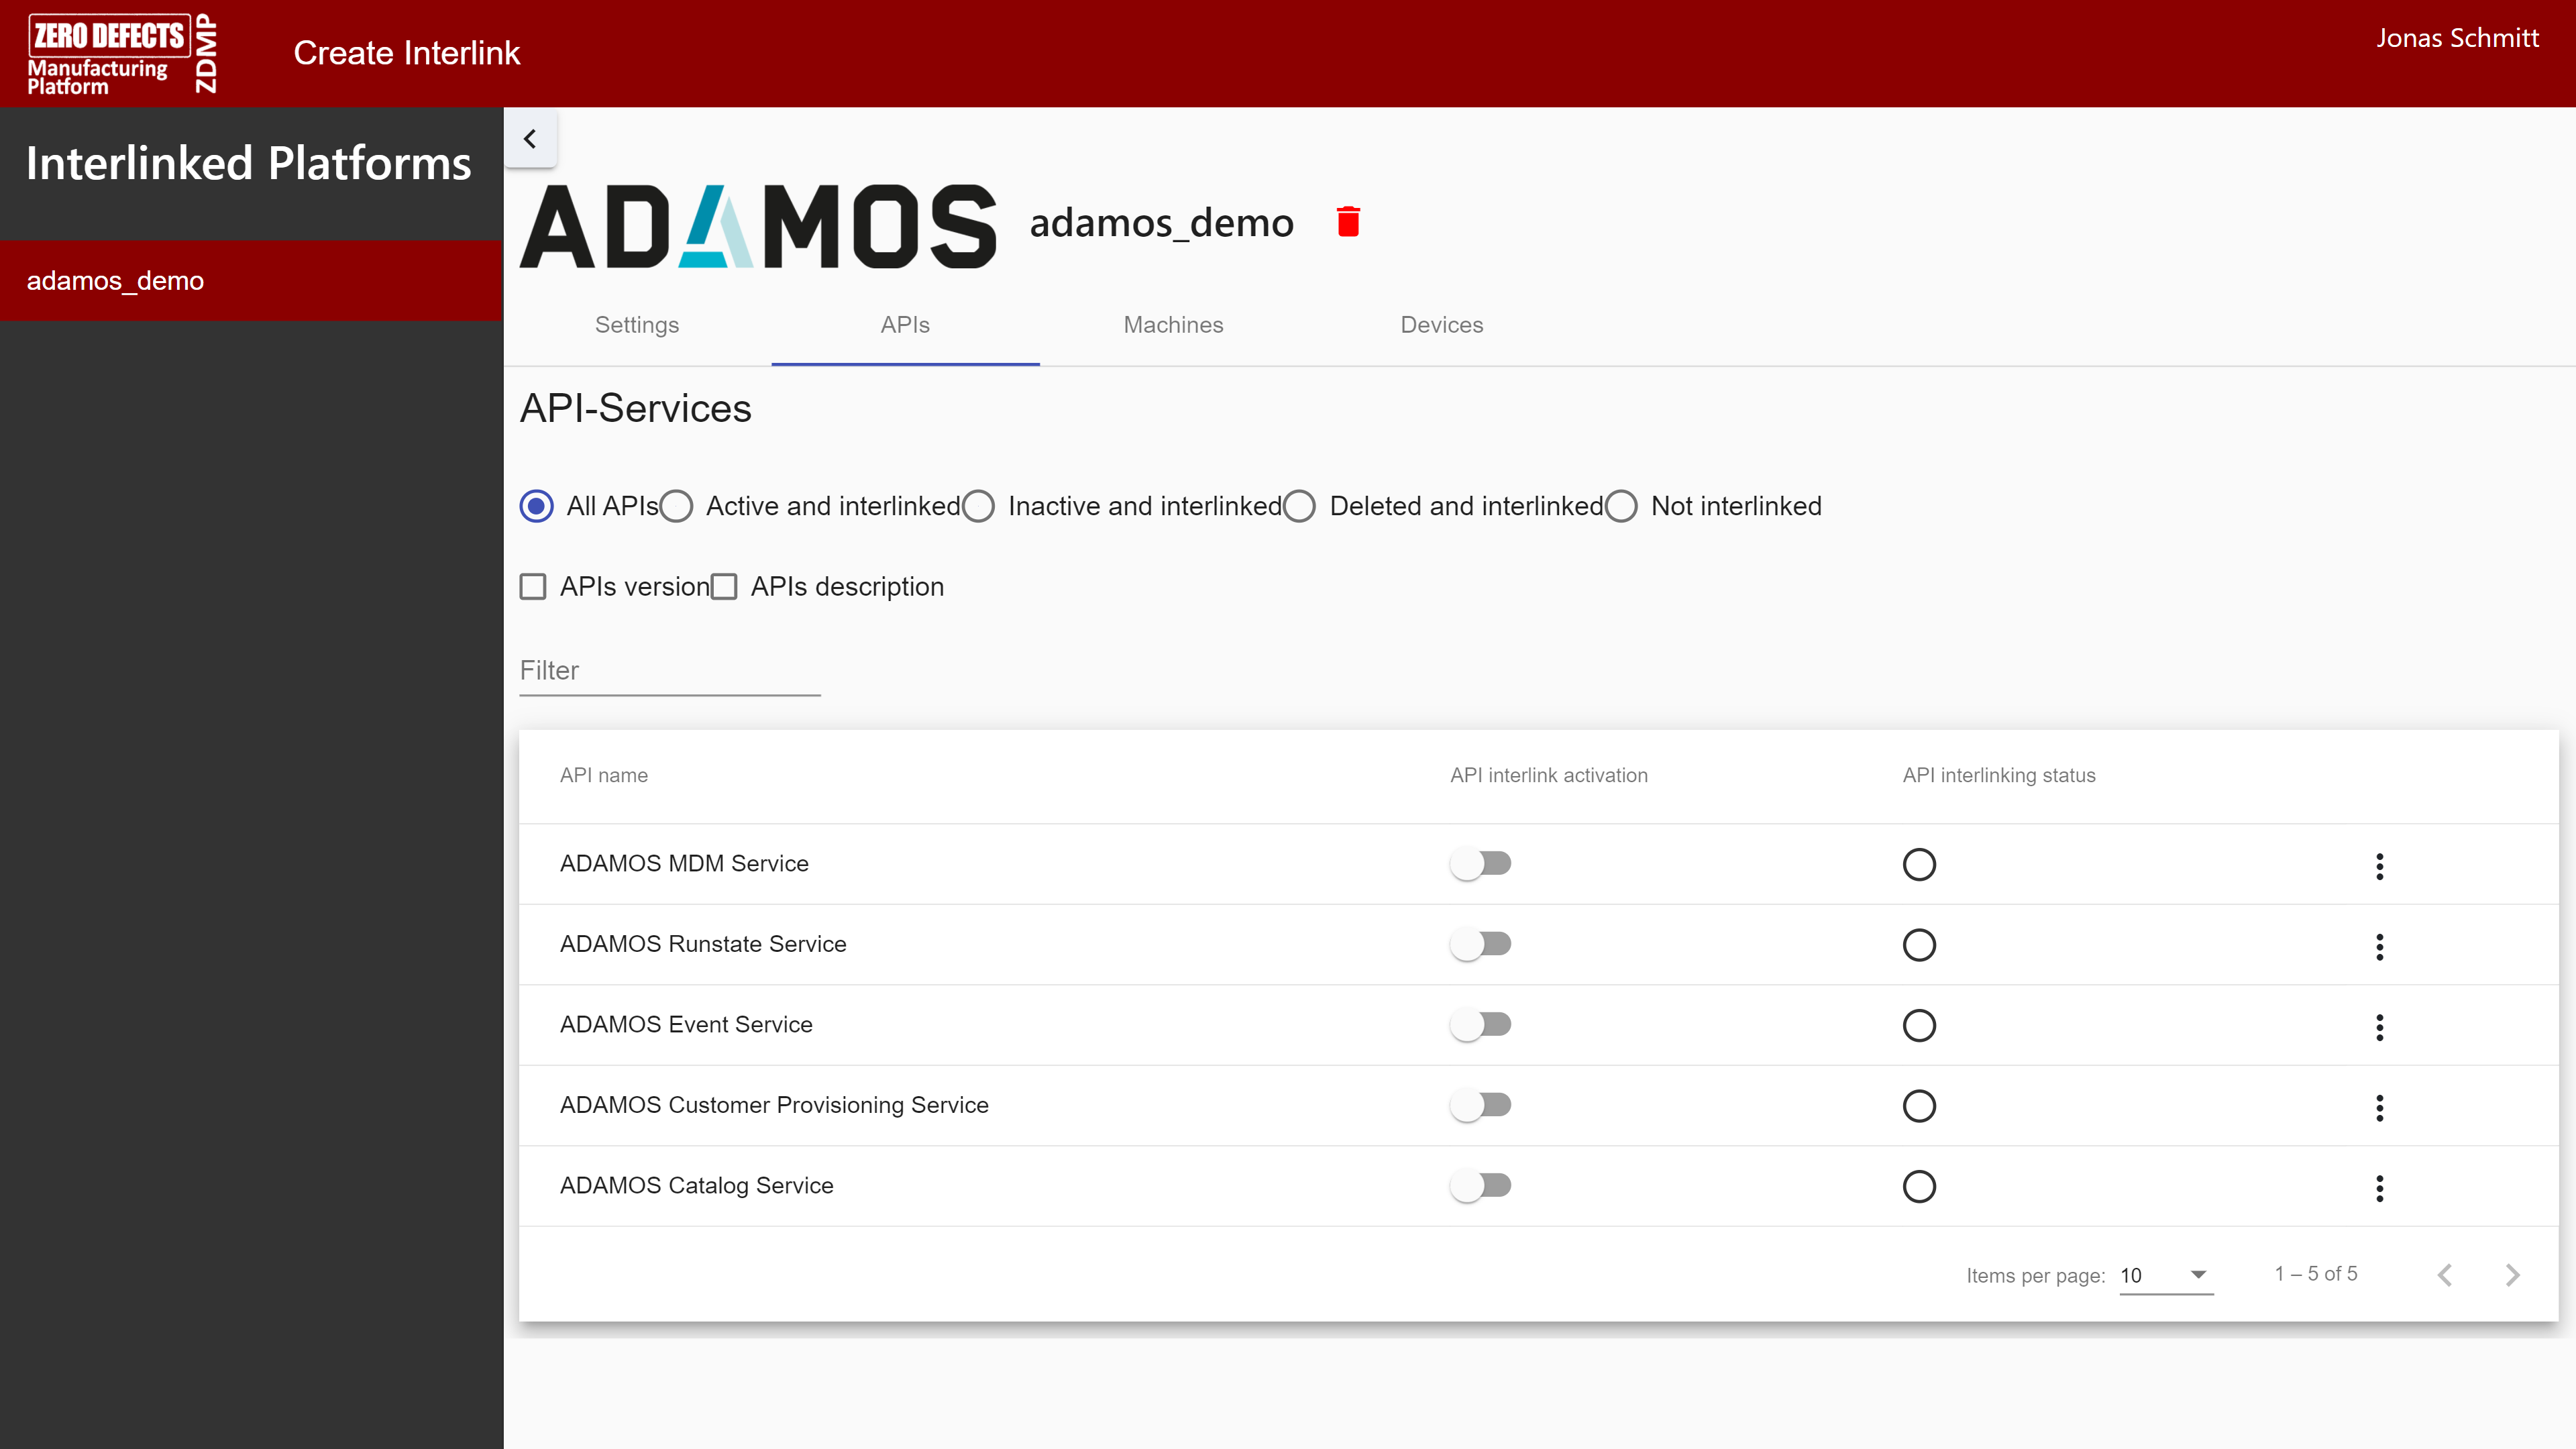
Figure 21: ADAMOS Interlink - API interlinking screen
Step 5: Activate Machine-interlinking
To receive status updates of machines configured in the ADAMOS Machine Book, go to the tab “Machines” of your ADAMOS interlink and click on the switch next to a specific machine. Once the status indicator turns green, status update from this machine will be forwarded to the ZDMP message bus to the topic, which can be copied via the three-dot-menu.
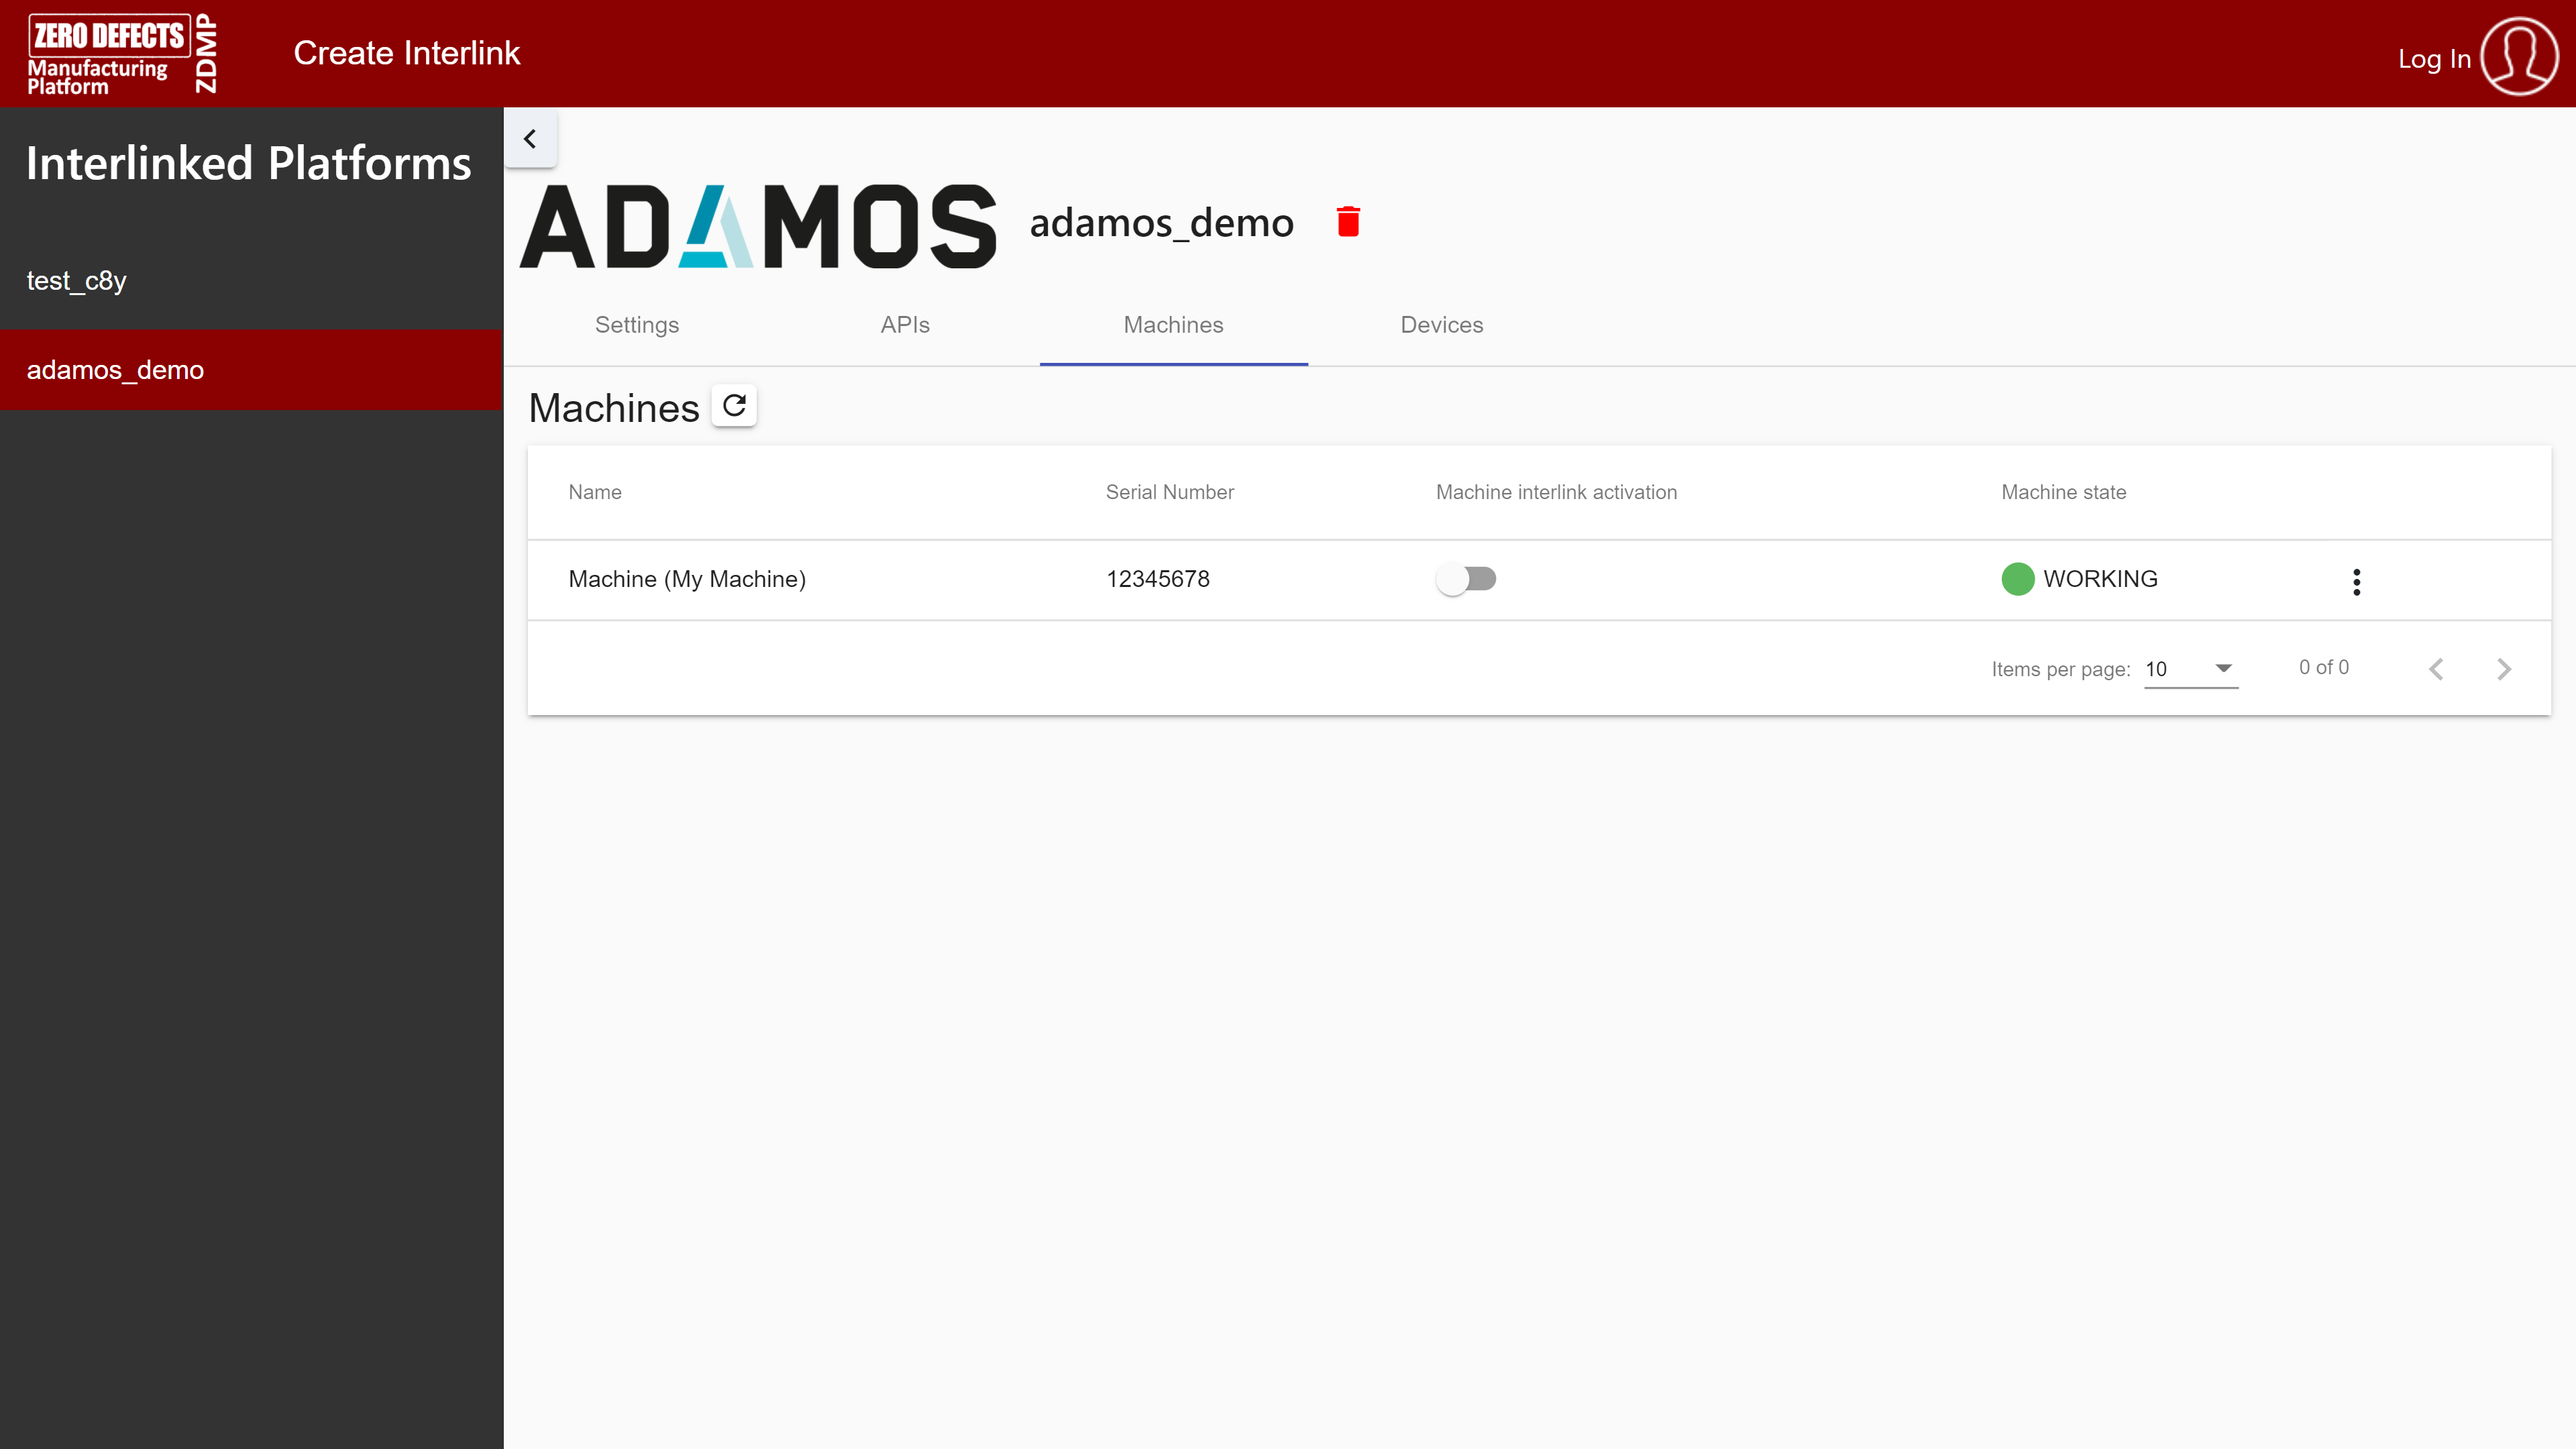
Figure 22: ADAMOS Interlink – Machines overview
Step 6: Activate device interlinking
The interlinking platform supports forwarding telemetry and event messages from ADAMOS to the ZDMP message broker. To use this functionality, switch to the “Devices” tab. Each device has three switches which allow to activate the forwarding of events, alarms and/or measurements. The topic where the messages can be found on the ZDMP message bus can be found by hovering above the activation switch once it is activated.
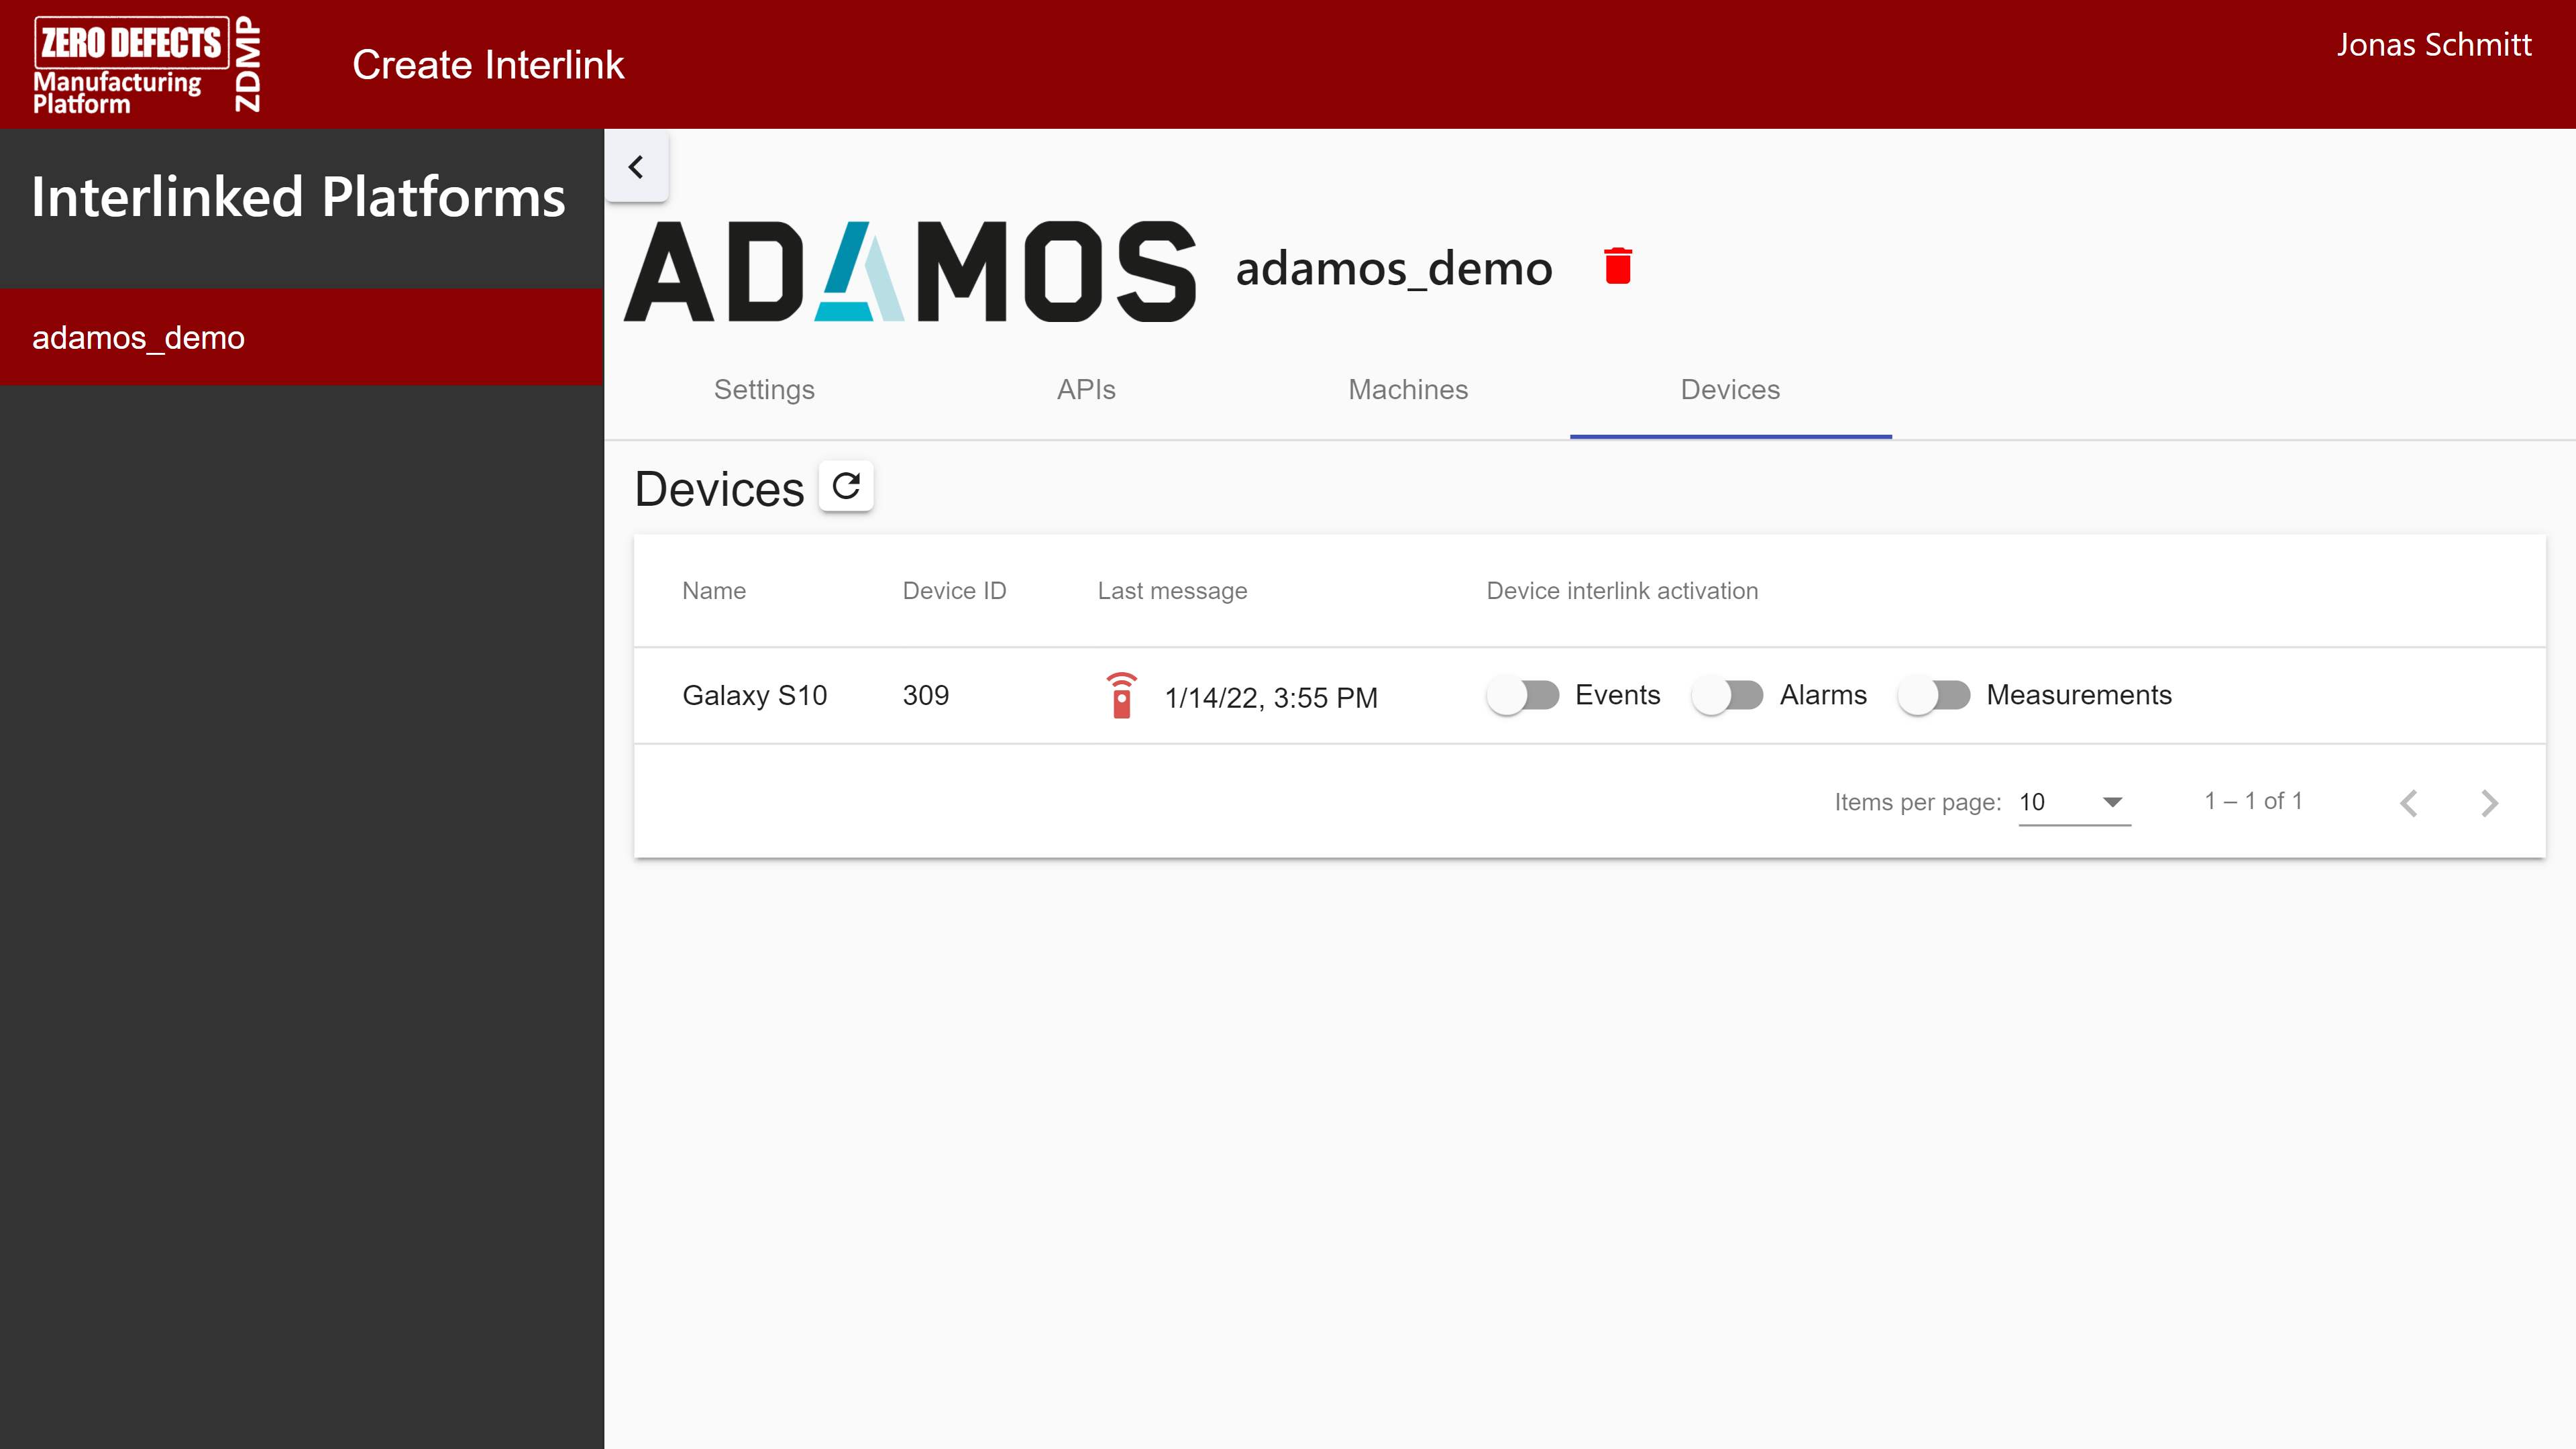
Figure 23: ADAMOS Interlink – Device overview
Interlinking with Cumulocity
The Cumulocity interlinking plugin allows to connect ZDMP with one or more Cumulocity instances. It provides access to measurements and events from devices connected to the Cumulocity instance via the ZDMP message bus.
Step 1: Create the interlink
To create the interlink, visit the “Create Interlink” tab and select “Cumulocity IoT”
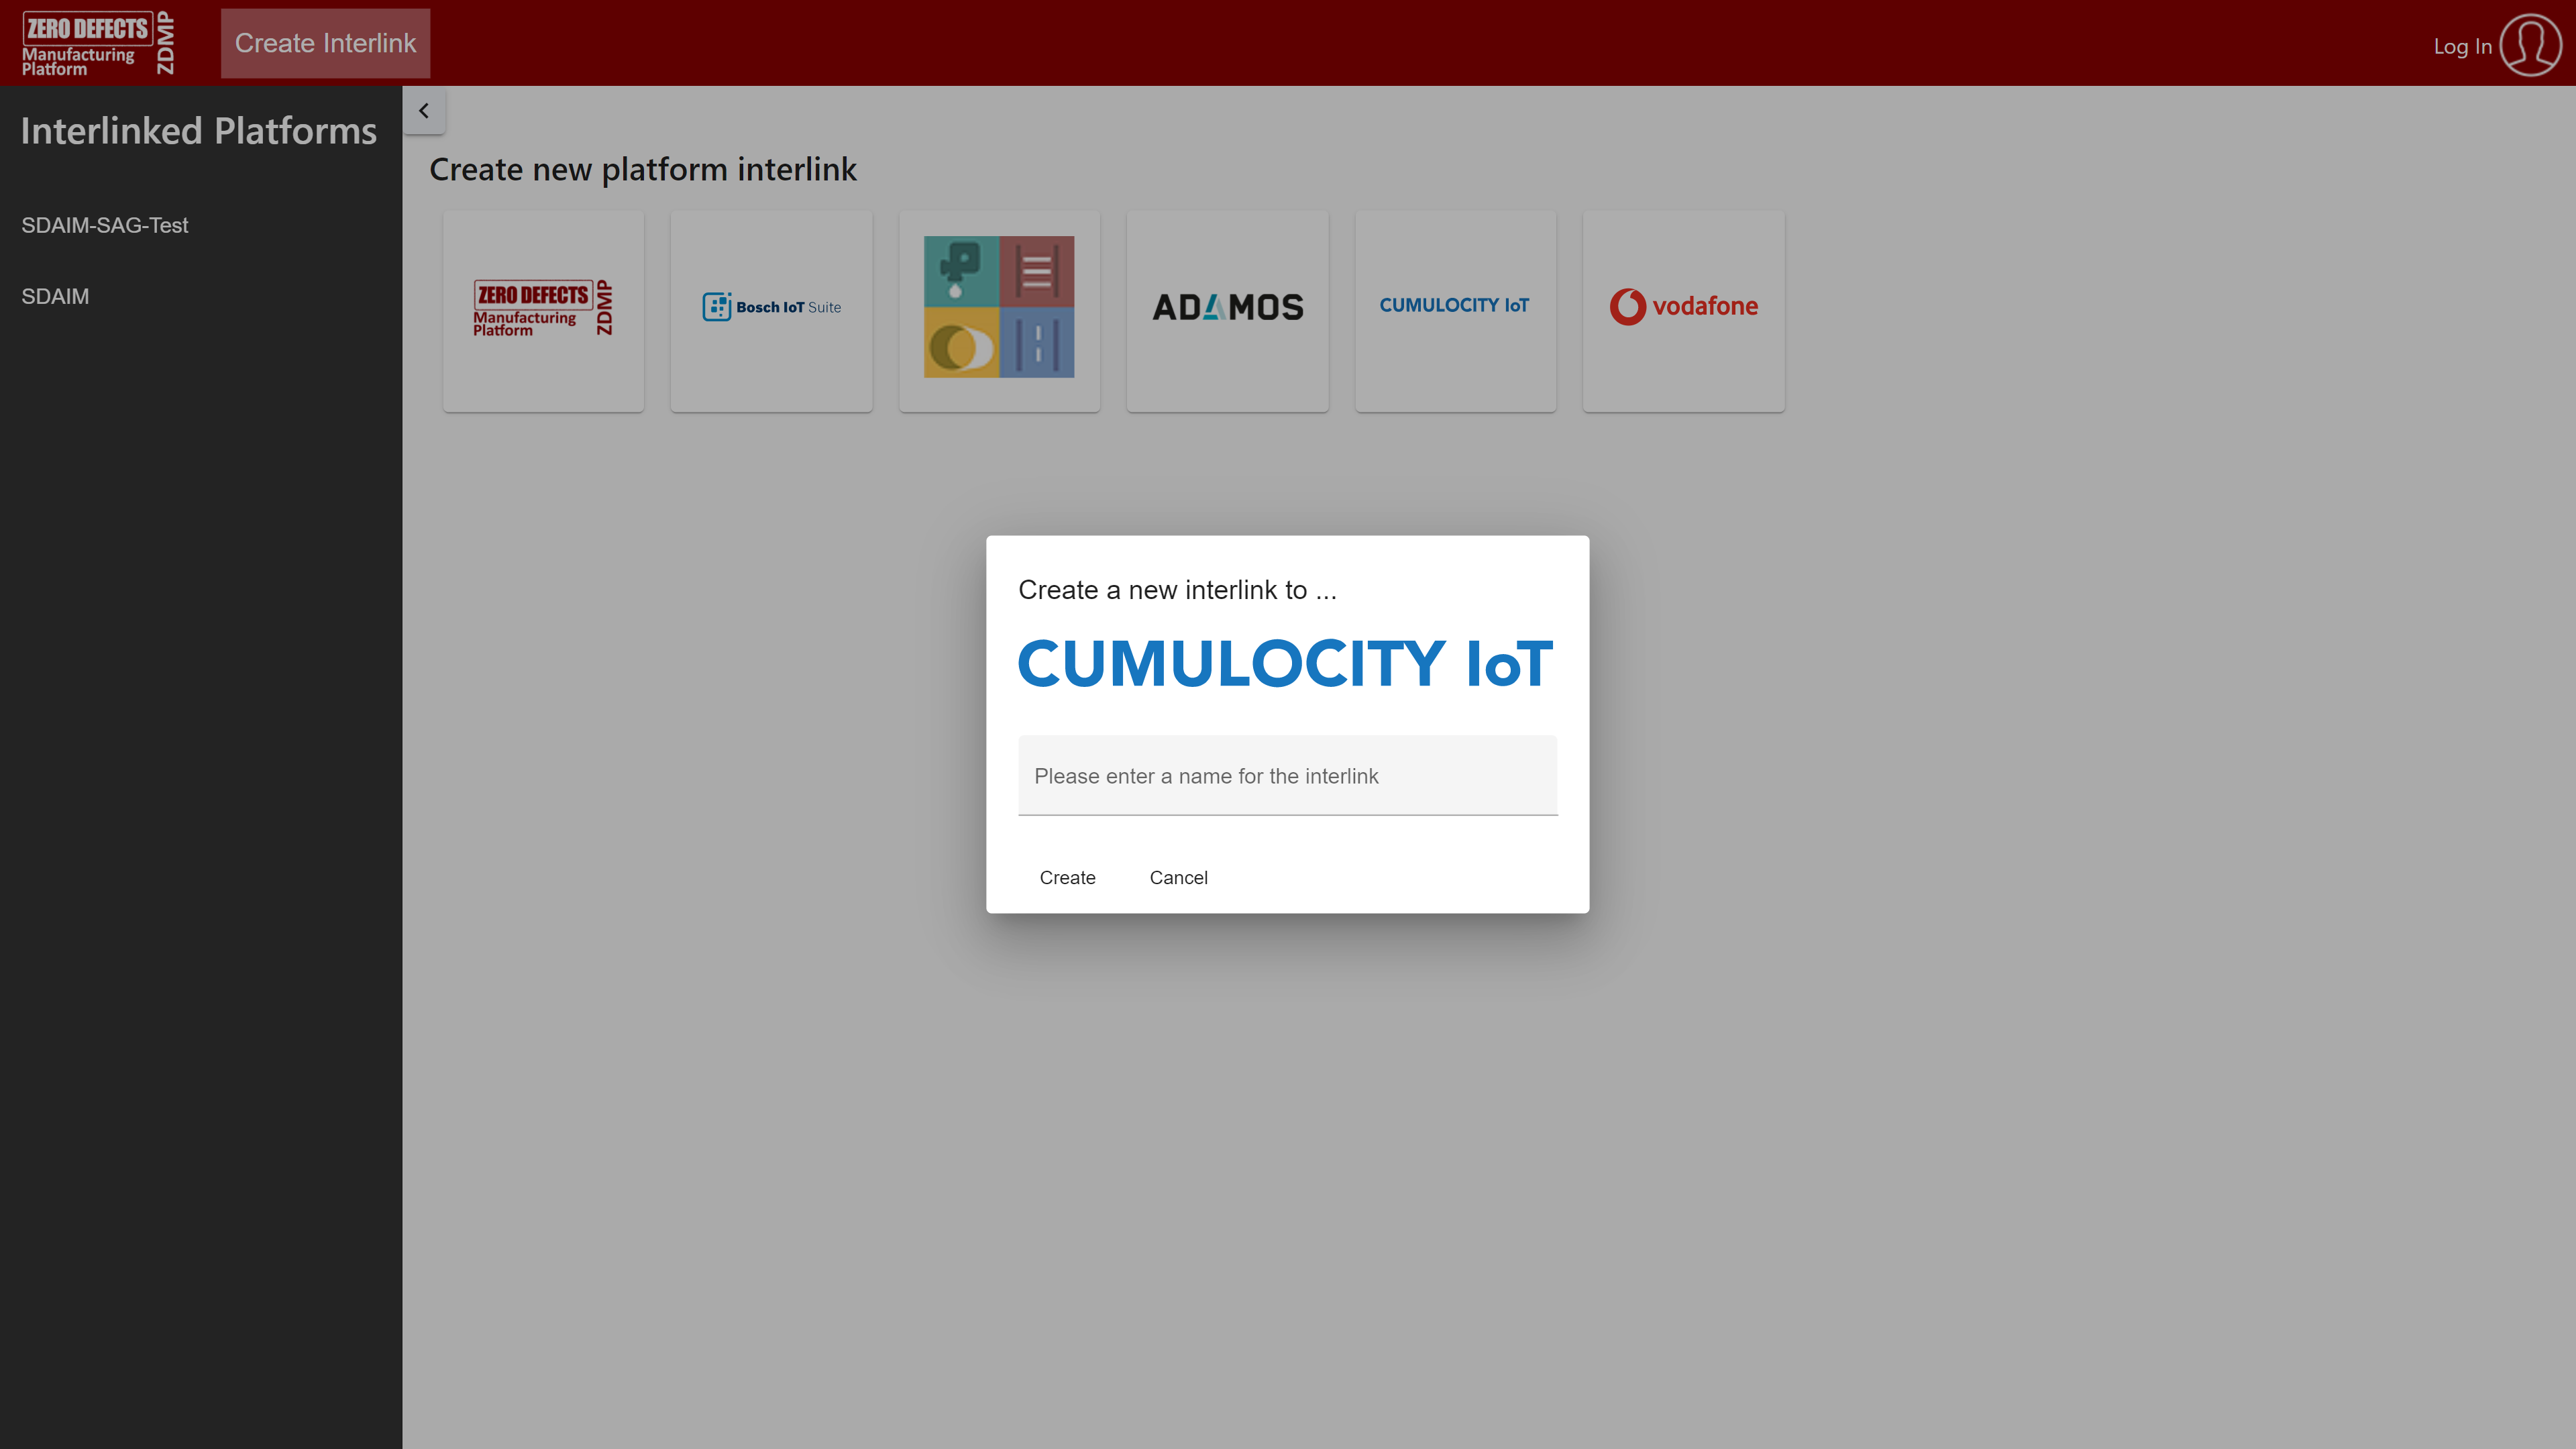
Figure 24: Cumulocity Interlink creation dialogue
- Enter a name for the interlink and click on “Create”
Step 2: Configure the interlink
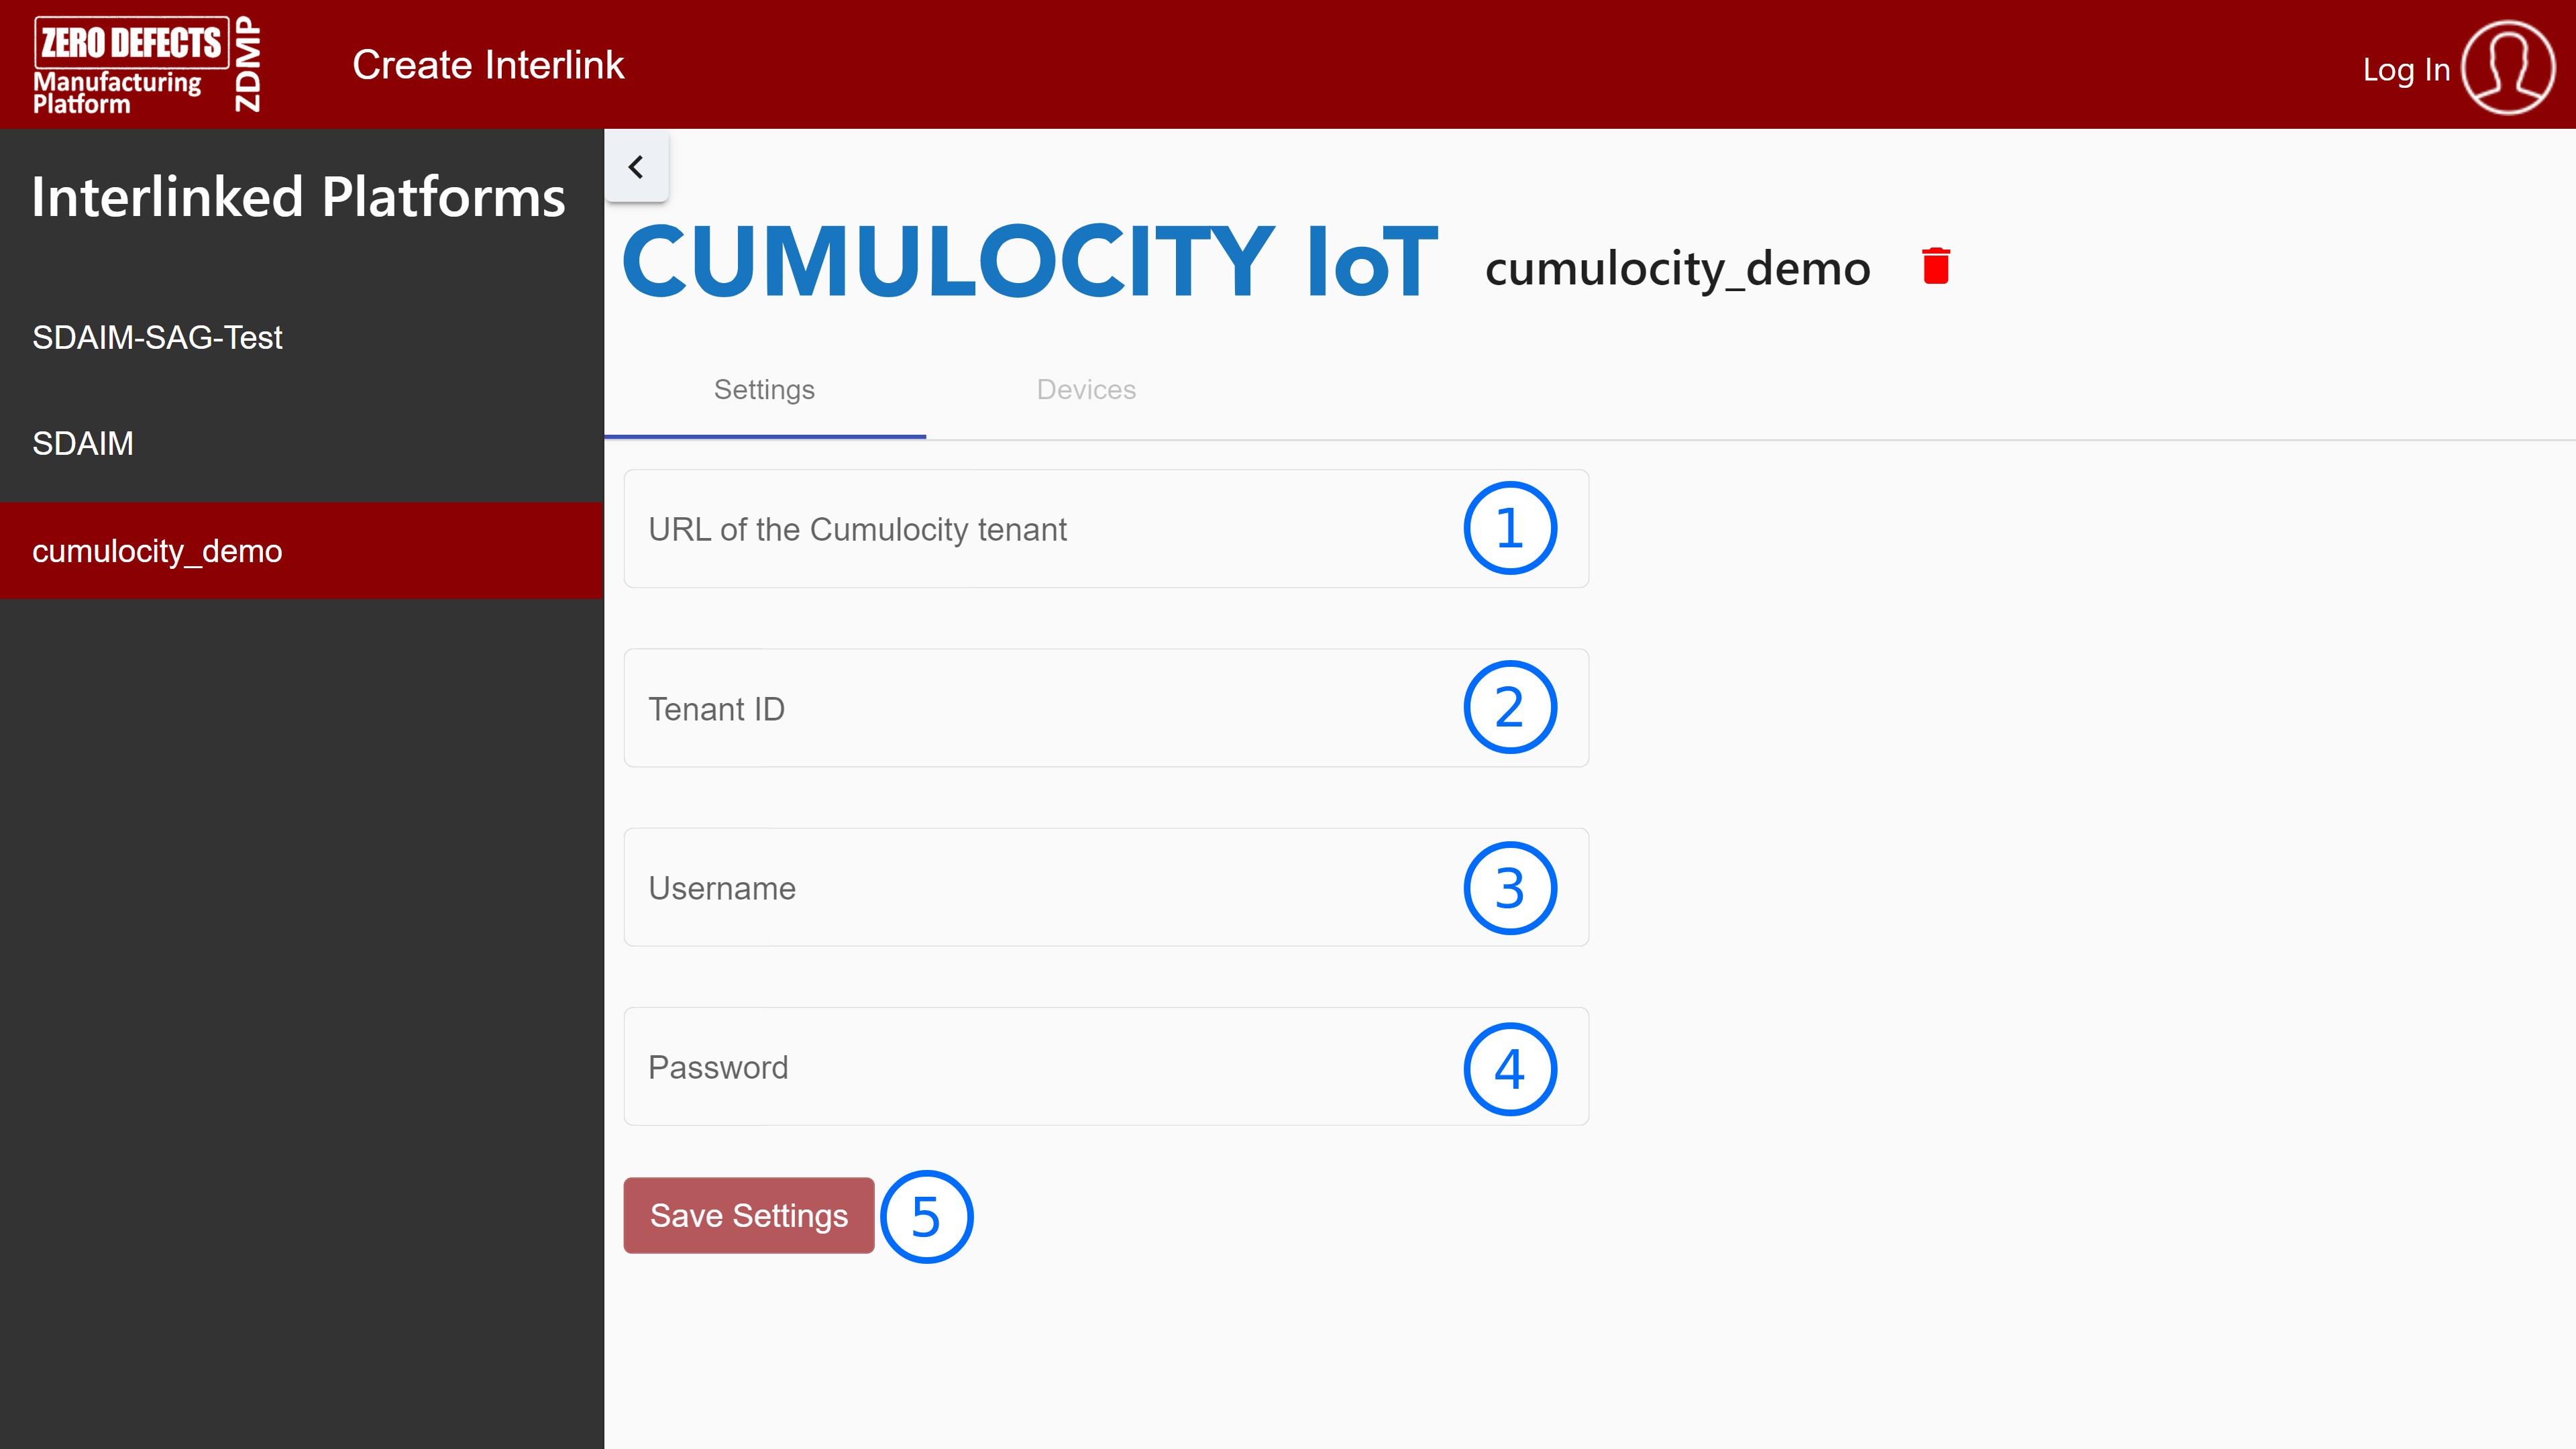
Figure 25: Cumulocity Interlink settings page
Enter the URL of your Cumulocity instance. eg https://mytenant.eu-latest.cumulocity.com
Enter the tenant ID. This information can be found by logging into your Cumulocity instance and then clicking on the user icon in the upper-right corner
Figure 26: Cumulocity Tenant ID location
Enter the username for the Cumulocity instance
Enter the corresponding password
Click “Save Settings” to complete the setup
Step 3: Activate device interlinking
The interlinking platform supports forwarding telemetry and event messages from Cumulocity to the ZDMP message broker. To use this functionality, switch to the “Devices” tab. Each device has three switches which allow to activate the forwarding of events, alarms and/or measurements. The topic where the messages can be found on the ZDMP message bus can be found by hovering above the activation switch once it is activated.
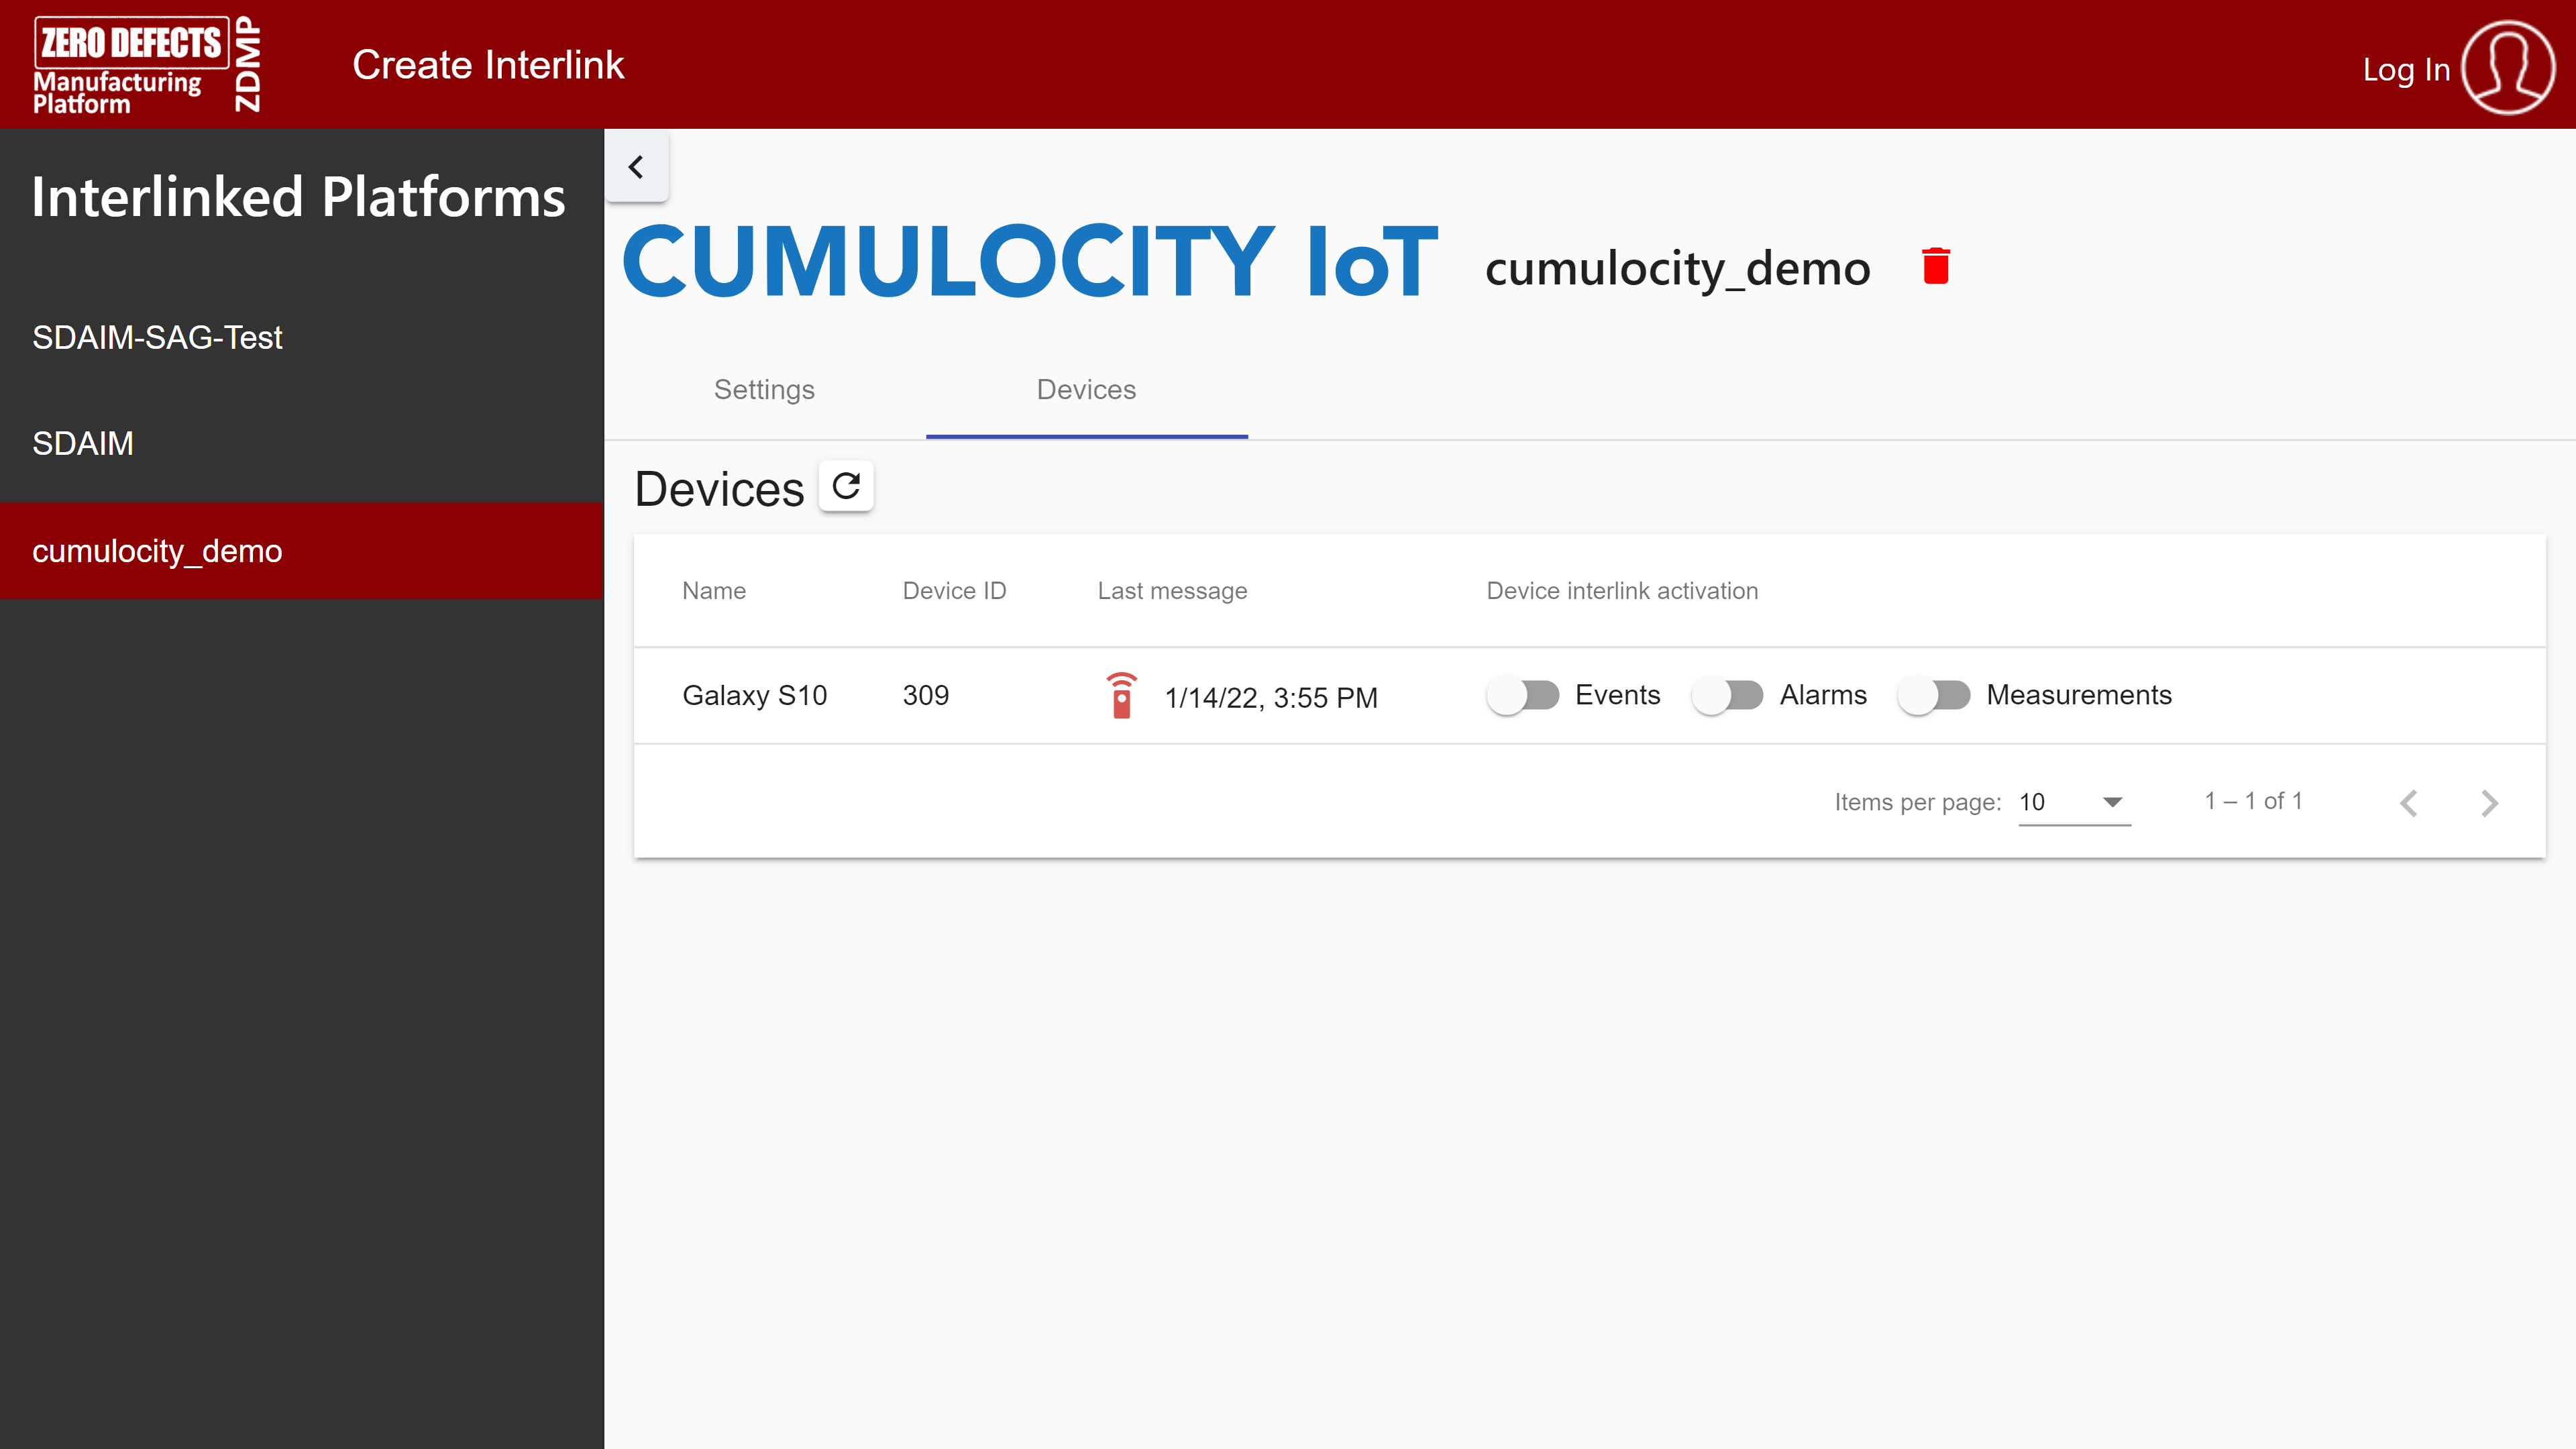
Figure 27: Cumulocity Interlink – Device overview
Interlinking with Servitly
The Cumulocity interlinking plugin allows to connect ZDMP with one or more Servitly tenants. It provides access to measurements and events from devices, connected to Servitly, via the ZDMP message bus.
Step 1: Create the interlink
To create the interlink, visit the “Create Interlink” tab and select the Servitly logo
Enter a name for the interlink and click “Create”
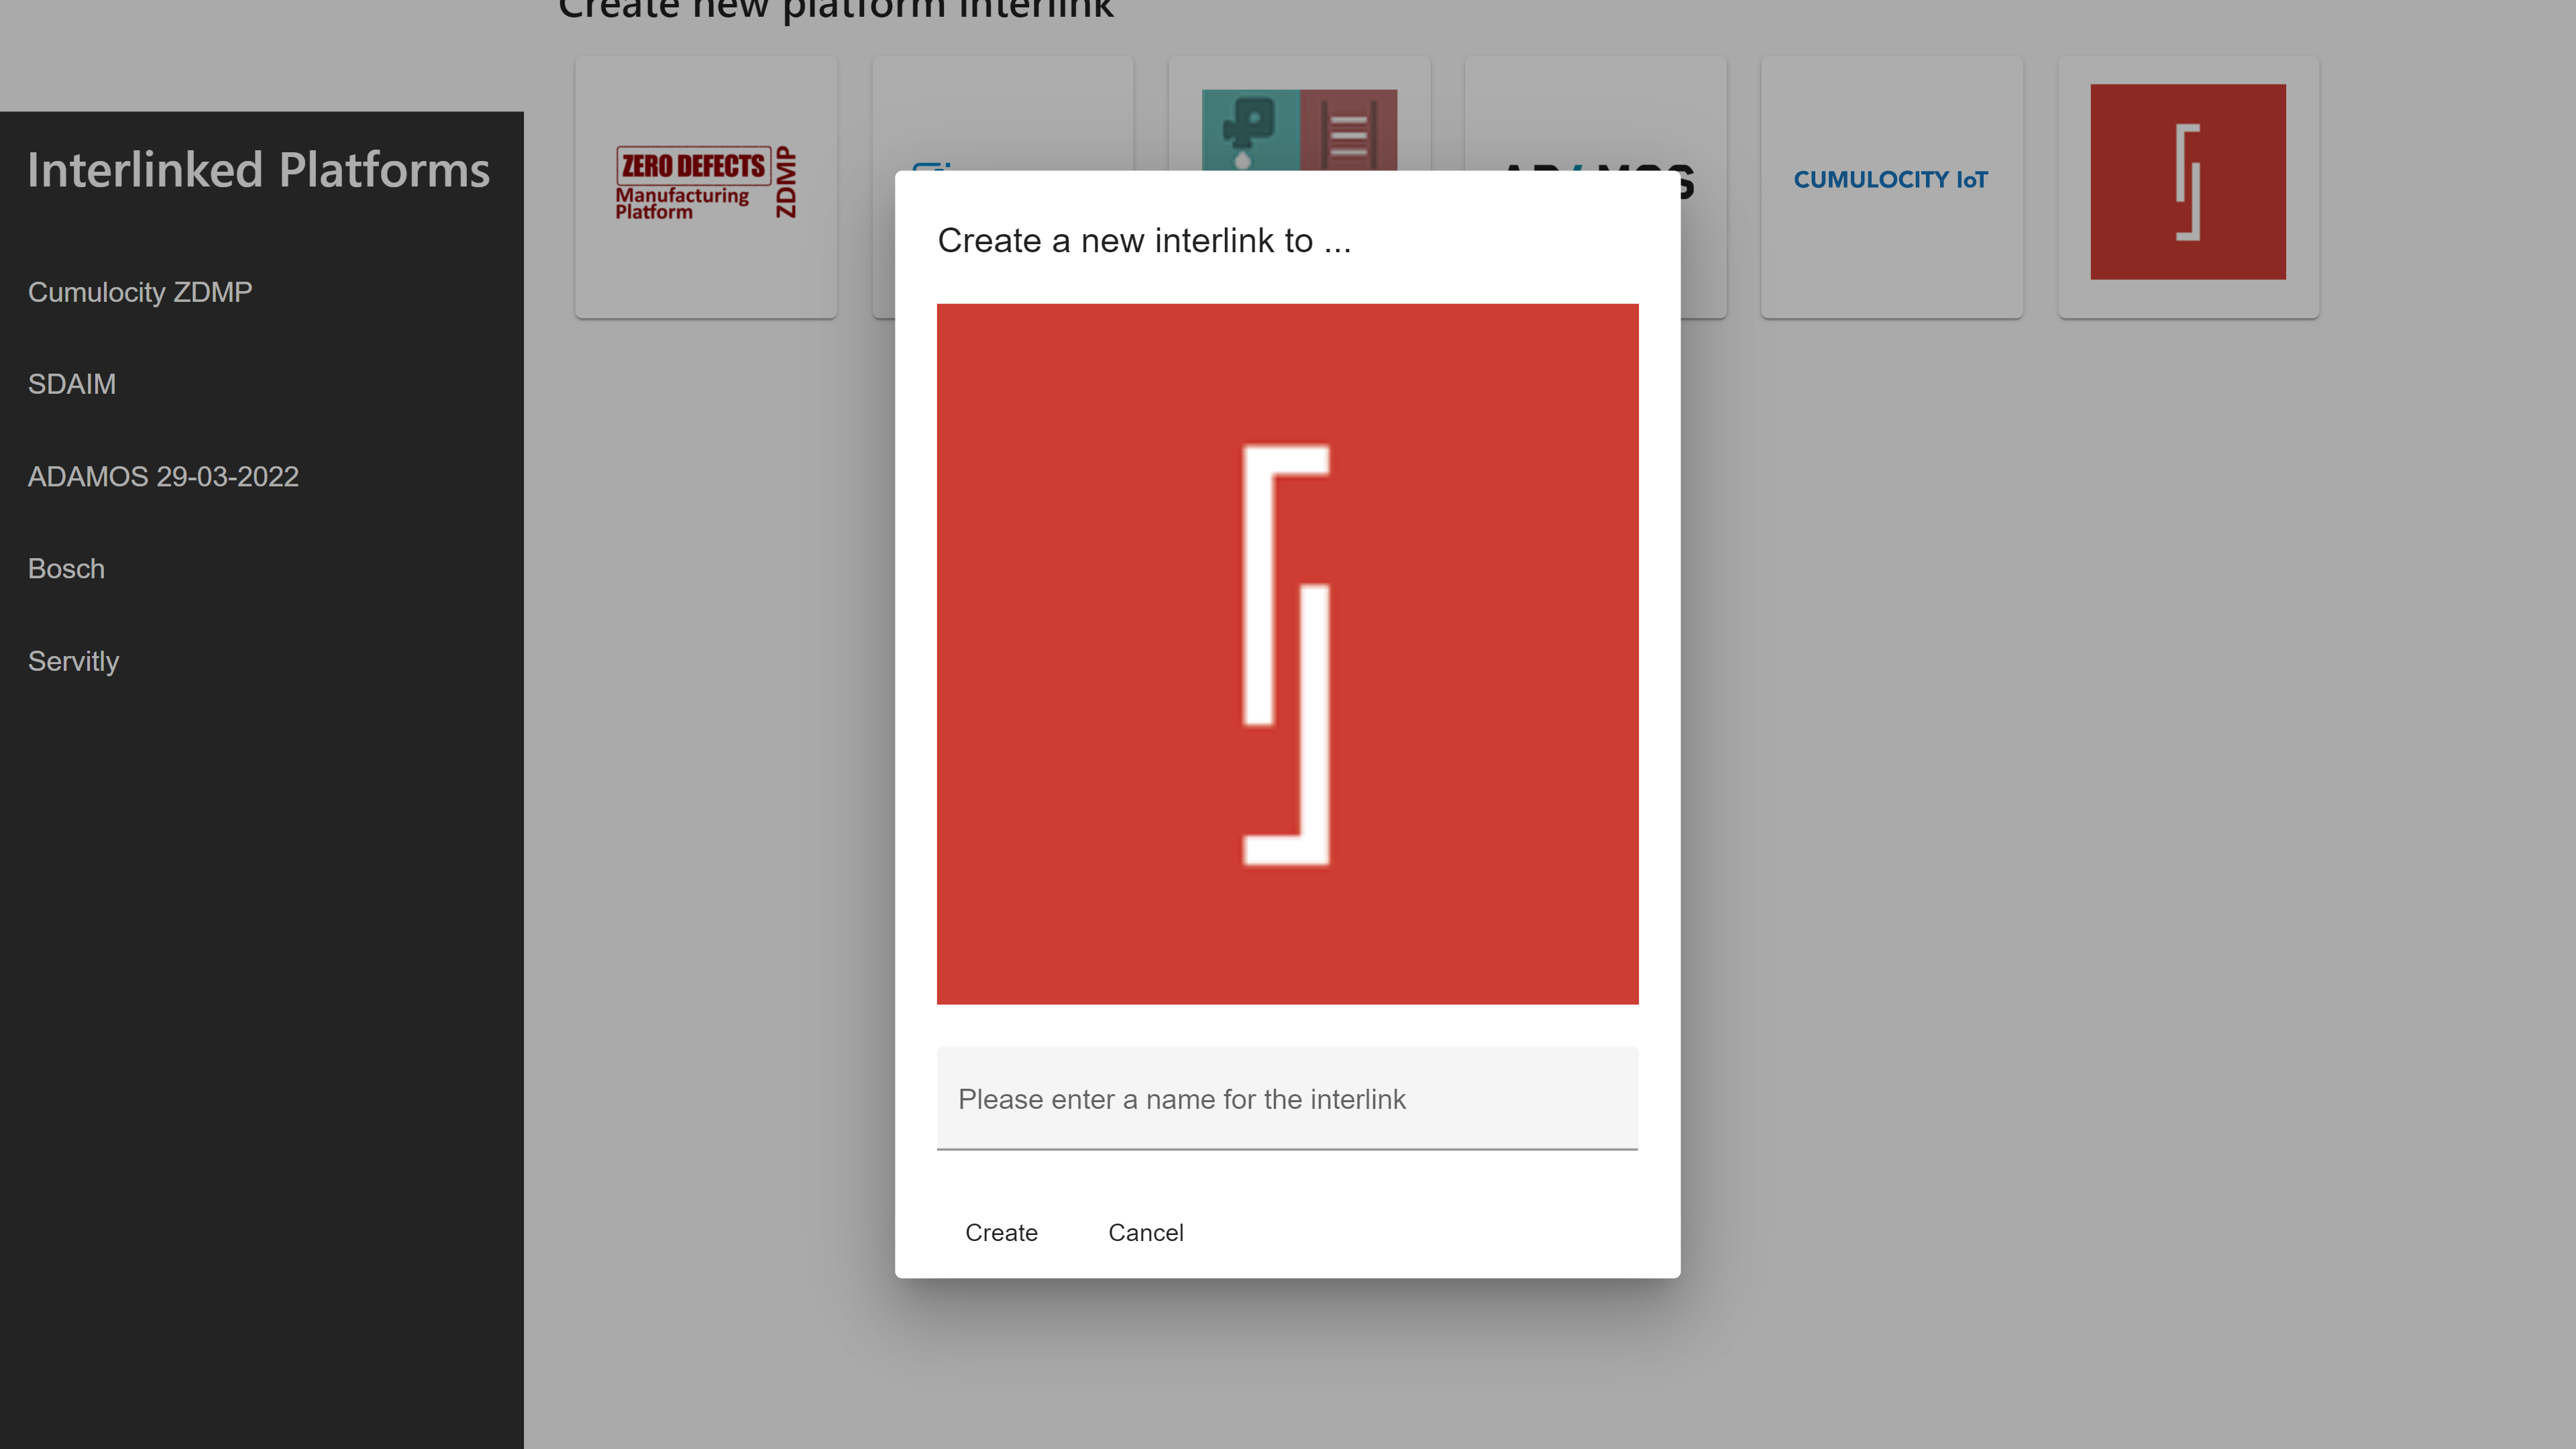
Figure 28: Servitly interlink creation dialogue
Step 2: Configure the interlink

Figure 29: Servitly Interlink settings page
- Choose the region of your Servitly instance
Enter the tenant’s name of your Servitly instance
Enter the E-Mail address of your Servitly user. This can be a service user
Enter the corresponding password
Enter the API key provided by Servitly or your provider
Enter the username of a global Servitly Thing Connector user. This should be a user configured at Customer or Location level, so that it can access all subordinate devices. This will be used to access device communication if no device-specific credentials are provided
Enter the password of the Servitly Thing Connector user
Click “Save Credentials” to complete the setup
Step 3: Activate device interlinking
The interlinking platform supports forwarding messages (eg measurements) from Servitly to the ZDMP message broker. To use this functionality, switch to the “Devices” tab where you will find a list of devices configured in Servitly. The result is restricted by the permissions of the configured API user.
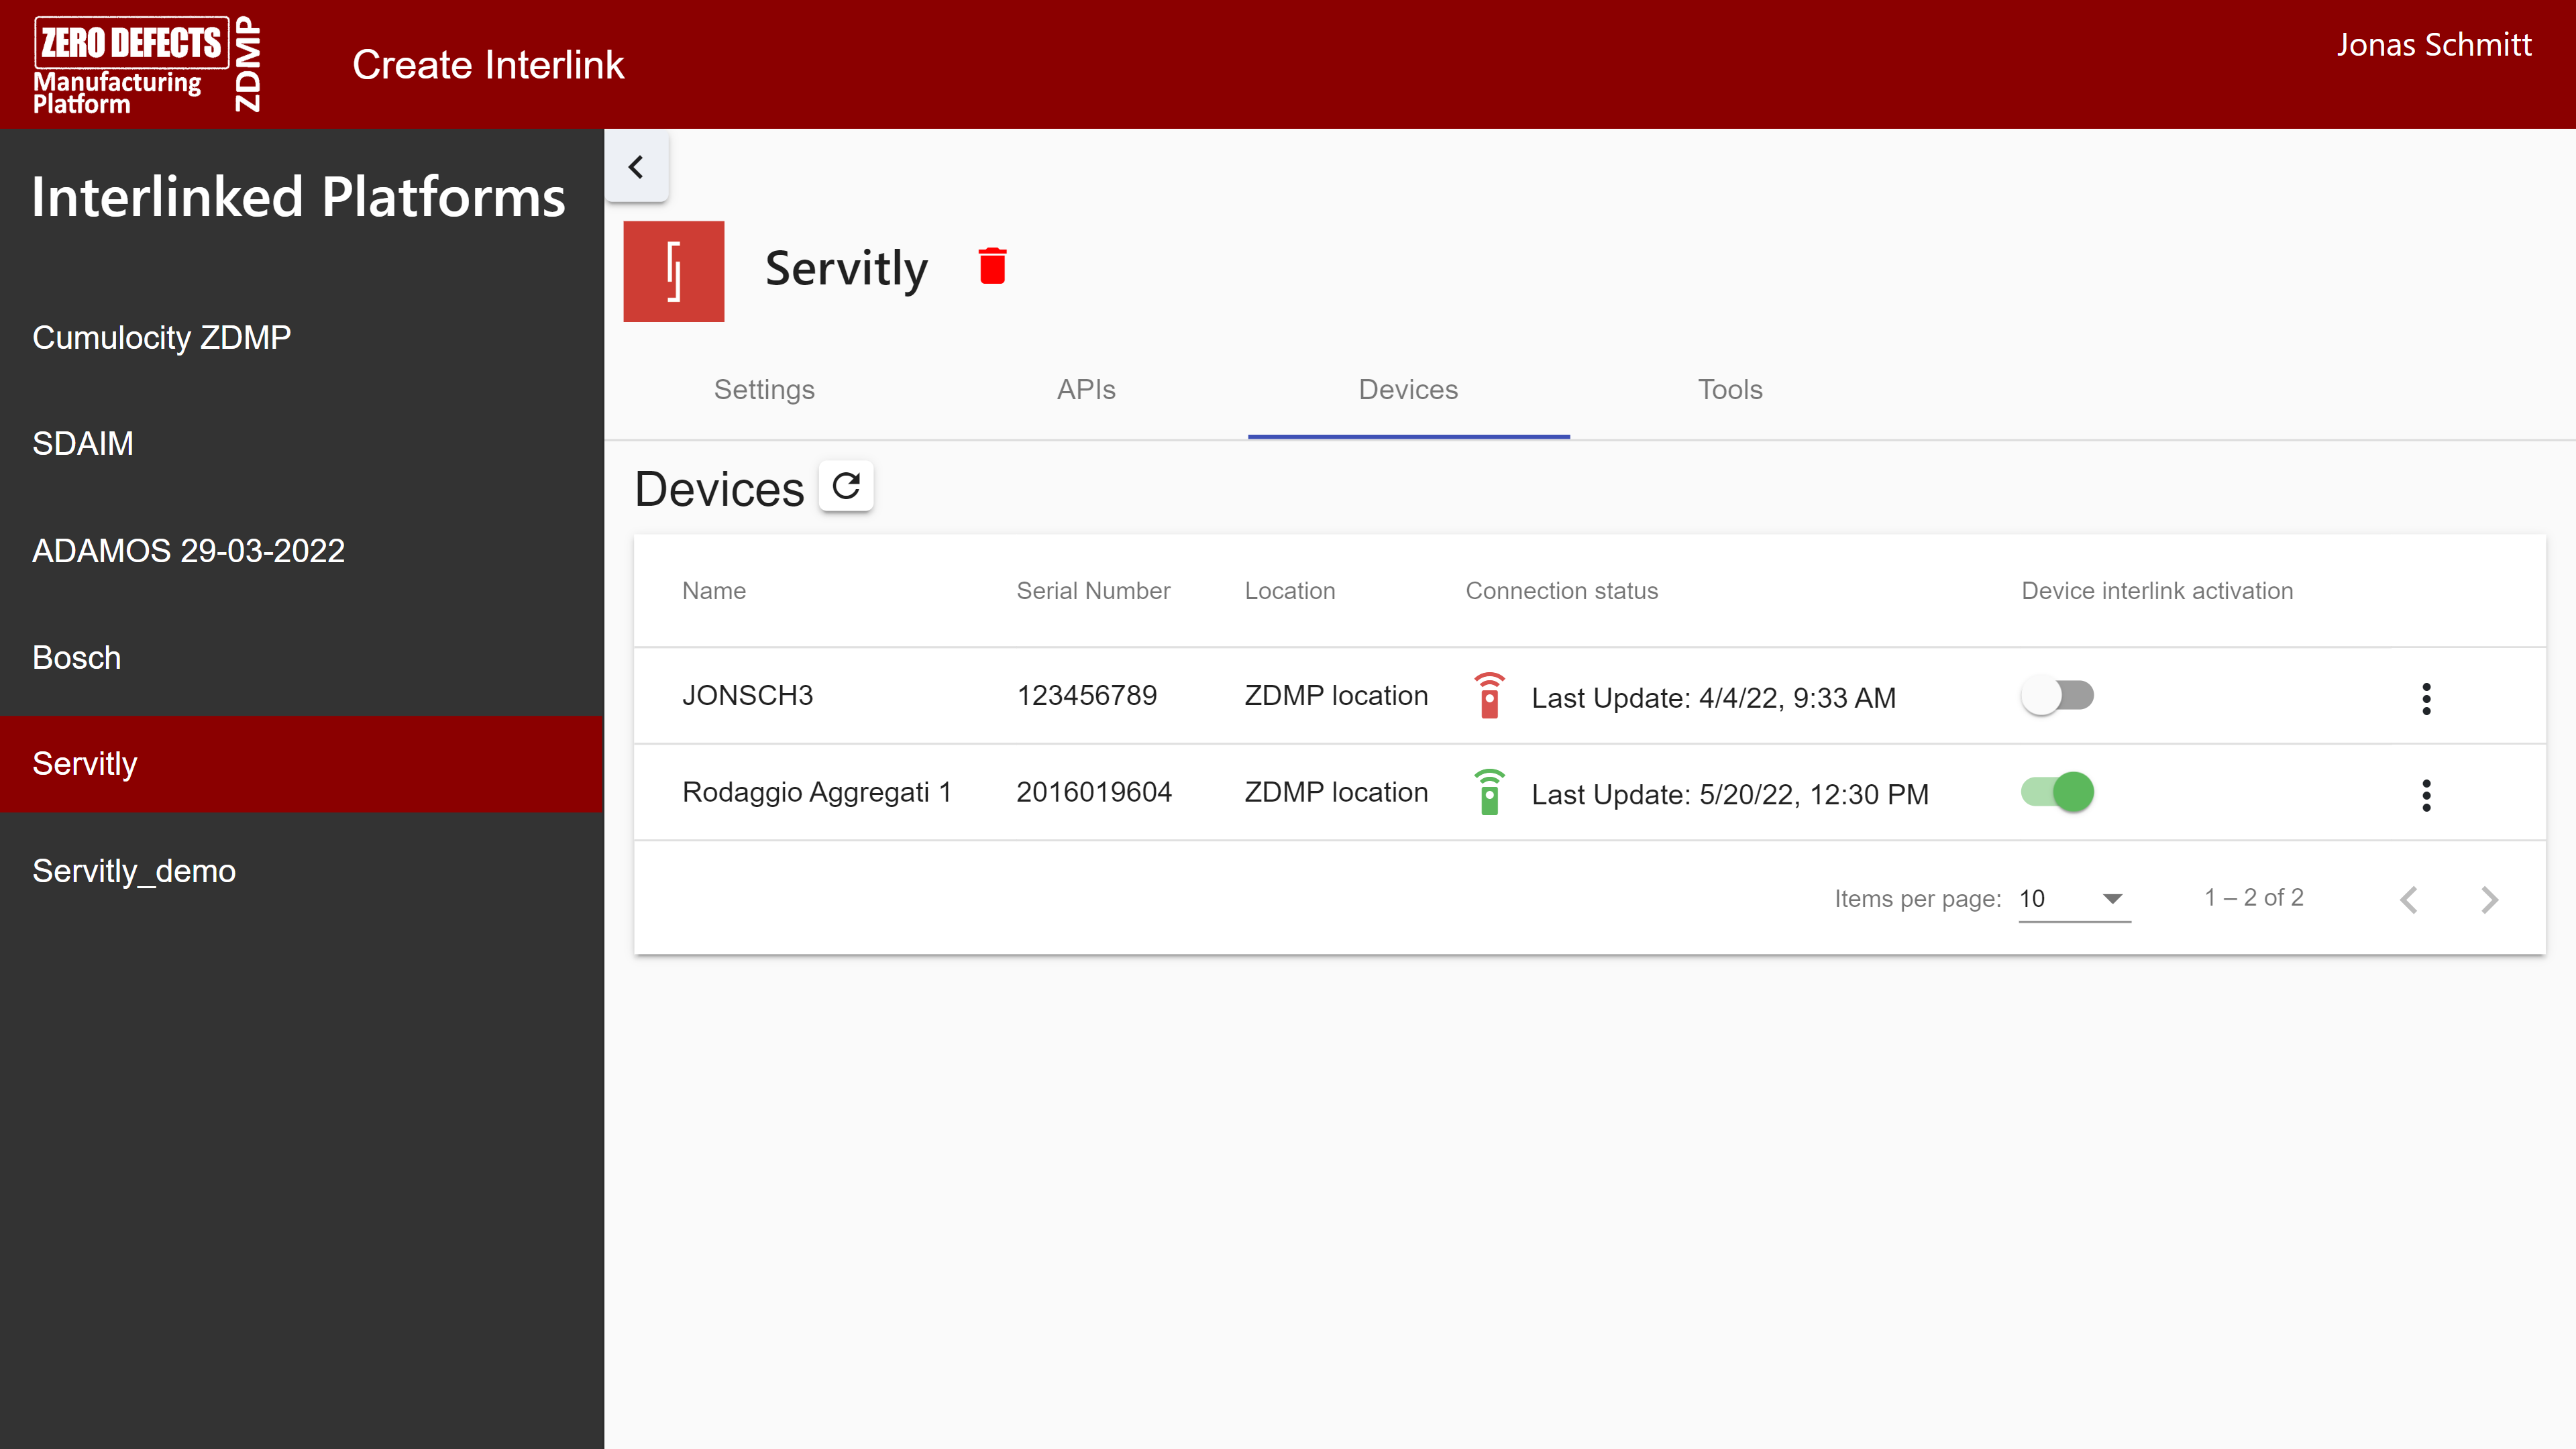
Figure 30: Servitly Interlink – Device overview
To interlink a device, click on the switch next to the corresponding entry.
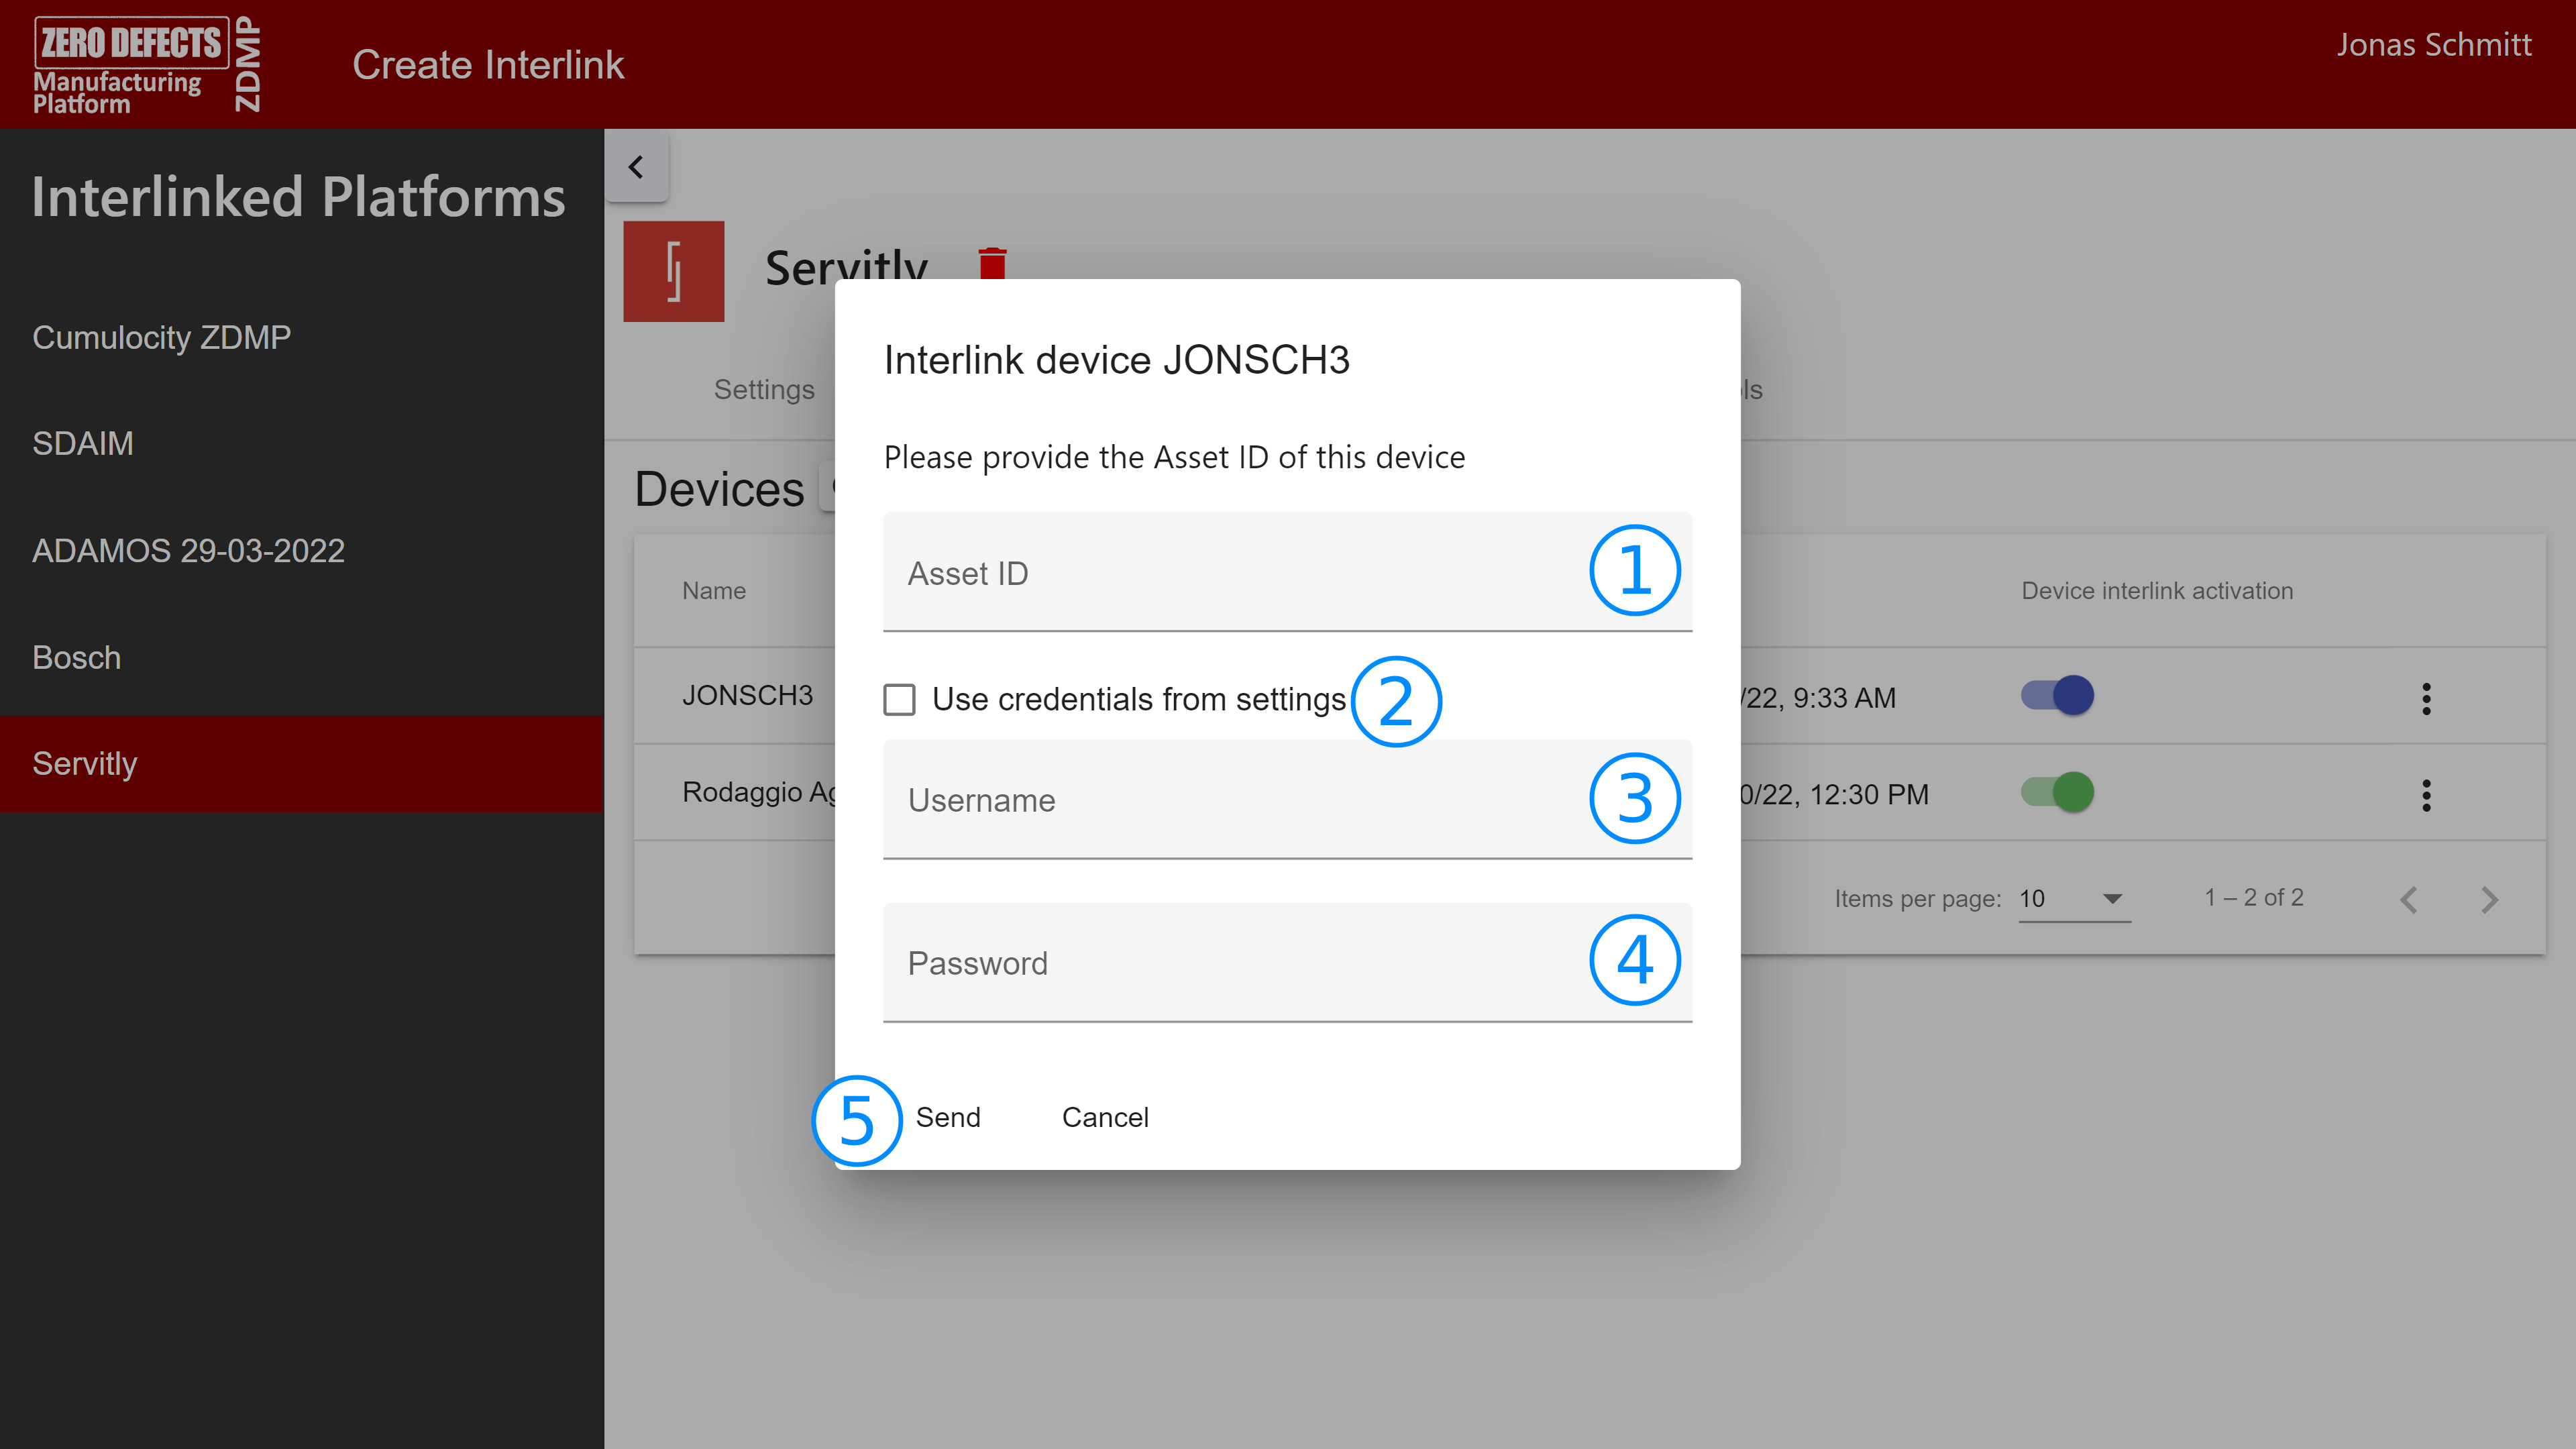
Figure 31: Servitly Interlink – Device overview
- Enter the Asset ID configured for the device in the Servitly connection settings
If the device uses its own credentials, uncheck “Use credentials from settings”. Otherwise, the device must be using the same credentials as configured as “Messaging credentials” in the interlink settings
If the device uses its own credentials, enter the device’s username
If the device uses its own credentials, enter the device’s password
Click “Send”. Once the status indicator turns green, all messages from this device will be forwarded to the ZDMP message bus to a specific topic, which can be copied via the three-dot-menu
Interlinking with EFPF
The EFPF interlinking plugin connects the ZDMP Marketplace with the European Connected Factory Platform for Agile Manufacturing. In particular, it allows EFPF to retrieve the list of products offered on the ZDMP Marketplace through a REST API.
Create the interlink
To create the interlink, visit the “Create Interlink” tab and select “European Factory Platform”.
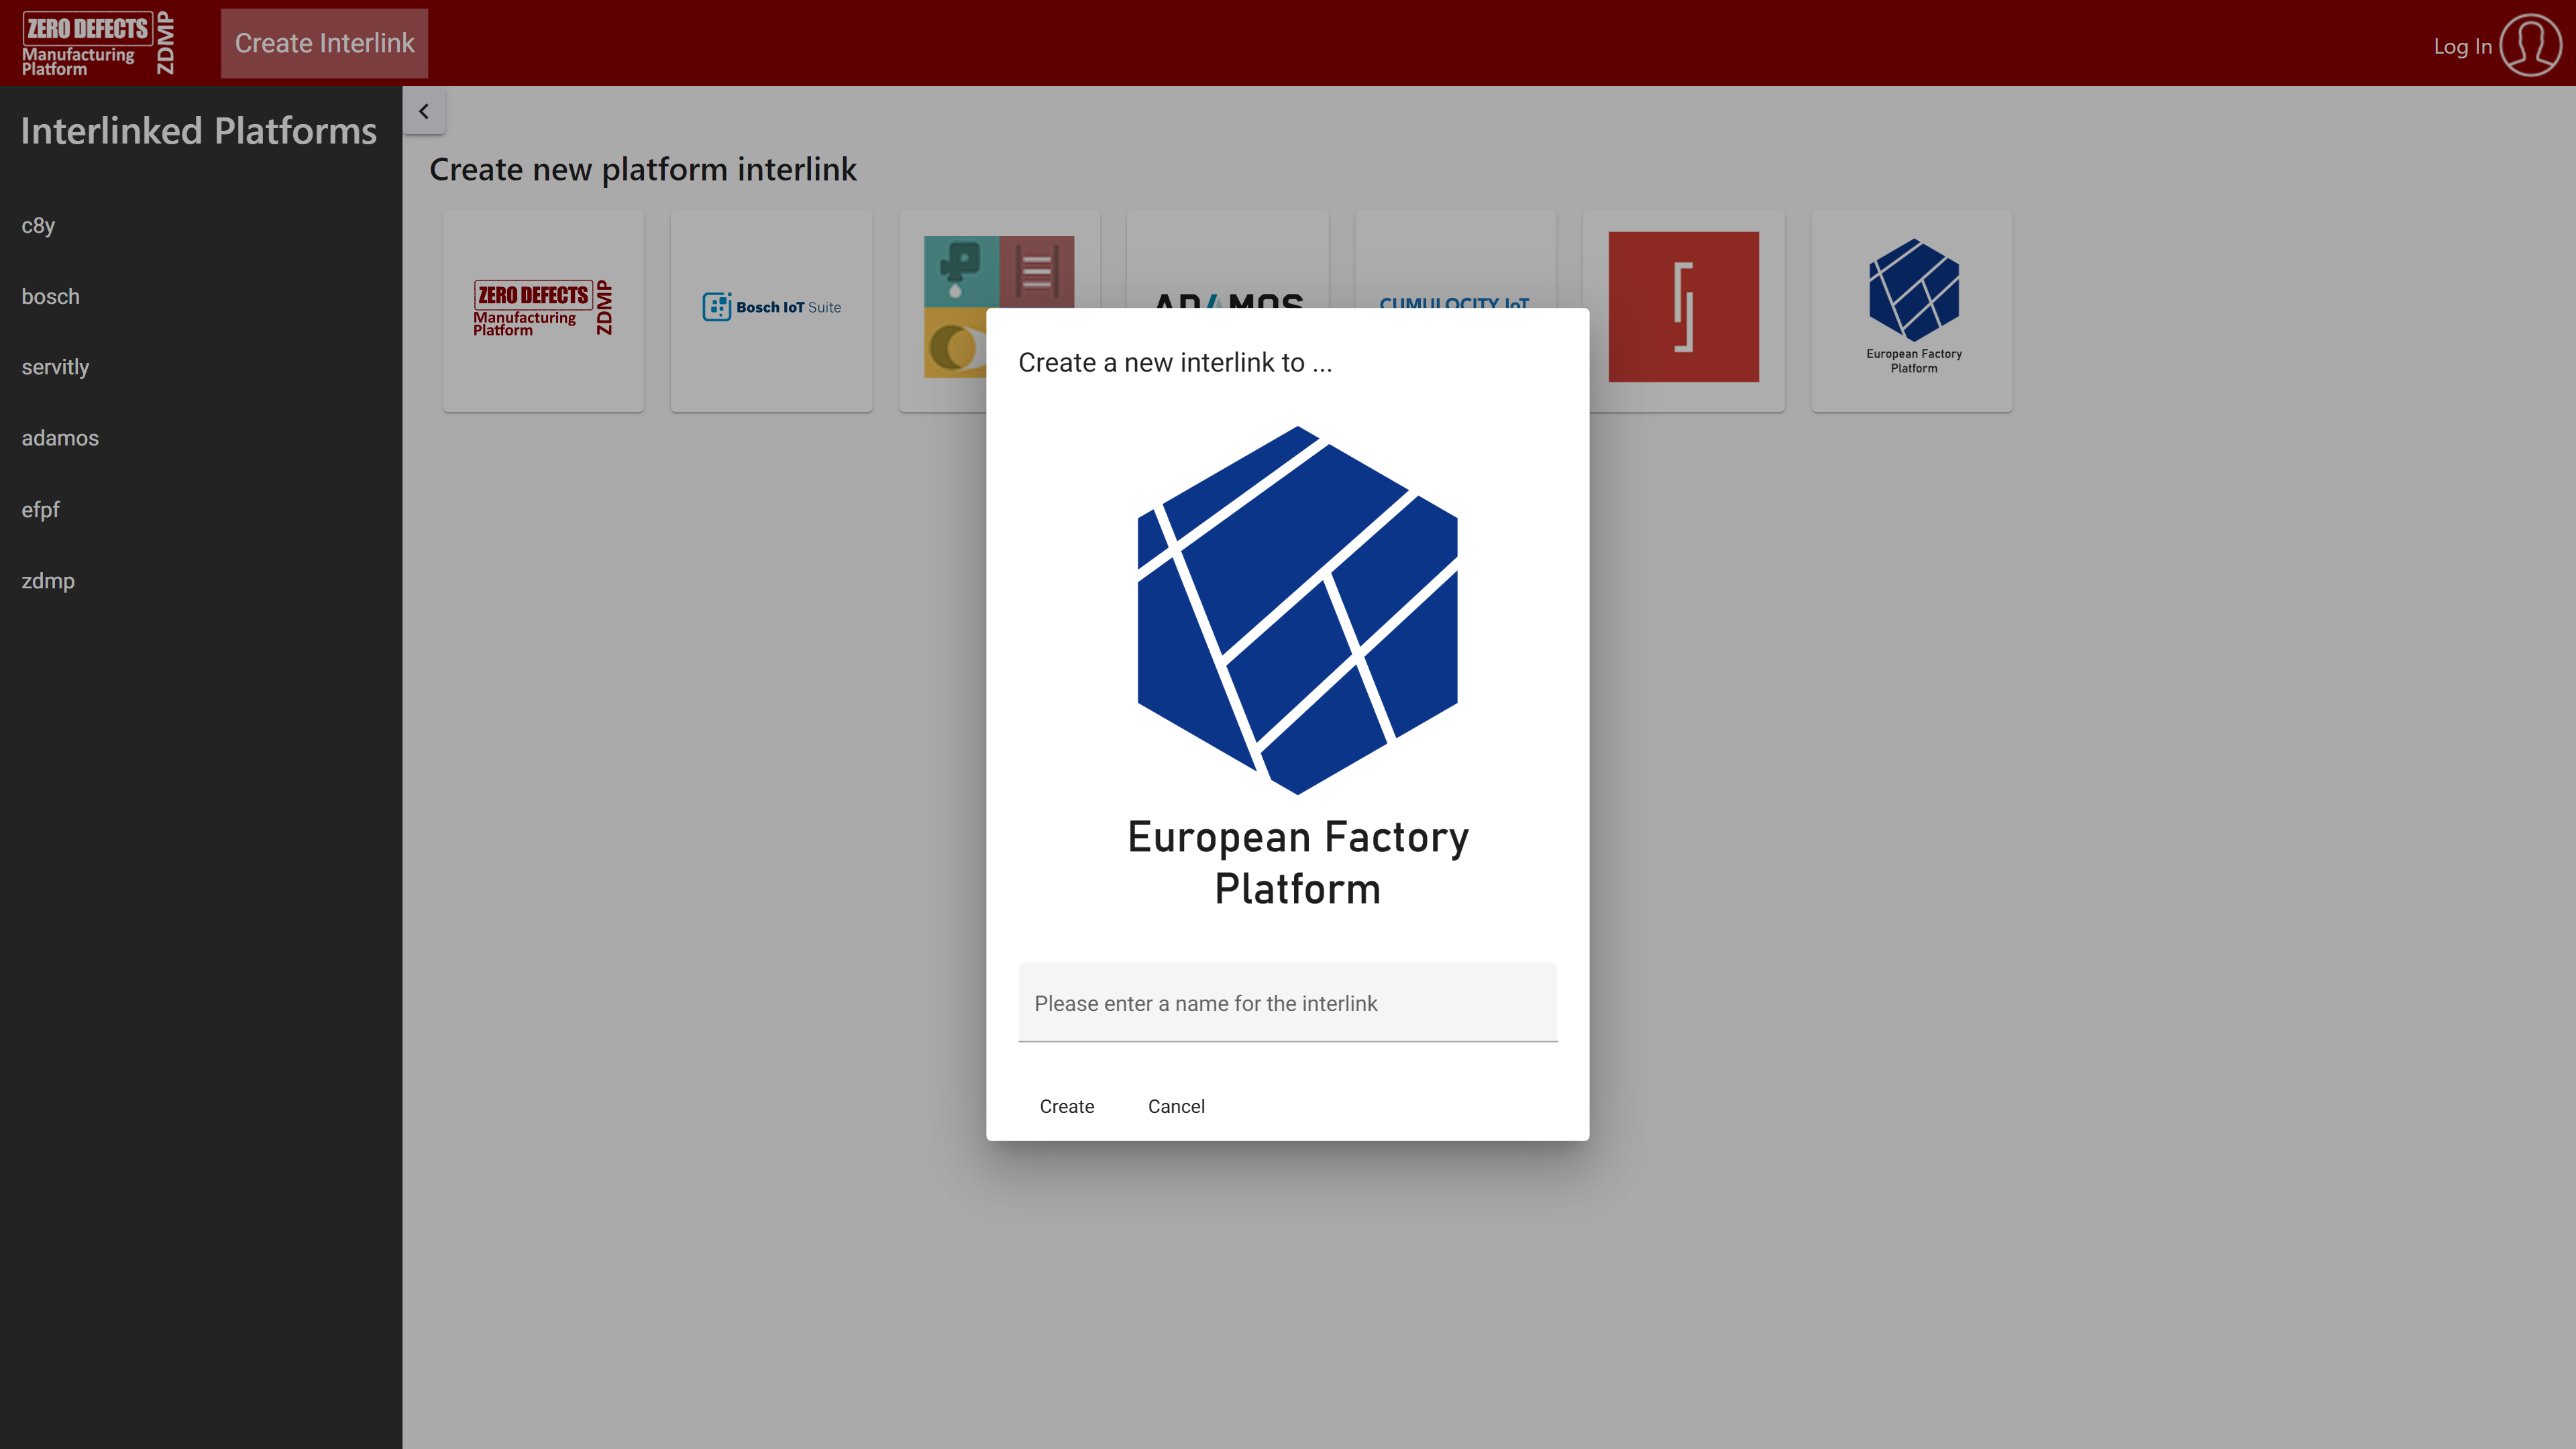
Figure 32: EFPF Interlink creation dialogue
- Enter a name for the interlink. It will be used to identify the interlinked resources
- Click on “Create”
You will be redirected to the configuration page of the new interlink.
Configure the interlink
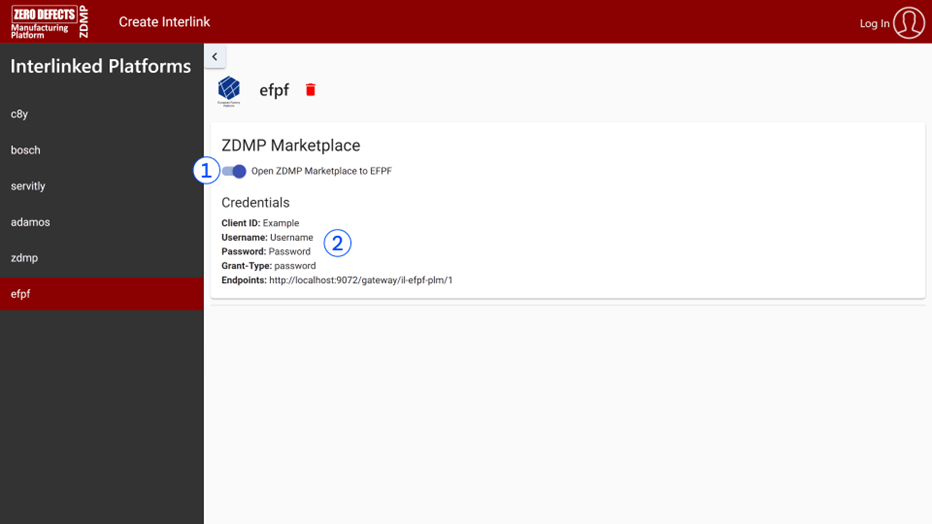
Figure 33: EFPF Interlink configuration page
Clicking on “Open ZDMP Marketplace to EFPF” (1) will expose the ZDMP Marketplace Product API to EFPF through the ZDMP API Gateway. The corresponding endpoints and required credentials are shown afterwards in the “credentials” section (2). This information needs to be configured in EFPF to enable EFPF to retrieve the list of products from the ZDMP Marketplace.