Service and Message Bus

General Description
The T6.4 Services and Message Bus is a core component of the ZDMP platform and represents its communication layer. It provides the following main functions:
It acts as the central endpoint to all ZDMP APIs and allows the convenient management of the APIs through a WebUI. Thereby it automatically updates an API’s service endpoint when installing a component on the platform and automatically manages user authentication and authorisation for the APIs
It provides ZDMP Assets with a message bus – a standardised communication interface to exchange messages, events, and data. This message bus implements a publish/subscribe messaging concept which allows the connected components to broadcast (publish) information on specific topics and to listen for certain events and topics (subscribe). Supported messaging protocols are MQTT and AMQP
It provides an Enterprise Service Bus as an alternative way to integrate ZDMP Assets into the platform if the preferred integration method via REST interfaces and AMPQ/MQTT messaging is not feasible. Connecting a ZDMP Asset to the Enterprise Service Bus requires the implementation of a custom connector
| Resource | Location |
|---|---|
| X Open API Spec | Link |
| Video | Link |
| Online documentation | Link |
| Further Guidance | API Gateway documentation RabbitMQ documentation |
| Related Datasets | None |
| Additional Links | Use of MQTT QoS |
**
**
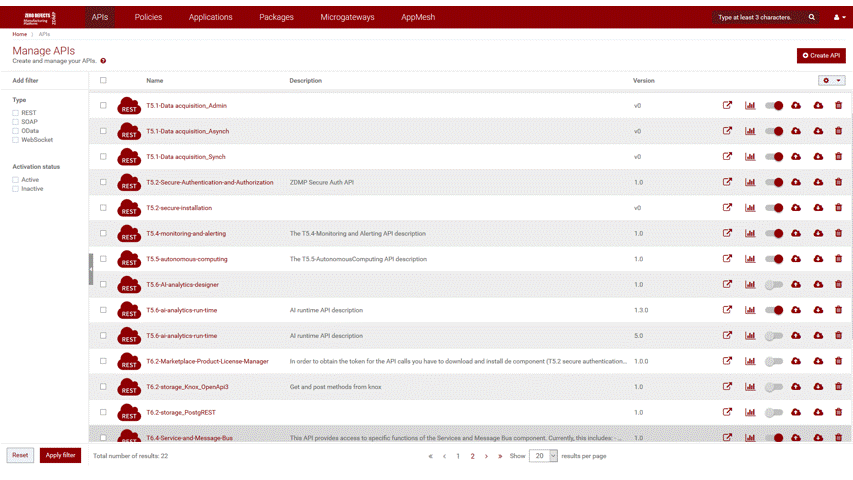
Screenshots
The following images are illustrative screen shots of the component:
Component Author(s)
| Company Name | ZDMP Acronym | Website | Logo |
|---|---|---|---|
| Software AG | SAG | www.softwareag.com |  |
Commercial Information
| Resource | Location |
|---|---|
| IPR Link | |
| Marketplace Product |
Architecture Diagram
The following diagram shows the position of this component in the ZDMP architecture:
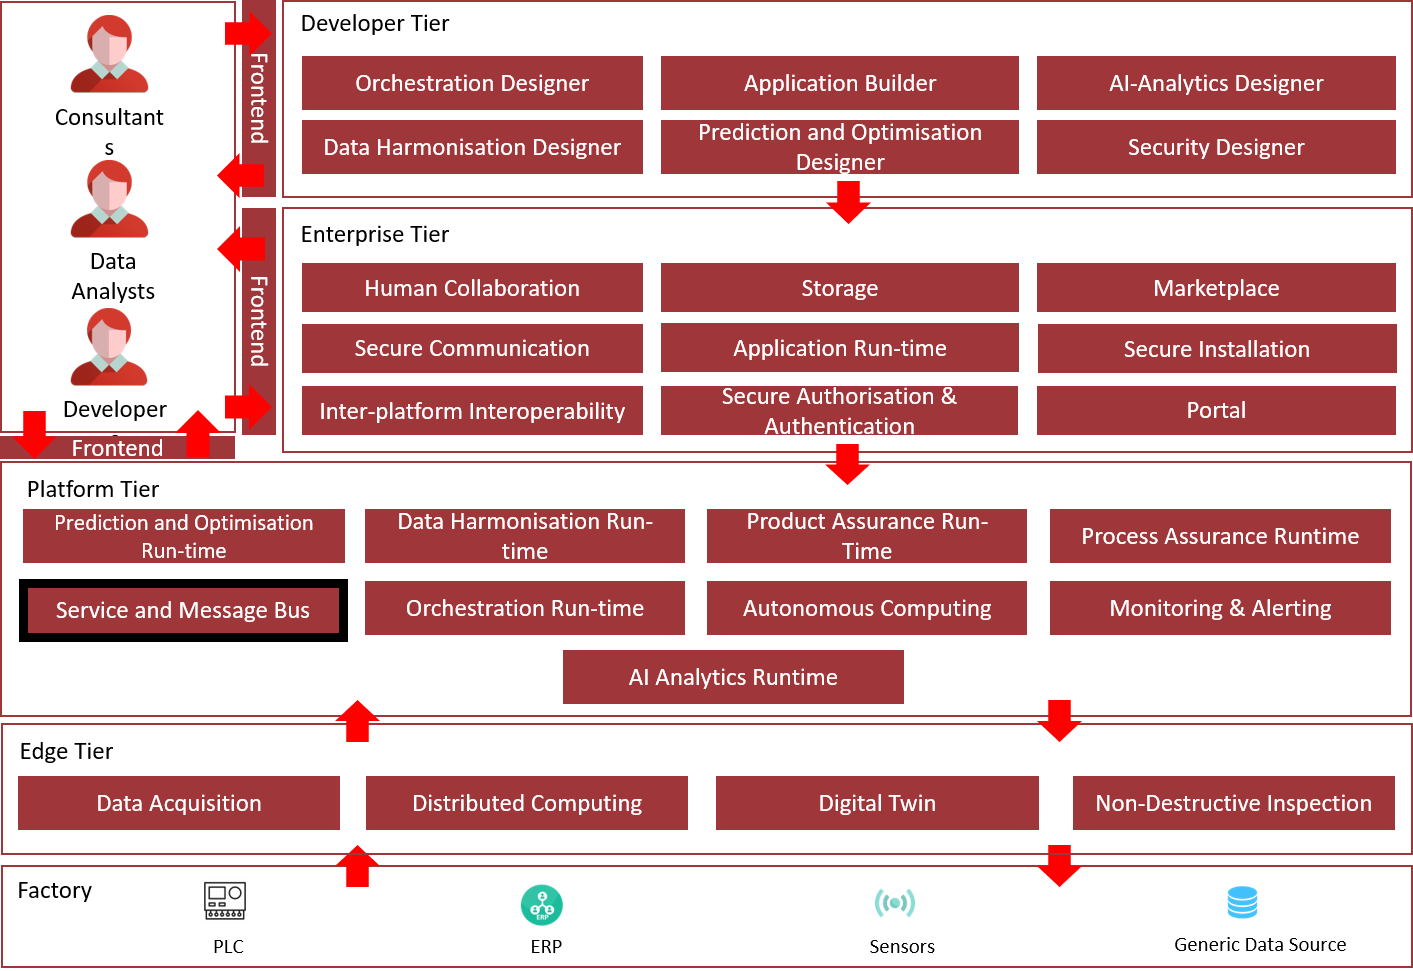
Figure 1: Position of Component in ZDMP Architecture
Benefits
The benefits are:
Central place for managing all APIs of the whole platform
Manage internal and external access of the APIs
Securely expose APIs to external developers, partners, and other consumers for use in building their own applications on their desired platforms
Monitor the API usage to enable further business models, eg pay per use models
Create APIs, define and activate policies, create applications, and consume APIs
Features
This component consists of two modules: The API Gateway and the Message Bus. Their features are listed below.
API Gateway
The API Gateway offers the following features:
API Management for all ZDMP Assets:
WebUI and REST APU for managing APIs
API Mock-up functionality for testing or for creating API stubs
Versioning of APIs
Import/Export of APIs in OpenAPI, Swagger, or RAML format
Automatic management of user authentication and authorisation through the Secure Authentication/Authorisation component
API usage statistics
Message Bus
The Message Bus subcomponent provides the following features:
Publish / Subscribe messaging functionality
Secure TLS-based communication
Supported Messaging Protocols:
MQTT
MQTT over Websockets
AMQP
System Requirements
The T6.4 Service and Message Bus has the following requirements:
2 CPUs
8 GB RAM
64 GB disk space
Associated ZDMP services
Required
Optional
- All other ZDMP components and zApps
Installation
Application Run-time/Rancher
The recommended way for installing and operating the Service and Message Bus is through the ZDMP Application Run-time. Please follow these steps to install the component:
Log into the Rancher UI of the Application Run-time
Open the cluster and project you want to deploy the Service and Message Bus to
Click on the “Launch” button in the top right corner to open the application catalogue
For easier deployment, we ship the Service and Message Bus as two separate applications – the API Gateway and the Message Bus. For a full installation, repeat the following steps for each of these applications.
- Click on the application you want to install. The Rancher UI now shows you the configuration dialogue of the application along with further instructions explaining the different settings. A setting explanation is listed below. Not all settings will be displayed depending on your configuration. Please follow these instructions and finally hit the “Launch” button shown at the bottom of the dialogue. The application will now be deployed automatically.
API Gateway configuration overview
Deployment settings
Deployment type: Choose whether the full API Gateway (which requires a license) or a lightweight testing replacement (no license required but reduced feature set) should be deployed
Registry Settings
Image registry: The source of the docker images. The ZDMP HCE Gitlab contains the latest images and should be used by default
Registry Hostname: If a custom registry should be used, enter the hostname of the registry (without any protocol prefix)
Repository Path: If a custom registry should be used, enter the path where the images are stored
Private registry user: A username to authenticate with at the image registry. For ZDMP HCE Gitlab this can be the zdmp_catalog user
Private registry password: The password to authenticate with at the image registry. For ZDMP HCE Gitlab this can be the password of the zdmp_catalog user
Private registry secret: The name of the Kubernetes secret that will be created to store the registry credentials. The default value should be used.
Ingress Configuration
Ingress enabled: Whether an ingress (proxy from the Internet to the component) should be created
Integration Server Domain Name: The Hostname for the Gateway proxy server. Adjust to the platform domain name.
API Gateway UI Domain Name: The Hostname for the API Gateway Web-Interface. Adjust to the platform domain name.
Storage & Volumes
Use default MiniZDMP storage location: Enable if you want to deploy the component on MiniZDMP
Storage type: Choose “local” to store the data in a persistent volume on the local filesystem or “nfs” to store it on an NFS server
NFS Server: The hostname/IP of the NFS server
Data location: Path where to store the data on the filesystem. Note that this path must have permissions set to 777.
API Gateway data storage size: Set the size of the persistent volume to store the data in. 5Gi is the default.
API Gateway
Number of Replicas: How many pods of the API Gateway should be created. 1 pod is sufficient
Requested CPU allocation: How much CPU share should be reserved for the API Gateway. 1000m is the minimum
CPU allocation limit: How much CPU share should the API Gateway be allowed to use at high load. 2000m is the recommended minimum
Requested memory allocation: How much RAM should be reserved for the API Gateway. 2Gi is the minimum
Memory allocation limit: How much RAM should the API Gateway be allowed to use at high load. 4Gi is the minimum
API Gateway license secret: The name of the Kubernetes secret containing the API Gateway license. This must be created before launching the application
App Service Type: Choose what type of IP the application should get. A “ClusterIP” is sufficient if used with an ingress. A “NodePort” can be useful for local testing without an ingress. “LoadBalancer” should not be used
API Gateway IS NodePort: NodePort of the API Gateway proxy server. Must not be in use
API Gateway UI NodePort: NodePort of the API Gateway Web-Interface. Must not be in use
API Gateway Database
Requested CPU allocation: CPU allocation to request for the API Gateway Database (ElasticSearch). 500m is the minimum
CPU allocation limit: Maximum CPU allocation that the API Gateway Database (ElasticSearch) may use at high load. 2000m is the recommended minimum
API Gateway REST API
Requested CPU allocation: CPU allocation to request for the API Gateway REST API. 100m is the minimum
CPU allocation limit: Maximum CPU allocation that the API Gateway REST API may use at high load. 250m is the minimum
Requested memory allocation: RAM allocation to request for the API Gateway REST API. 128Mi is the minimum
Memory allocation limit: Maximum RAM allocation that the API Gateway REST API may use at high load. 512Mi is the recommended minimum
App Service Type: Choose what type of IP the application should get. A “ClusterIP” is sufficient if used with an ingress. A “NodePort” can be useful for local testing without an ingress. “LoadBalancer” should not be used
API GW REST API port: NodePort for the API Gateway REST API. Must not be in use
API Gateway Connection Scheme: Whether the REST API should connect to the gateway using “http” or “https”. “http” is the default. “https” requires a correct certificate setup
API Gateway Hostname: Name of the API Gateway service. Should not be changed
API Gateway Port: Proxy Server Port of the API Gateway. Should not be changed
API Gateway Administrator Username: The administrator user account used for communicating with the API Gateway. Should only be changed if changed in the API Gateway itself
API Gateway Administrator Password: The password for the administrator user account. Should only be changed if changed in the API Gateway itself
Default Keycloak Client ID: The default client configured in Keycloak for token inspection
Keycloak Client Secret: The client secret for the default client configured in Keycloak
Full API Access Scope name: The name of the default scope configured in Keycloak that grants full access to all APIs
(Deprecated) Default Tenant ID: Fallback authorization server ID if requests miss the tenantId parameter. The ID can first be obtained after the API Gateway is deployed and the authorization server is configured. (Should be removed in future versions)
Token Validation mode: Choose whether authentication tokens should be validated only by signature (certificate is retrieved from Keycloak) or by a token introspection (each token is sent to Keycloak for validation)
Default Keycloak URL: URL of the default Keycloak instance to check tokens. This should be the URL that is contained in the “iss” field of the token. The “/realm/…” part can be removed to grant all realms access
Message Bus configuration overview
Registry Settings
Image registry: The source of the docker images. The ZDMP HCE Gitlab contains the latest images and should be used by default
Registry Hostname: If a custom registry should be used, enter the hostname of the registry (without any protocol prefix)
Repository Path: If a custom registry should be used, enter the path where the images are stored
Private registry user: A username to authenticate with at the image registry. For ZDMP HCE Gitlab this can be the zdmp_catalog user
Private registry password: The password to authenticate with at the image registry. For ZDMP HCE Gitlab this can be the password of the zdmp_catalog user
Private registry secret: The name of the Kubernetes secret that will be created to store the registry credentials. The default value should be used.
General settings
Number of Replicas: How many pods of the Message Bus should be created. 1 pod is sufficient.
Ingress Configuration
Ingress enabled: Whether an ingress (proxy from the Internet to the component) should be created
Ingress Domain Name: The Hostname for the Message Bus. Adjust to the platform domain name
Resources
Requested CPU allocation: CPU allocation to request for the Message Bus. 250m is the minimum
CPU allocation limit: Maximum CPU allocation that the Message Bus may use at high load. 2000m is the recommended minimum.
Requested memory allocation: RAM allocation to request for the Message Bus. 1Gi is the minimum
Memory allocation limit: Maximum RAM allocation that the Message Bus may use at high load. 8Gi is recommended
Storage & Volumes
Choose where the persisted volumes will be stored: Choose “local” to store the data in a persistent volume on the local filesystem or “NFS” to store it on an NFS server
NFS Server: The hostname/IP of the NFS server
Data location: Path where to store the data on the filesystem.
Volume size: Set the size of the persistent volume to store the data in. 1Gi is the default
SSL
Fetch TLS certificate from secret: Enable if you want to fetch the TLS certificate from a secret instead of using the default self-signed certificate stored in the image
TLS certificate secret: The Kubernetes Secret holding the TLS certificate, the CA certificate, and the private key
Service Type & Ports
App Service Type: Choose what type of IP the application should get. A “ClusterIP” is sufficient if no access from outside the cluster is required. A “NodePort” can be useful for local testing. “LoadBalancer” should not be used
Admin UI port: The NodePort for the Admin Web-Interface. Must not be in use.
MQTT Websocket port (TLS): The NodePort for TLS-secured WebMQTT connections. Must not be in use
MQTT Websocket port: The NodePort for plain WebMQTT connections. Must not be in use
MQTT port: The NodePort for plain MQTT connections. Must not be in use
MQTT port (TLS): The NodePort for TLS-secured MQTT connections. Must not be in use
AMQP port (TLS): The NodePort for TLS-secured AMPQ connections. Must not be in use
AMQP port: The NodePort for plain AMQP connections. Must not be in use
(Optional) Docker Compose
The Services and Message Bus component can optionally be installed via docker-compose:
Download the latest docker-compose file from ZDMP’s GitLab
(Optional) Adapt the docker-compose file to your needs. Please check the comments in the file for further information
Set the vm.max_map_count kernel parameter on the host system to at least 262144 by executing the following command using root privileges: sysctl -w vm.max_map_count=262144
Note: To persist this setting through a reboot of the host system, add vm.max_map_count=262144 to the /etc/sysctl.confInstall and start the component by executing the following command:
docker-compose up -d
How to use
The following sections contain instructions on how to configure and use the Services and Message Bus modules. Please note that only ZDMP administrators are able to modify the configuration of the API Gateway and the Message Bus.
API Gateway
The API Gateway provides centralised access to all ZDMP components through REST APIs. It also allows to register external or additional APIs along with separate credentials to expose them for internal use in ZDMP. Additionally, it automatically handles user authentication and authorisation for these APIs through the ZDMP’s Secure Authentication and Authorisation component.
Configuration
The API Gateway can be configured through its Web UI or by using its REST API. The latter is the recommended method because it automates the configuration and ensures that all required integrations will be set up properly.
API Gateway REST API
Depending on your chosen deployment type, the API Gateway REST API is available at:
Application Run-time
Srv.Type – NodePort: http://{Node-IP}:30215
Srv.Type – ClusterIP: http://apigw-api.zdmp-message-bus:8080
Docker-Compose: http://localhost:8080
The REST API provides the following capabilities:
- API Management: Allows to manage REST APIs through the API Gateway. This includes (de-)registration, update, and (de-)activation of APIs as well as API endpoint management. All management functions can be applied during run-time which can be useful for ZDMP components that need to dynamically maintain and adapt APIs.
Note: The API specifications must be provided in OpenAPI format
ZDMP tenant registration: Allows to (de-)register ZDMP tenants with the API Gateway to enable automatic authN/Z handling for REST APIs through the Secure Authentication and Authorisation component
ZDMP client and scope management: Allows to (de-)register ZDMP client applications and OAuth/OpenID scopes with the API Gateway to manage zAsset REST API access
For all a full list of available endpoints and their descriptions please refer to the Open API specification of the Service and Message Bus component.
API Gateway Web UI
The Web UI provides access to the full API Gateway configuration including features not (yet) used in ZDMP. Common configuration tasks such as the registration of a new API and the configuration of related access rules, however, require multiple manual steps and further knowledge about the Gateway’s functionality. Describing all those steps in detail is out of the scope of this documentation.
For a detailed documentation of all API Gateway’s capabilities and functionalities provided by the Web UI, thus please refer to the official API Gateway documentation.
Depending on your chosen deployment type, the Web UI is available at:
Application Run-time
Srv.Type – NodePort: http://{Node-IP}:31065
Srv.Type – ClusterIP: http://zdmp-message-bus.zdmp-message-bus:9072
With Ingress enabled: http{s}://apigw-ui-zdmp.{Your-chosen-domain}
Docker-Compose: http://localhost:9072
Accessing the Web UI requires an API Gateway user account with administrator privileges. The default admin account credentials are:
Username: Administrator
Password: manage
Usage
Authentication
To get access to a REST endpoint, an authentication token must be passed along with the API call by using the “Bearer” Header Prefix. This access token can be requested from the T5.2 Secure Authentication and Authorisation component. Please refer to the T5.2 Secure Authentication and Authorisation Documentation for detailed instructions on how to request this token.
Available zAsset REST APIs
The API Gateway provides REST endpoints to access other zAssets through the following naming schema: http://{basePath}/gateway/{componentAPIName}/{apiVersion}/{resource}
The available set of endpoints depends on the specific ZDMP installation and the installed components. A list of the currently available REST APIs can be obtained by calling the following API Gateway REST API endpoint:
Deployment via Application Run-time
Srv.Type – NodePort: http://{Node-IP}:30215/apimgmt/apis
Srv.Type – ClusterIP: http://apigw-api.zdmp-message-bus:8080/apimgmt/apis
Deployment via Docker-Compose: http://localhost:8080/ apimgmt/apis
Adding the query parameter “includeResources=true” to the request will also include the corresponding REST resources and endpoints.
Message Bus
The Message Bus enables message-based information exchange between zAssets as well as with external systems using the Publish / Subscribe Messaging concept in combination with the messaging protocols MQTT and AMQP. It is based on RabbitMQ – an open-source message broker.
The following sections describe the configuration and usage of the Message Bus from a ZDMP point of view. Please refer to the official RabbitMQ documentation if you need further details and information not covered by this documentation.
Configuration
The Message Bus can be configured through its Web UI by a user with administration privileges. The address of the Web UI depends on your chosen deployment type:
Application Run-time
Srv.Type – NodePort: http://{Node-IP}:30201
Srv.Type – ClusterIP: http://zdmp-message-bus.zdmp-message-bus:15672
With Ingress enabled: http{s}://msgbus-zdmp.{Your-chosen-domain}Docker-Compose: http://localhost:15672
The default administrator credentials to access the Web UI are:
• Username: ZDMP
• Password: ZDMP2020!
General information
As outlined above, the Message Bus is built upon the AMQP message broker RabbitMQ. For this reason, the configuration is based on AMQP-related settings (eg read, write, and configure permissions). These settings are mapped to the properties used by other protocols through plugins shipped with the Message Bus.
The Message Bus restricts access to the system on a user and on a virtual host level. The latter represent tenants that are isolated from each other. Users may access multiple tenants depending on their permissions.
Registration of new users/clients
Open the Message Bus Web UI and log in as administrator
Open the “Admin” tab
Enter username and password
(Optional) Assign tags to grant the user additional privileges. The “management” tag, for instance, allows the user to access the web ui and the “admin” tag gives the user administrator rights
Finally click on “Add user” to create the user
Note: This only creates the user account but does not grant the user access to a virtual host (tenant). Please follow the instructions below to set the relevant permissions.
Registration of new virtual hosts (tenants)
Open the Message Bus Web UI and log in as administrator
Open the “Admin” tab
Switch to the “Virtual Hosts” section
Enter the name of the virtual host (tenant)
(Optional) Add descriptions and tags
Finally click on “Add virtual host” to create the virtual host
Set user permissions for individual virtual hosts
Open the Message Bus Web UI and log in as administrator
Open the “Admin” tab
Switch to the “Users” section
Click on the user’s username shown in the user table
Set the permissions (read, write, configure) for the chosen virtual host using regular expressions (.* for full access)
Finally click on “Set permissions” to apply the changes
Set topic permissions for individual users
Open the Message Bus Web UI and log in as administrator
Open the “Admin” tab
Switch to the “Users” section
Click on the user’s username shown in the user table
Set the topic permissions (read, write) for the chosen virtual host and exchange using regular expressions. Please select “AMQP default” or “amq.topic” as exchange if you want to apply the permissions to MQTT and AMQP connections. Otherwise, the permissions are only used for AMQP messaging
Finally click on “Set topic permissions” to apply the changes
Usage
The Message Bus can be used with any AMQP or MQTT library of the user’s choice such as the RabbitMQ or Eclipse Paho libraries. By default, the Message Bus exposes the following ports depending on the chosen deployment type:
| Protocol | Deployment type | Hostname | Port | TLS Port |
|---|---|---|---|---|
| AMQP | App. Run-time – NodePort | {Node-IP} | 30207 | 30206 |
| App. Run-time – Cluster IP | zdmp-message-bus.zdmp-message-bus | 5672 | 5671 | |
| App. Run-time – Ingress | {Your-chosen-domain} | N/A* | 5671 | |
| Docker-Compose | localhost | 5672 | 5671 | |
| MQTT | App. Run-time – NodePort | {Node-IP} | 30203 | 30214 |
| App. Run-time – Cluster IP | zdmp-message-bus.zdmp-message-bus | 1883 | 8883 | |
| App. Run-time – Ingress | {Your-chosen-domain} | N/A* | 8883 | |
| Docker-Compose | localhost | 1883 | 8883 | |
| MQTT over Websockets** | App. Run-time – NodePort | {Node-IP} | 30204 | 30205 |
| App. Run-time – Cluster IP | zdmp-message-bus.zdmp-message-bus | 15675 | 15673 | |
| App. Run-time – Ingress | {Your-chosen-domain} | N/A* | 15673 | |
| Docker-Compose | localhost | 15675 | 15673 |
*For security reasons, ports not using TLS are disabled in the ingress configuration.
**The base path for the websocket connection is /ws.