AI Analytics Runtime
General description
Artificial Intelligence pipelines are complex, and its management involves diverse technical profiles usually specialized in specific areas when brought to production environment.
In a minimum AI setup, data needs to be stored and retrieved efficiently, and for that a “Big Data Engineer” is needed. Usually, the machines in which the Big Data tools are installed need to be provisioned by someone, here is where comes the IT systems administrator. On top of that, the data is consumed, processed, and transformed into AI’s models. These tasks are usually performed by Data Scientists. However, at the end, these models need to be deployed and executed in a specific infrastructure; it needs also to be secured and orchestrated in an overall application. This is where the roles of DevOps Engineer and Software Engineer come into play. Of course, the way that the systems involved are interconnected one to each other, the selection of technologies and the architectural decisions are made by the Software Architect.
The AI Analytics Runtime component has been therefore conceived with the objective of simplifying the provision of the infrastructure to run AI models automatically and bridging the gap between the data scientist lab and production lines. The component has been designed with full automation in mind. Everything, from the component deployment to the AI model deployments, is performed without human intervention. To achieve this behaviour, the component uses automation technologies in every layer. In addition, it integrates with the other components in the ZDMP architecture which provide functionalities such as: authentication and authorization, monitoring and alerting and data acquisition.
| Resource | Location |
|---|---|
| |
| |
|
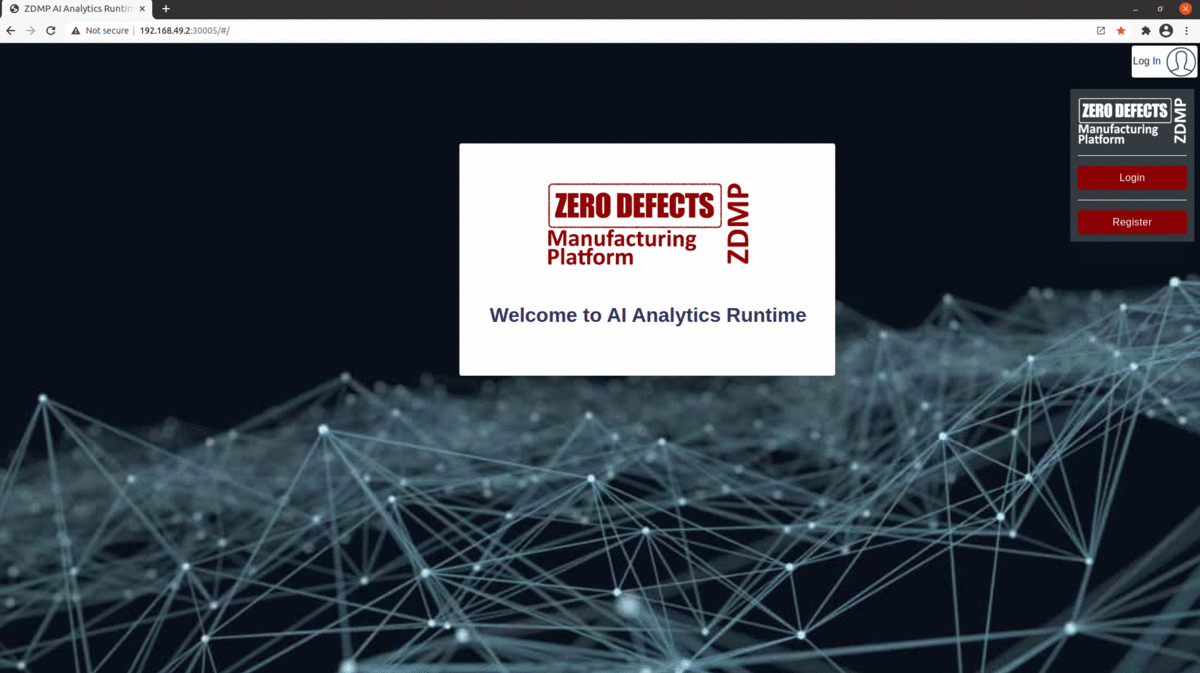
Screenshots
The following images are illustrative screen shots of the component
Component Author(s)
| Company Name | ZDMP Acronym | Website | Logo |
|---|---|---|---|
| Instituto Tecnológico de la informática | ITI | www.iti.es |  |
Commercial Information
| Resource | Location |
|---|---|
| IPR Link | AI Analytics Runtime |
| Marketplace Link | AI Analytics Runtime |
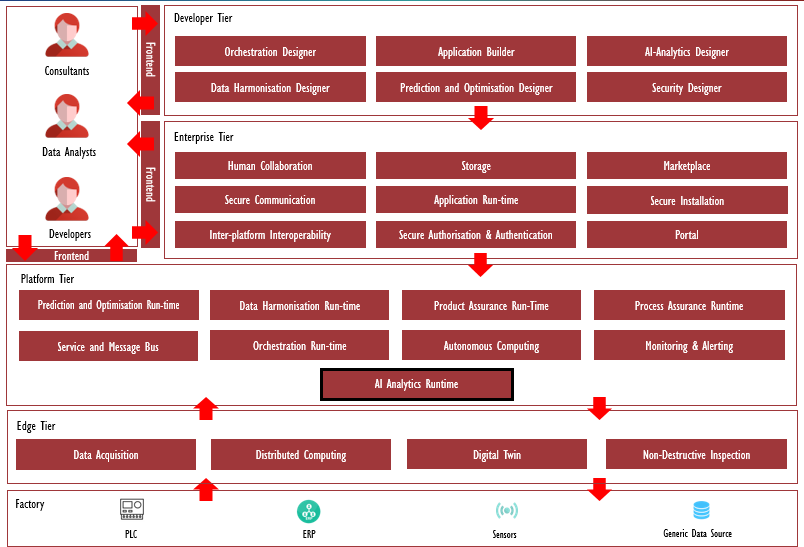
Architecture Diagram
The following diagram shows the position of this component in the ZDMP architecture
Benefits
Artificial Intelligence models’ configurations can be specified through a Manifest file depending on the user/model needs: training from historic data, adaptative learning, API configurations, etc
Artificial Intelligence models can be uploaded to be automatically configured, deployed, trained, and run, making them available for generating data predictions
Deployed AI models can be visualized and managed: they can be stopped/started on-demand or by creating a model schedule
New datasets can be uploaded to be used in the training phase of AI model deployments
Features
This component offers a User Interface (WebApp) with the following features:
Dashboard: Visualization of Artificial Intelligence models’ deployments at runtime. Display of some specific model information, ie starting time, the RAM memory in use or its public API URL
Deployer: AI models’ scripts and a Manifest file with specific configurations can be uploaded to be deployed in a Kubernetes cluster. For each model, docker images are created and uploaded to a docker registry, for later execution in the Kubernetes deployment. If configured, the models can be trained using predefined datasets or by consuming specific message bus input topics. If configured, the deployment includes the generation of a public API Gateway endpoint which allows users to use them and make AI predictions. If configured, models are also consuming input/output message bus topics to perform new predictions. If configured, data input/output transformations are also configured using the Data Processor integration. If configured, usage of AI models is restricted by user roles. Furthermore, AI models could be configured to use Wazuh security monitoring. Finally, all deployed models are displayed on the screen and start/stop/delete actions are available for each of them
Scheduler: Deployed AI models can be scheduled to be started or stopped with a specific frequency (ie every Monday) by configuring different options (ie specific time of day), creating an automation of each model run-time
Storage: Dataset files can be uploaded to be used in the training phase of AI models’ deployments. All available datasets are displayed in the upper table. On the other hand, after an AI model is trained, a model file is created and displayed in the lower table. Datasets and trained model files can also be downloaded for other purposes
System Requirements
Minimal requirements needed:
Kubernetes cluster with Docker support:
Docker: Docker builds and runs the containers where the components and the Artificial Intelligence models are executed. (To get started, check this)
Kubernetes cluster: this is a containers’ orchestration engine. The installation of this component and the deployment and execution of Artificial Intelligence models need of the existence of a configured Kubernetes cluster. (To get started, check this)
Helm: Helm is the package manager for Kubernetes that enables quick installations through helm chart files. (To get started, check this)
Associated ZDMP services
Required
Portal: Needed for Login/Logout services. It connects to the Authentication services.
Secure Authentication and Authorization: Needed for creating user credentials.
Service and Message Bus: Needed for API and input/output data configurations.
Optional
Application Runtime: Offers a Kubernetes cluster flavour, miniZDMP, compatible with the rest of ZDMP components. The AI Analytics Runtime can be installed and made available through this ZDMP component. Even though it is not a required components simplifies the deployment.
Storage: Offers NFS and database support to ZDMP components.
Product Assurance Runtime - Supervision: Offers a User Interface to define AI models’ configurations step by step and deploying them directly through the AI Analytics Runtime. This component also provides the Data Processor, which can be used for input/output data transformations.
Service and Message Bus: Offers a central endpoint to all ZDMP APIS including the interface to the deployed AI models.
Installation
Stand-alone installation
For a stand-alone installation of the AI Analytics Runtime, satisfy the System Requirements section and the Associated ZDMP services marked as Required. Then follow the next steps:
Start and configure a Kubernetes cluster (FYI: a Minikube local cluster could also be used for testing purposes, check this)
Download the last version Helm Charts from here. Unzip this file and go into the /orchestration/helm-charts directory
Check the values.yaml file, as different values’ configurations can be used here.
Inside the /templates directory, find different configuration files:
backend-config.yaml file: environmental variables used by the component’s backend:
database variables: when using ZDMP Storage component, the “MONGO_” variables must be modified to redirect to the corresponding ZDMP Storage values
registry variables: “REGISTRY_” variables must specify the docker registry where AI models’ images are stored. “REGISTRY_PIP_” variables must specify the Python PIP registry for user customized libraries if needed.
message bus variables: “MESSAGE_BUS_” variables must specify the corresponding ZDMP Message Bus services credentials and URL/Ports
API gateway variables: “_API_GW_” variables must specify the corresponding URLs/endpoints for the API Gateway services (these services are included in the ZDMP Service and Message Bus component)
data processor variable: when using ZDMP Product Assurance Runtime, “DATA_PROCESSOR_URL” must correspond with the URL of the Data Processor API
backend-secret.yaml file: passwords or tokens must be specified for the following environmental variables:
Docker registry: “REGISTRY_PASSWORD” variable needs to be a valid password or token, corresponding to the “REGISTRY_USER” value defined in the backend-config.yaml
PIP registry: “REGISTRY_PIP_PASSWORD” variable needs to be a valid password or token, corresponding to the “REGISTRY_PIP_USER” value defined in the backend-config.yaml
message bus services: “MESSAGE_BUS_PASSWORD” variable needs to be a valid password, corresponding to the “MESSAGE_BUS_USER” value defined in the backend-config.yaml
frontend-config.yaml file – Environmental variables used by the component’s frontend:
AI Analytics Runtime API: “API_URL” variable must specify the public URL for the component’s backend API, ideally an API Gateway’s public URL
Portal API: “PORTAL_API_URL” variable must specify the public URL for the Portal’s backend API, ideally an API Gateway’s public URL
When using ZDPM Storage component or other NFS persistent storage, make sure the minio-persistentvolume.yaml is modified according to user volume specifications (more information here). Different options for the persistent volumes inside these .yaml files (ie capacity) can also be specified
User must make sure to be familiar with the different Kubernetes with Helm Charts’ configurations to satisfy user needs
Now the component’s helm charts can be installed by executing the following command in the /orchestration directory:
```bash
helm install <new-instance-name> helm-charts/
After the installation has finished, the application should be available at http://<your_cluster_IP>:30005 or at ingress URL if it has been specified (for more documentation on Kubernetes ingress, check this).
MiniZDMP installation
After setting up the catalogs in the Application Runtime available as miniZDMP distribution, select the app AI Analytics Runtime and fill the form with the desired configuration:
Image registry
It includes configuration regarding the image registry needed to deploy the component. It must be left with the configuration by default.

Ingress
To expose the subcomponents to the internet through the ingress configured in the Application Runtime, the domain must be specified.

Side Deployments
AI Analytics requires some subcomponents from the Storage component. The user can deploy MinIO and MongoDB as part of the AI Analytics Runtime by setting “Create self-managed …” to “True” and selecting the persistence, if required.
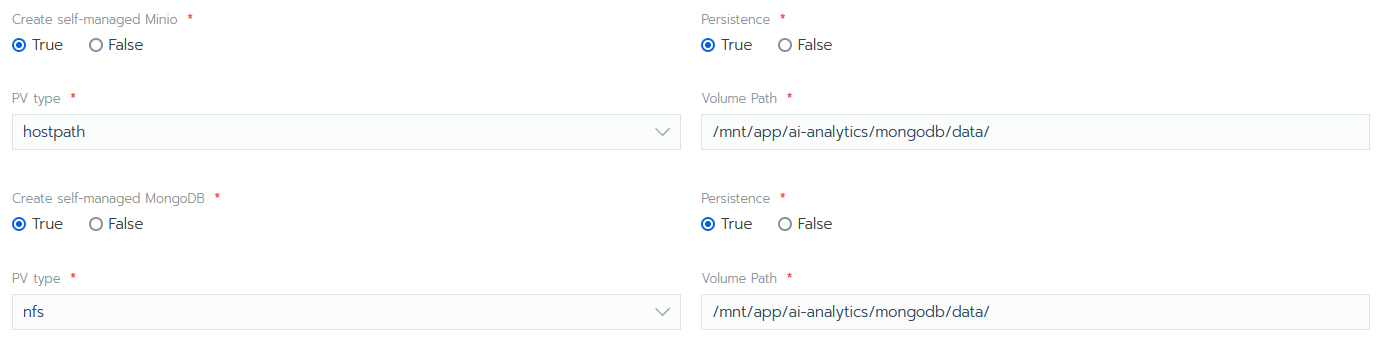
If PV type is set to “nfs”, the NFS server url must be specified.

Integrations
The remaining fields are dedicated to the integration of other ZDMP components:
Portal
Service and Message Bus (aka APIGW and Message Bus)
Storage component (aka MinIO and MongoDB)
HCE (aka Image Registry and Package Registry)

They must be configured carefully to ensure the correct deployment.
How to use
Using the AI Analytics Runtime, users can upload Artificial Intelligence models’ code to build, deploy, train, run and expose these models to make them available for new predictions.
General pipeline overview
The AI Analytics Runtime defines the following workflows to deploy and use the AI models:
A user can upload a new AI models’ code in the Deployer page. This model’s code and its configuration Manifest file must be in a ZIP file using the required structure
Based on the Manifest file, the required configurations are added, and the corresponding files are generated: python requirements file, model API file, message bus file, training and/or prediction scripts and Docker files
The Docker images for the training and/or prediction phases are built and uploaded to the private Docker registry
Then, the Kubernetes manifests are deployed, and the Docker images are downloaded and executed inside the cluster. Furthermore, if an API is configured, the model is registered with a new public URL through the API Gateway
Therefore, the AI model is all set up and running, trained (if specified) and ready to generate new predictions, being exposed through input/output channels (API or message bus topics) according to its Manifest specifications
The user is able to manage the status of this AI model, stopping/starting it on-demand or by creating a model schedule from the Scheduler page
The user is able to upload new datasets in the Storage page, in order to specify them in the Manifest file for training a new AI model
Manifest
To standardize the model’s configuration, the concept of manifest is used. The manifest is formatted in into a JSON file and defines every aspect of the model configuration to allow the automation of the building process and its deployment. A manifest example could be:
{
“name”: “Injection Model”,
“description”: “Using a PCA algorithm to detect injection defects”,
“tags”: [
“unsupervised”,
“PCA”,
“injection”
],
“version”: 1,
“input”: {
“training”: [
{
“type”: “HISTORIC_DATA”,
“payload”: {
“dataSource”: “STORAGE”,
“fileName”: “train_data.csv”
}
},
{
“type”: “MESSAGE_BUS”,
“payload”: {
“routingKeys”: [
{
“name”: “injection_training_input_1”
}
]
}
}
],
“prediction”: [
{
“type”: “REST_API”,
“payload”: {
“parameters”: [
{
“position”: 1,
“name”: “json_data”,
“description”: “input variables in json”
}
]
}
},
{
“type”: “MESSAGE_BUS”,
“payload”: {
“routingKeys”: [
{
“name”: “injection_prediction_input_1”
}
]
}
}
]
},
“output”: {
“training”: [
{
“type”: “MESSAGE_BUS”,
“payload”: {
“routingKeys”: [
{
“name”: “injection_training_output_1”
}
]
}
}
],
“prediction”: [
{
“type”: “MESSAGE_BUS”,
“payload”: {
“routingKeys”: [
{
“name”: “injection_prediction_output_1”
}
]
}
}
]
},
“modelData”: {
“type”: “PYTHON”,
“payload”: {
“dependencies”: [
{
“name”: “pandas”,
“version”: “1.0.1”
},
{
“name”: “scikit-learn”,
“version”: “0.21.3”
},
{
“name”: “numpy”,
“version”: “1.18.1”
},
{
“name”: “scipy”,
“version”: “1.3.1”
},
{
“name”: “z-utils”,
“version”: “0.1.2”
}
],
“hyperparameters”: {
“n_comp_criteria”: 0.95,
“scale”: “True”,
“cleansing”: “extreme”,
“algorithm”: “SVD”
},
“modelFile”: “trained_model.pkl”
}
}
}
The manifest includes:
name: The name of the model
description: Model explanation
tags: Useful keywords for searching or filtering
version (Optional): If this property is included, it must be a positive integer and greater than the last model version deployed. If this property is not included (recommended), an upgraded version is generated automatically (starting with 1 or checking the last model version in the system and incrementing it by 1)
input: Optional channels for input data used in model’s training and/or predictions:
training: Different data sources can be specified in the field “type”:
“HISTORIC_DATA”: The dataset containing historic data must be specified in the “fileName” property and it must be uploaded to Storage before deployment. This triggers a training phase in the Kubernetes cluster before the model is available for predictions
“MESSAGE_BUS”: Training can also be progressively achieved by sending single data registries to a specific topic, defined as a “routingKey”. The training is successfully performed when a specific number of registries is reached (users can specify a “buffer” property inside this “payload”, by default this is set to 1000 registries). Online learning or adaptative learning models are a particular case for which a property “online”: “true” must be specified in the “payload”
prediction: Different data sources can be specified in the field “type”:
“REST_API”: Predictions can be generated by REST API calls. This exposes the AI model through a public API Gateway URL. The “payload” must include all parameters taken as input by the predict function of the model
“MESSAGE_BUS”: Predictions can also be generated by sending new data registries to a specific topic, defined as a “routingKey”. The message sent must contain all parameters expected by the model’s predict function
output: Optional channels for output data used in model’s training and/or predictions:
training output published to a message bus topic (type: “MESSAGE_BUS”): Some output statistics related to the AI model’s training can be published to a specific topic, defined as a “routingKey”. These statistics are received by all consumers who were subscribed to this output topic
prediction results published to a message bus topic (type: “MESSAGE_BUS”): The prediction results of the AI model can be published to a specific topic, defined as a “routingKey”. These new predictions are received by all consumers who were subscribed to this output topic
modelData: Defines the model specifications for each different type of model:
type: Type of model (supports PYTHON, H2O, or DOCKER_LAYERS)
payload: Includes the model specifications:
dependencies (only for PYTHON): Python PIP dependencies
hyperparameters: Specific training parameters
modelFile (only for PYTHON): Name of file which is generated by the training phase and then used for new predictions, ie trained_model.pkl
jarFile (only for H2O): Name of .jar file to be used to make predictions, ie “jarFile”: “predict.jar”
layers (only for DOCKER_LAYERS): List of docker layers to be included (only for DOCKER_LAYERS), ie layers: [{“name”: “layer-name”}]
envVars (only for DOCKER_LAYERS): a list of environmental variables to be included ie envVars: {“var1”: “value1”, “var2”: “value2”}
openapi (only for DOCKER_LAYERS): OpenApi specification to register the API in the Service and Message Bus component if required.
Note: All message bus topics defined as (type: “MESSAGE_BUS”) are using the AMQP protocol and the predefined “amq.topic” exchange.
Python based models
The zip file uploaded must have (at least) the following structure:
manifest.json
src
├── predict.py
├── train.py (if your model needs training)
├── … (other files needed or generated by your code)
train.py includes all the needed code to train the model. According to the manifest configurations, training can be performed from a predefined dataset uploaded to the component Storage or by sending single data inputs to a message bus topic. After training has finished, a model file (ie trained_model.pkl) is generated and the model is ready to make new predictions
predict.py defines the predict method. This method must accept the parameters specified in the manifest. This must return a JSON serializable output which would contain the prediction results provided by the AI model
H2O based models
H2O based models can be sent to the AI Analytics Runtime. The “src” folder for H2O models must include a predict.jar that receives the parameters specified in the manifest. The zip structure must be like:
manifest.json
src
├── predict.jar
├── train.jar (if your model needs training)
├── … (other files needed or generated by your code)
Docker layers
Docker Layers support has been added. It allows to send any Docker layer specification to build it using the AI Analytics Runtime. After the image has been built, the layer is deployed. The zip file structure must be like:
manifest.json
Dockerfile
… (other files needed or generated by your code)