Marketplace

General Description
The Marketplace primarily targets users from the manufacturing sector. The successful concept of the App Stores for mobile platforms is transferred to the domain of the manufacturing sector, where specialized applications (zApps) in combination with the ZDMP platform result in easily deployable applications for various kinds of use cases and all kinds of infrastructure need a central repository for zApps.
The Marketplace fills this need by enabling users and administrators of manufacturing companies to search for existing applications based on many characteristics such as category, price, type of payment (demo applications, one-time fee, monthly or yearly licenses, etc) and obtain licenses for their company. The purchase process includes the entire flow of selling: negotiation, order, invoicing, payments, post-selling services like technical support and keeping tracking of application usage. For users, a collaborative system for presenting ideas and requests towards 3rd party developers is included so that users can make clear what kind of solutions they are currently missing, stimulating developers to create more zApps. In addition, users can rate and review zApps as well as view existing ratings and reviews added by other users. For developers, the Marketplace provides developer access to licenses of their own products for easier testing.
The backend provides 3rd party developers a content management system for organizing and populating metadata for the different applications. The different possible licenses as well as the pricing can be managed in the backend, and affiliate marketing is possible.
| Resource | Location |
|---|---|
| Source Code | Link |
| X Open API Spec | Link |
| Video | Link |
| Online documentation | Link |
Screenshots
The following images are illustrative screen shots of the component.
Component Author(s)
| Company Name | ZDMP Acronym | Website | Logo |
|---|---|---|---|
| Software Imagination & Vision | SIMAVI | www.simavi.ro |  |
| Ascora GmbH | ASC | www.ascora.de |  |
Commercial Information
| Resource | Location |
|---|---|
| IPR Link | Marketplace |
| Marketplace Product Link | Marketplace Product |
Architecture Diagram
The following diagram shows the position of this component in the ZDMP architecture:
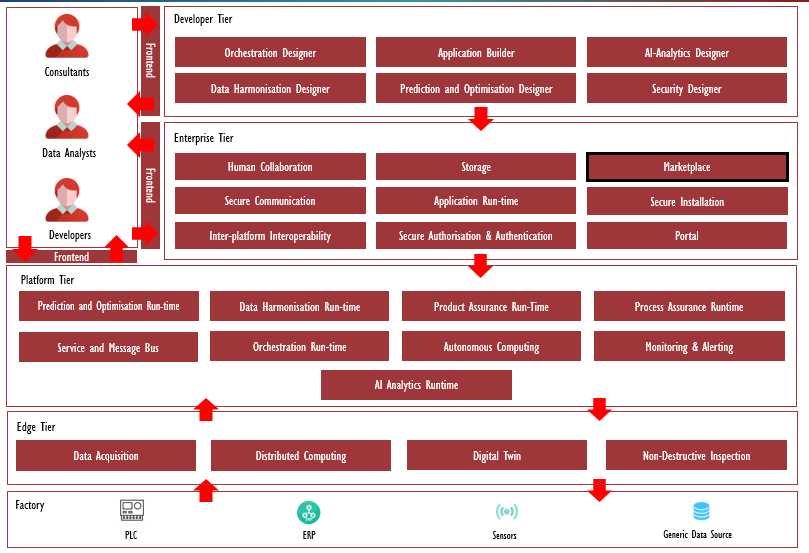
Figure 46: Position of Marketplace Component in ZDMP Architecture
Benefits
The marketplace user interface and payment system provide several benefits. zApps can be explored by categories and using a search, and zApps can be rated, reviewed and new zApps can be requested. The user can also view licenses they bought. The shopping cart of the payment backend makes the payment procedure usable and effective, collects the necessary user data, triggers the purchase, and notifies the License Manager when a user has obtained a license for a product after the payment provider confirms the payment.
The License Manager provides the backend to create and update zApps and their respective licenses, including pricing. License subscriptions will be managed as single one-time purchases. In these cases, the user will be notified, that they have to obtain an updated license. Licenses can be managed, renewed, and cancelled
In addition, affiliate links can be created, and sales generated with these links are aggregated on a per product and per user basis.
Features
The features for this component are itemized below and explained there after:
Marketplace User Interface and Payment System
Product License Manager UI and API
Affiliates Manager UI and API
Marketplace User Interface and Payment System
The functions for the Marketplace, including its User Interface and Payment System, which have been created, are as per the following:
Shopping cart: Marketplace user can add single or multiple products in the shopping cart system. The shopping cart functionality is shown in Section How to use
Rating and Review of zApps: ZDMP Customer can review and rate their purchased products. This type of customer feedback is moderated by the Marketplace admin and once approved, is listed under the product page.
Choose / Explore Categories: The categories can be set up in the Product License Manager and can be used in the Marketplace User Interface to further refine the search for products
Marketplace Search: Search functionality to help user find specific products using specific keywords
Requests: Research and implement application request / proposal system for the marketplace: a separate tool named Fider is used for this. Screenshots and usage are shown in Section How to use
Payment System: Integrated at the shopping cart level. Facilitate the payment step for the customer and manage all the callbacks necessary between the payment provider and the Product License Manager
Purchased zApps : Allow user to access all their purchased apps, manage their licenses and request their deployment in the ZDMP platform
Product License Manager UI and API
The Product License Manager a simple content management system to manage the static information about software (zApp) products. This is a backend UI to easily manage the content behind this, showing of the content is done in the marketplace frontend.
The functions and features of the Product License Manager component are the following:
Integration with the Secure Installation to add a security layer over model training process
UI for users to manage product (CRUD), translate and review them
UI for additional data useful for products such as: Supported platforms, license types, version purposes, tags etc
Manage the license management, send emails for to users regarding their license status, verify the license purchase etc
UI for user bank account
UI for admin payment settings
Affiliates Manager UI and API
The Affiliate Manager feature generates referral links which can be used to trace the source of the licenses sales. The UI displays the total sales per referral link which allows the user to know which product generated more sales and where the sales were generated. The system is tracking this information in order to be able to pay bloggers or social media marketeers who have brought paying users to the platform, which is a basic means to improve external interaction and word-of-mouth marketing, and which is a successful concept that was a cornerstone of the business success of online retailer Amazon.
System Requirements
Minimal requirements needed:
Virtual machine with at least 4 VCPU, 16GB RAM and 80GB of disk
Docker version 19 minimum
Associated ZDMP services
Required
Installation
Installation Marketplace User Interface and Payment System
In general, only i4FS will run a central instance of the payment system. The Marketplace user interface can also be run in a local installation, at a manufacturing site for example. This is a version disconnected from the shop system in a way, that this federated instance will be able to communicate with the central instance of the payment system and the Product License Manager, which will maintain restricted access to the payment infrastructure of i4FS.
While starting the Docker containers, some environment configuration is needed. The following environment variables must be passed to the container for the payment backend (cart-mediator).
The following environment variables must be specified for the container running the Marketplace user interface.
| Environment Variable | Description |
|---|---|
| PORTAL_FRONTEND_URL | The URL of the T6.4-Portal component frontend. |
| PORTAL_API_URL | The URL of the T6.4-Portal component API. |
| PRODUCT_LICENSE_MANAGER_API | The base URL for the Product License Manager API. |
| PRODUCT_LICENSE_MANAGER_URL | The URL to the Product License Manager frontend. |
| CART_MEDIATOR_URL | The base URL to the payment backend. |
Additionally, you must set up the web hook in your Stripe dashboard pointing to the URL “CART_MEDIATOR_URL/v1/stripe-webhook/event”, where “CART_MEDIATOR_URL” is the base URL to the payment backend, for the following events:
charge.dispute.created
checkout.session.async_payment_failed
checkout.session.async_payment_succeeded
checkout.session.completed
Installation Product License Manager
After the Docker containers are ready for use, run the commands to below have the system ready for use.
Enter to PLM container:
docker exec -it product-license-manager /bin/bash
Figure 47: Enter to PLM docker (Docker shell)
Create .env file. In this file it will be stored app config like credentials for database, storage, email, etc.
Figure 48: Create .env file (Docker shell)
This command runs the composer command in order to download the PHP packages needed for the project:
Figure 49: Installation Product License Manager (Docker shell)
Run migrations. This command will create the necessary database tables:
```php artisan migrate
Figure 50: Create database tables (Docker shell)
Optionally, you can populate database tables with dummy data such as: Languages, supported platforms, license types:
```php artisan db:seed
Figure 51: Populate database tables (Docker shell)
Because PLM use dash button for login you will need to install T6.4 Portal.
Next login on localhost:8080 with admin / Pa55w0rd
Go to IKERLAN realm
Add roles ZDMP_Marketplace_Product_Owner, ZDMP_Marketplace_i4FS_admin if not already exists. PLM can be accessed by two types of users, admin with role ZDMP_Marketplace_i4FS_admin will have access to whole application, he can review apps. The other type of user will be developer with role ZDMP_Marketplace_Product_Owner. He can submit app for review and manage his own apps.
Create a user with admin role and one with developer role.
Next expose localhost:8080(keycloak) to localhost:8000(plm) using ngrok.
```./ngrok http 127.0.0.1:8080
Figure : Expose keycloak
Copy https address to .env file var KEYCLOAK_BASE_URL
Set .env DASH_BUTTON_LOGIN=http://localhost:4200/auth/login
Set .env PORTAL_URL=http://localhost:5100
Now you can log in on 127.0.0.1:8000 with user created a few steps back
Minio setup.
You can use skip using minio by set in .env MEDIA_DISK=local
For minio set in .env MEDIA_DISK=minio
Install T6.2-storage component
Minio will be available on 127.0.0.1:9000 using minio/minio123
Login and create new bucket and set in .env AWS_BUCKET
Expose minio
```./ngrok http 127.0.0.1:9000
Figure 53: Expose minio
Copy https address to .env MINIO_ENDPOINT
Now all files will be uploaded to previously created bucket on minio.
How to use
Marketplace User Interface and Payment System
Marketplace content is displayed in the following screenshot:
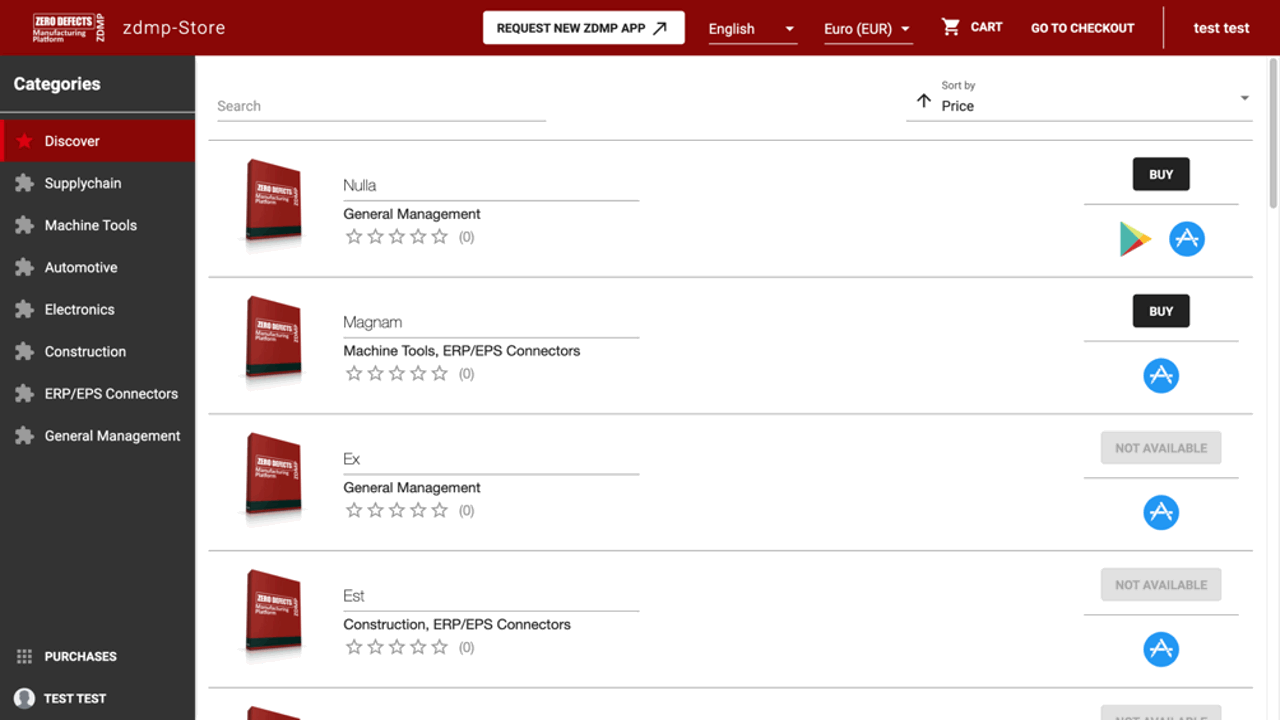
Figure 54: Marketplace start page for logged in users
The frontend for users focuses on findability of the created zApps. For this, the following tools are implemented:
A sorter allows the sorting of the shown list by Category, Price, Name or Rating.
The categories on the left-hand menu let the user quickly filter by Category. The discover mode lets the user search for a flat list of all categories of zApps. These categories are obtained from the Product License Manager and can be configured by the i4FS administrator
The search bar allows filtering the results shown by title, dynamically updating as necessary. It also includes search suggestions based on matching product titles
To view and interact with the Marketplace user interface, the user is required to be registered and logged in using the ZDMP user management functions. Otherwise, they will be redirected to the ZDMP Portal.
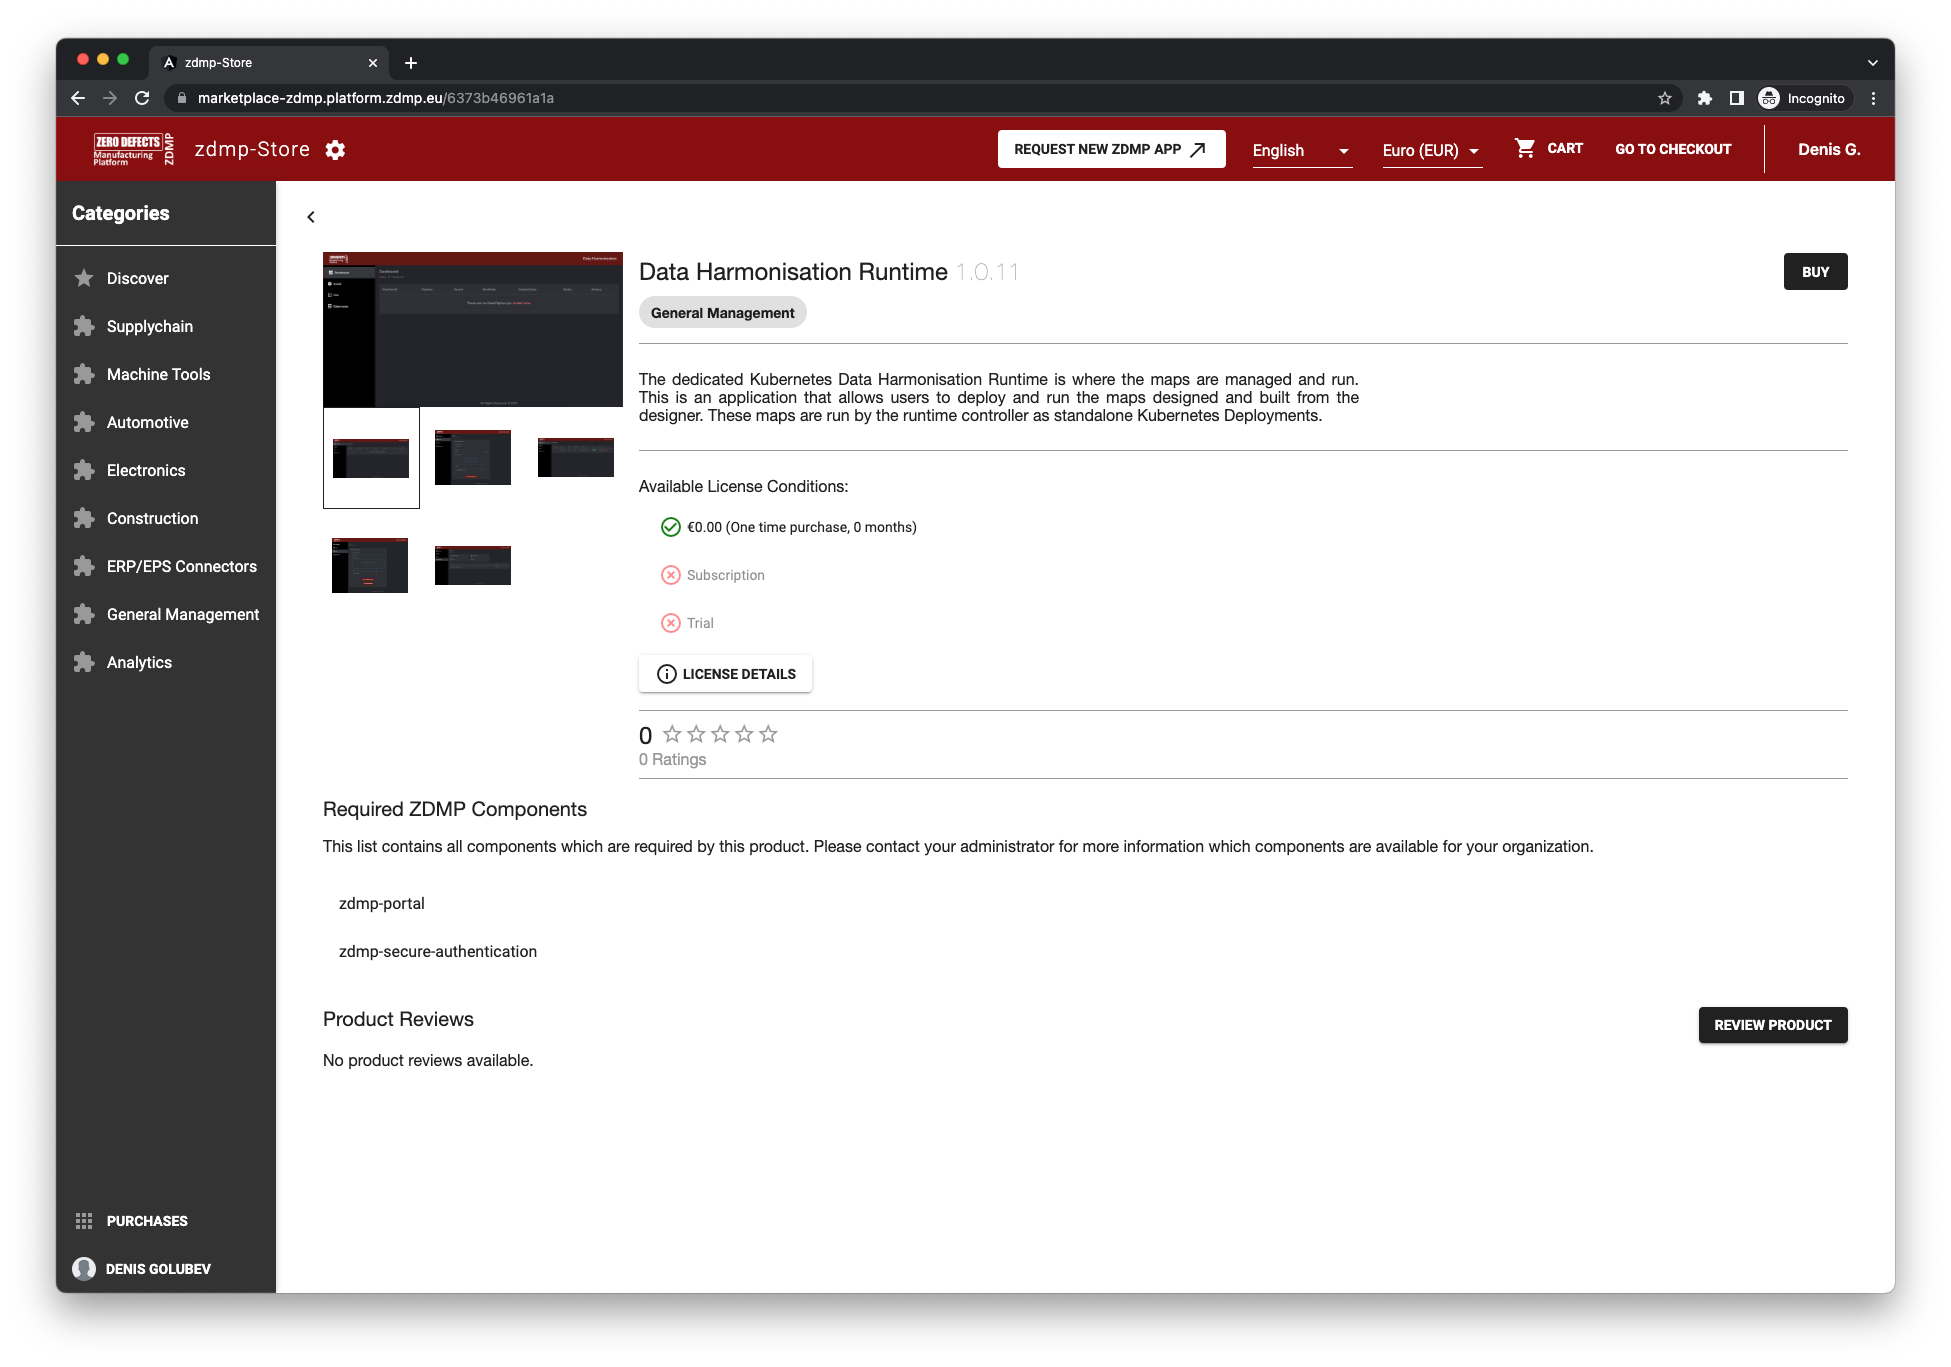
Figure 55: zApp Detail Page
The single items are now comprised of a title, version information and details, categories, screenshots, a screenshot gallery, a description, a list of dependencies, a ratings widget displaying the aggregated ratings for the product and a paginated list of reviews. Products, categories, and currencies are managed in the backend and are integrated in the frontend using the Service Bus from T6.4. Licenses and their integration in the frontend are integrated and available in the live build. This detail page also shows combinations of license and currencies in which the zApp is available.
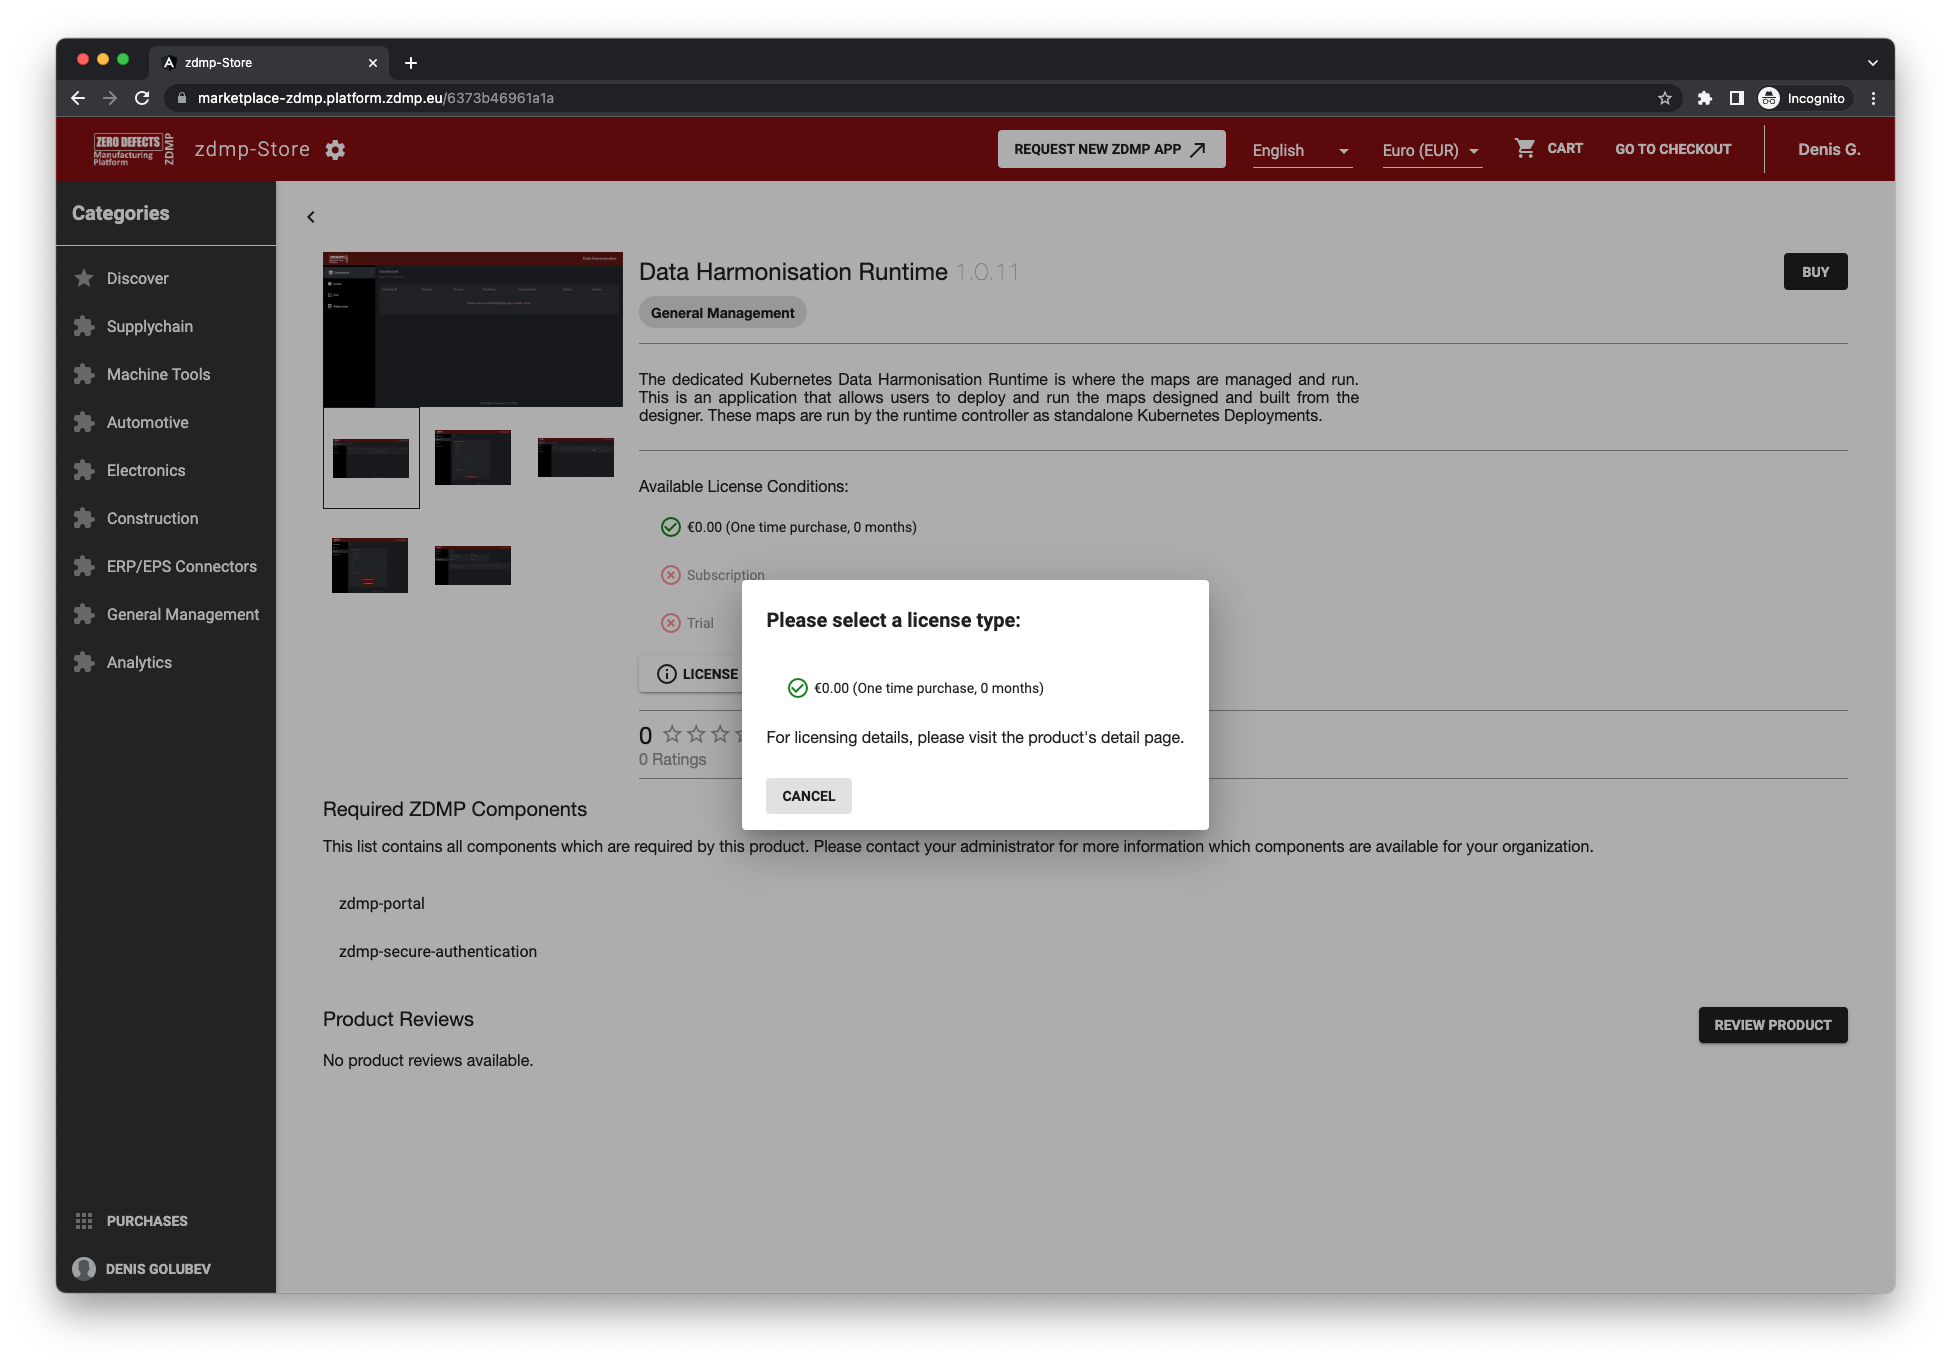
Figure 56: License Selection
If the user clicks the “Buy” button, they will be presented with licenses including their durations. This list only includes the licenses which are available for the currently selected currency. After selecting the desired license, the zApp will be added to the cart. If the zApp is not available in the current currency, the buy button is disabled.
If the current user of the Marketplace User Interface is the developer of the opened product, the detail screen also provides a “Developer Access” functionality (see Figure 57). If the user clicks on this button, they will be presented with the same license selection dialog as if they would try adding the product to the cart (see Figure 56). The difference is that upon selecting a license, the developer obtains the license for their product directly. This allows the developer to test their product without having to buy their product.
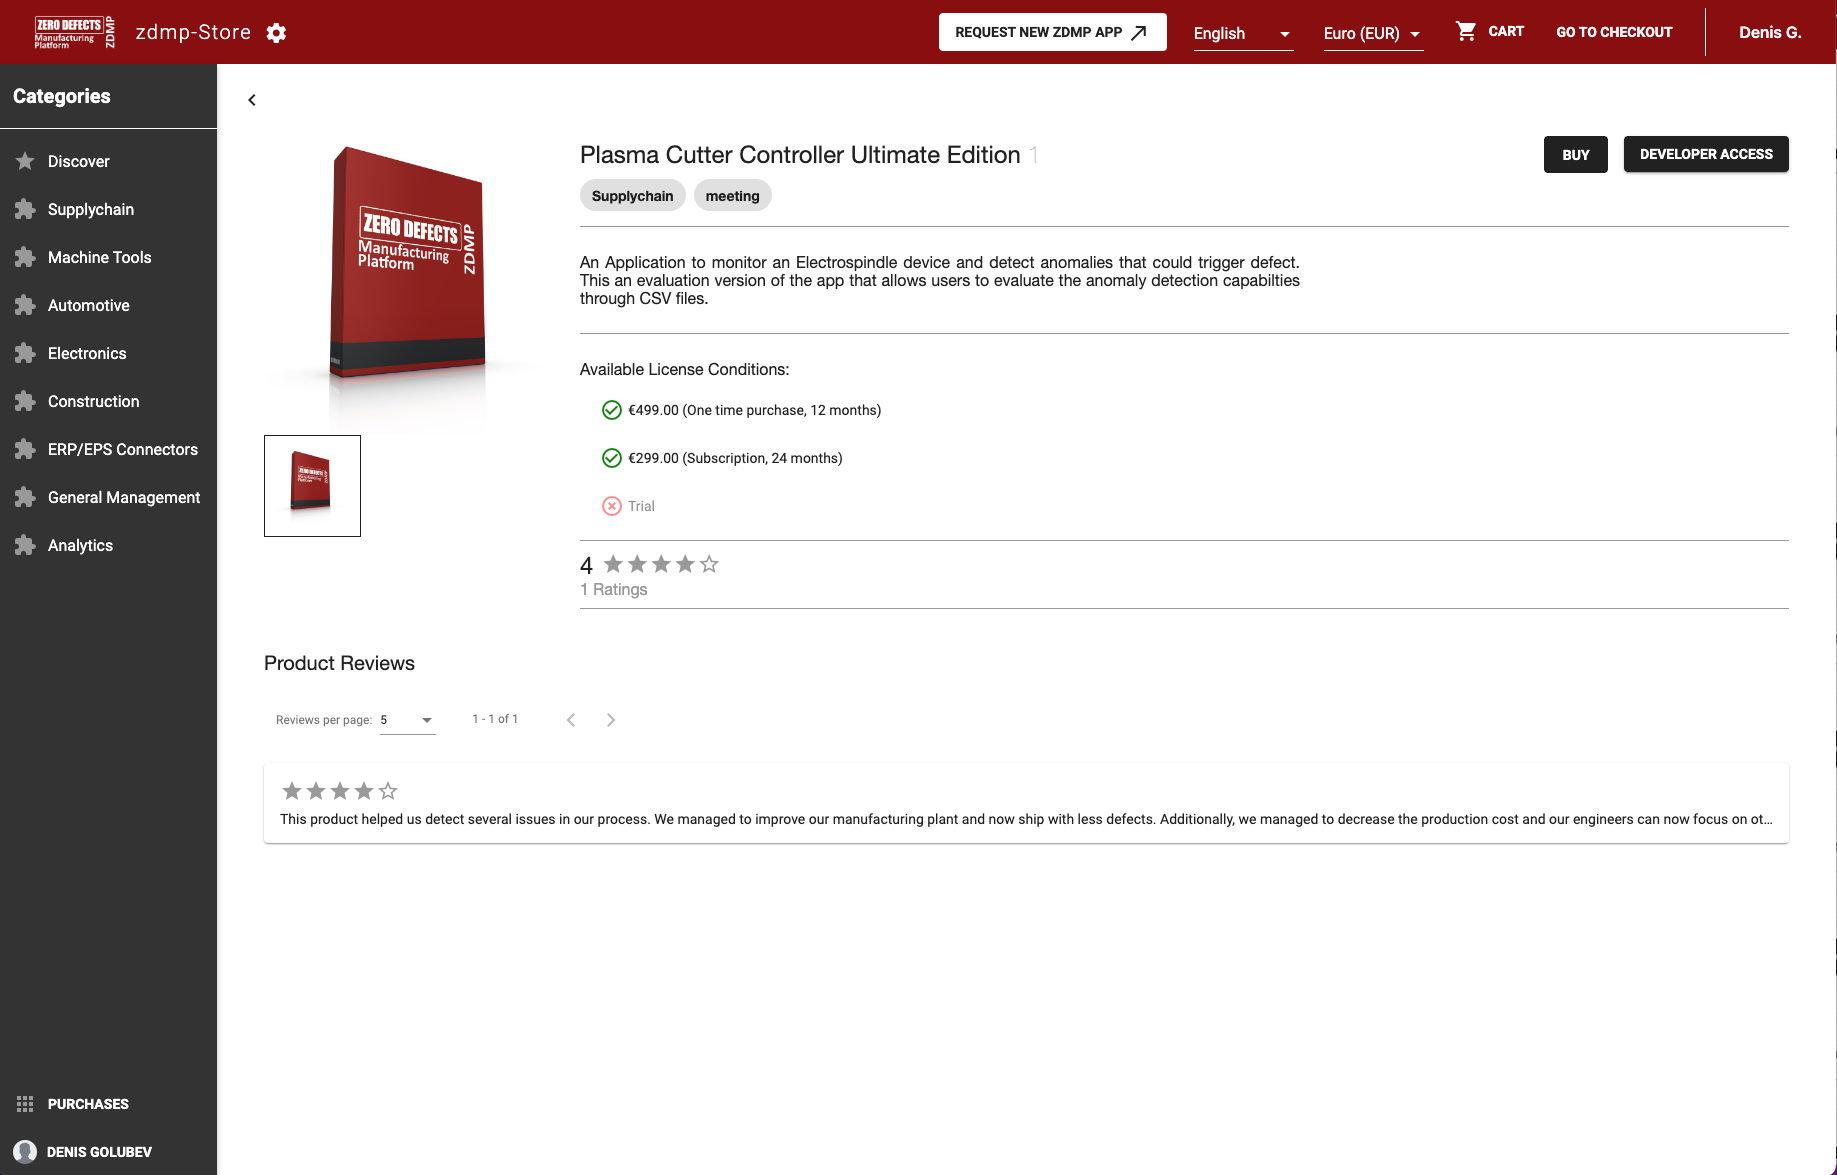
Figure 57: Product Detail page with “Developer Access”
After adding the desired zApps to the cart, the user can use the “Go to checkout” button to initiate the payment process.
The payment process in place currently puts the software items in the shopping cart with the selected license. The next step is gathering or confirming the shipment address as this is necessary for tax accounting.
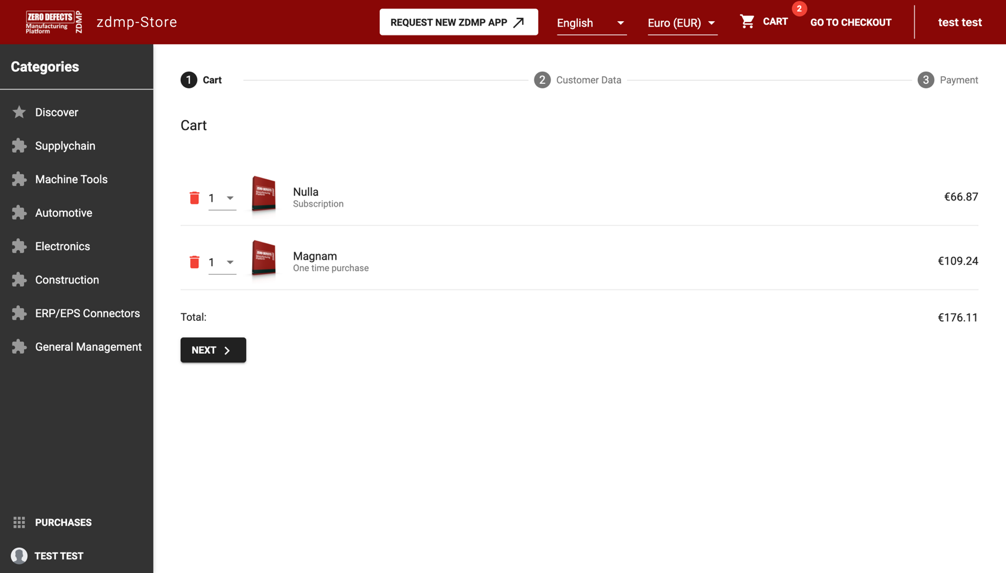
Figure 58: Shopping Cart
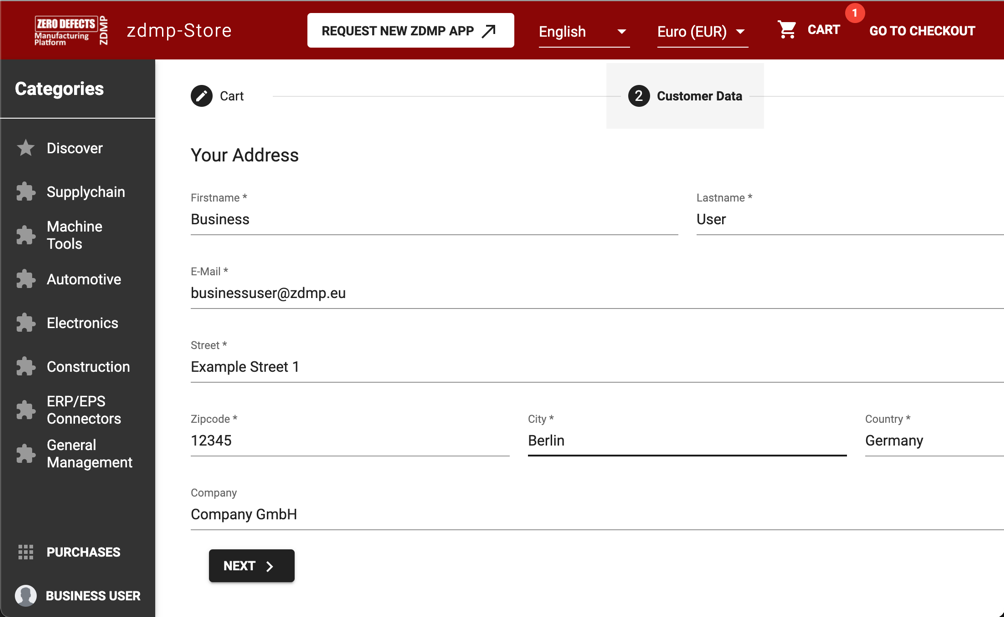
Figure 59: Customer Data Acquisition / Updating
After sending the order, the user will be redirected to the integrated payment provider Stripe, where they will enter their payment details. After entering the payment details was successful, the user is redirected back to the order confirmation screen (see Figure 60). In the background, the payment provider processes the payment and notifies the payment backend of the Marketplace if it was successful or not. If the payment was valid, the payment backend notifies the Product License Manager to store new licenses according to the placed order.
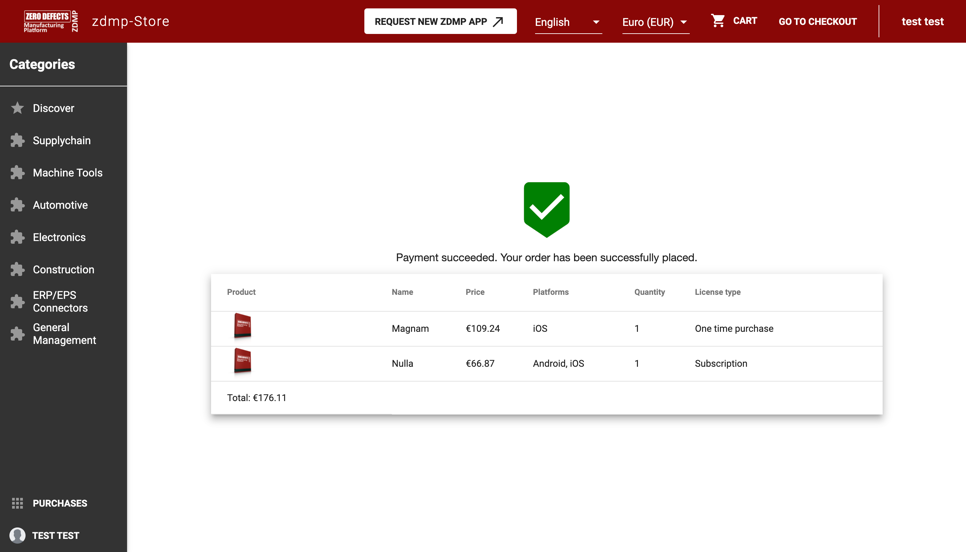
Figure 60: Order Summary
In the final step, the summary containing the ordered licenses is displayed in a result screen. After purchasing the licenses, there is a purchases menu item on the lower left-hand side. It leads to a page displaying all currently confirmed licenses for the user’s account. This may not yet contain the ordered licenses, as this depends on the payment provider confirming the payment.
This screen also allows the user to initiate deployment via the Secure Installation component. This functionality is only enabled if the user has the “ZDMP_IT_Security_Commander” role. If the user clicks on the “Manage Installations” button they will be redirected to the Secure Installation component, so they can further manage their deployment.
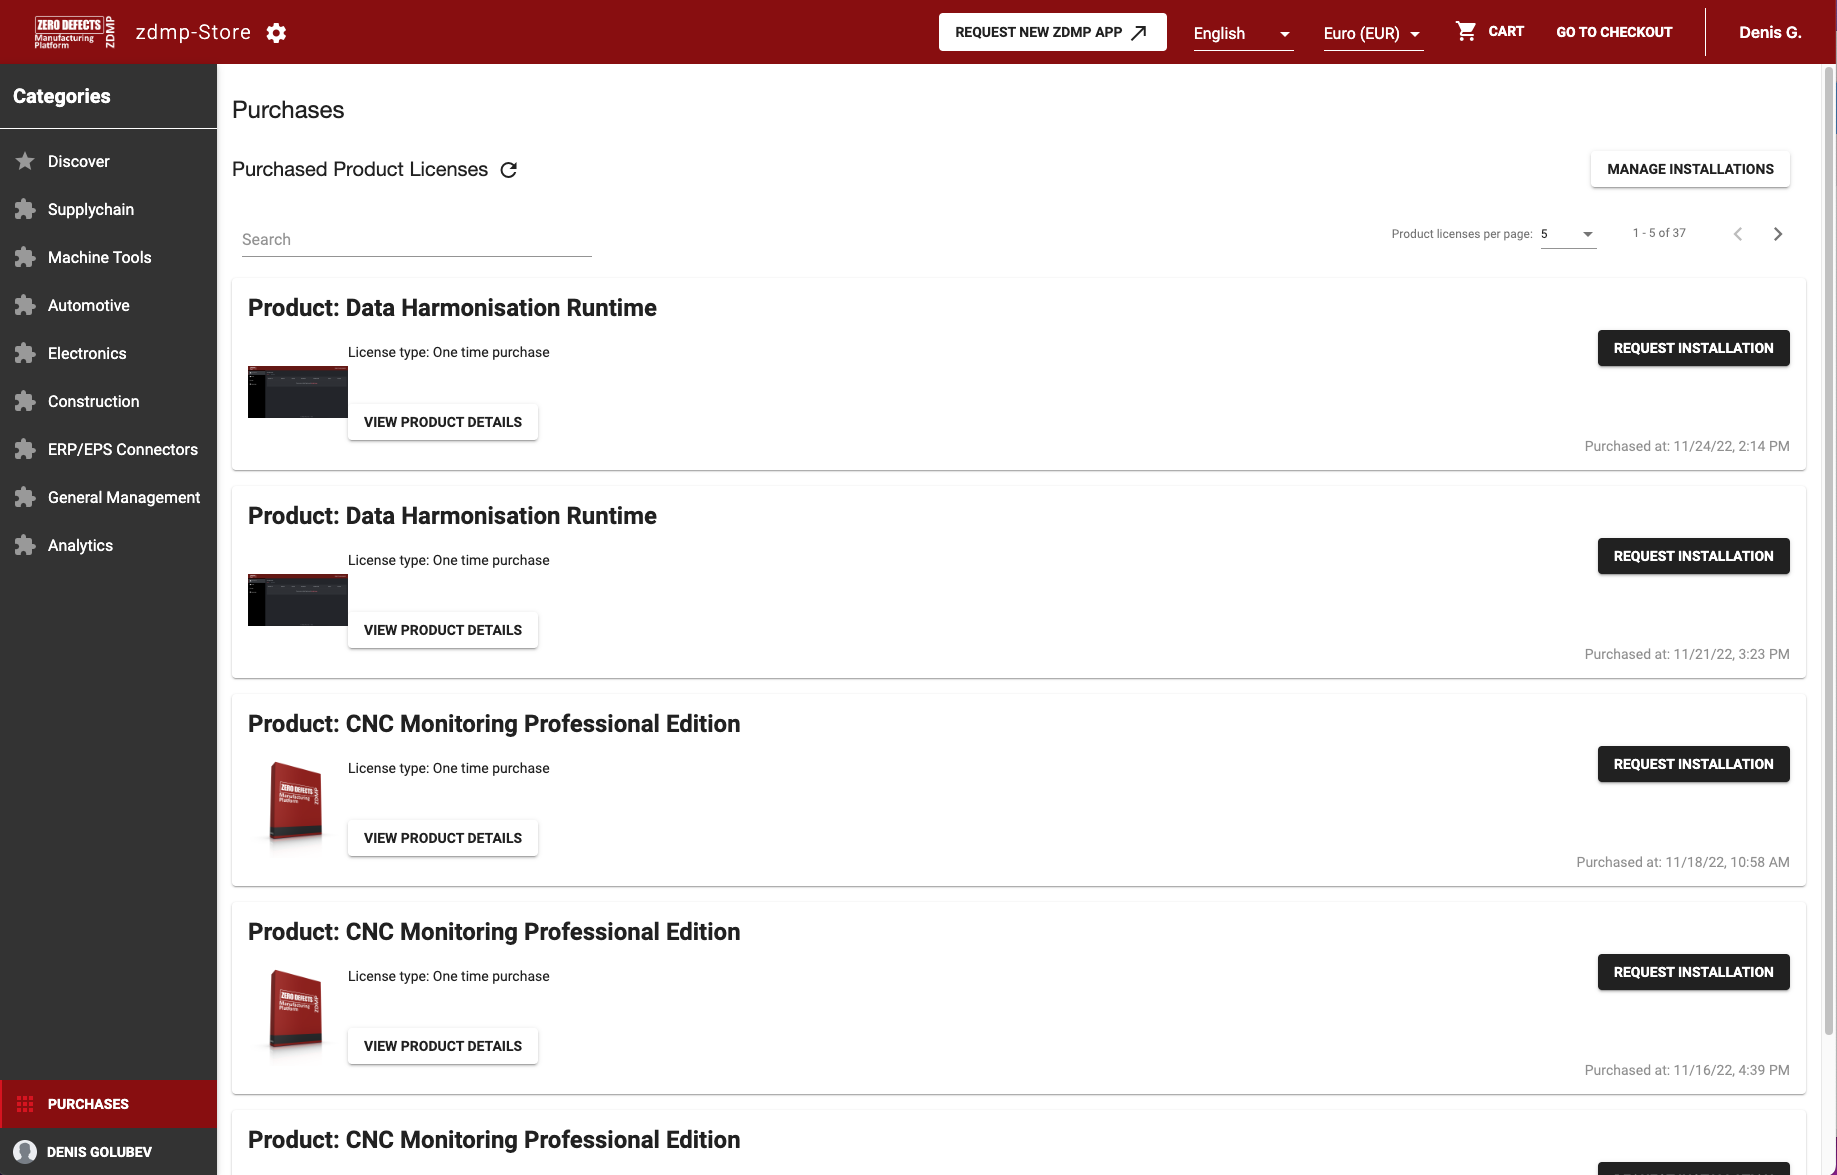
Figure 61: Product License User Frontend
In addition to the header, the frontend allows the user to edit their settings of the Marketplace user interface consisting of the language and currency in a separate screen as well:
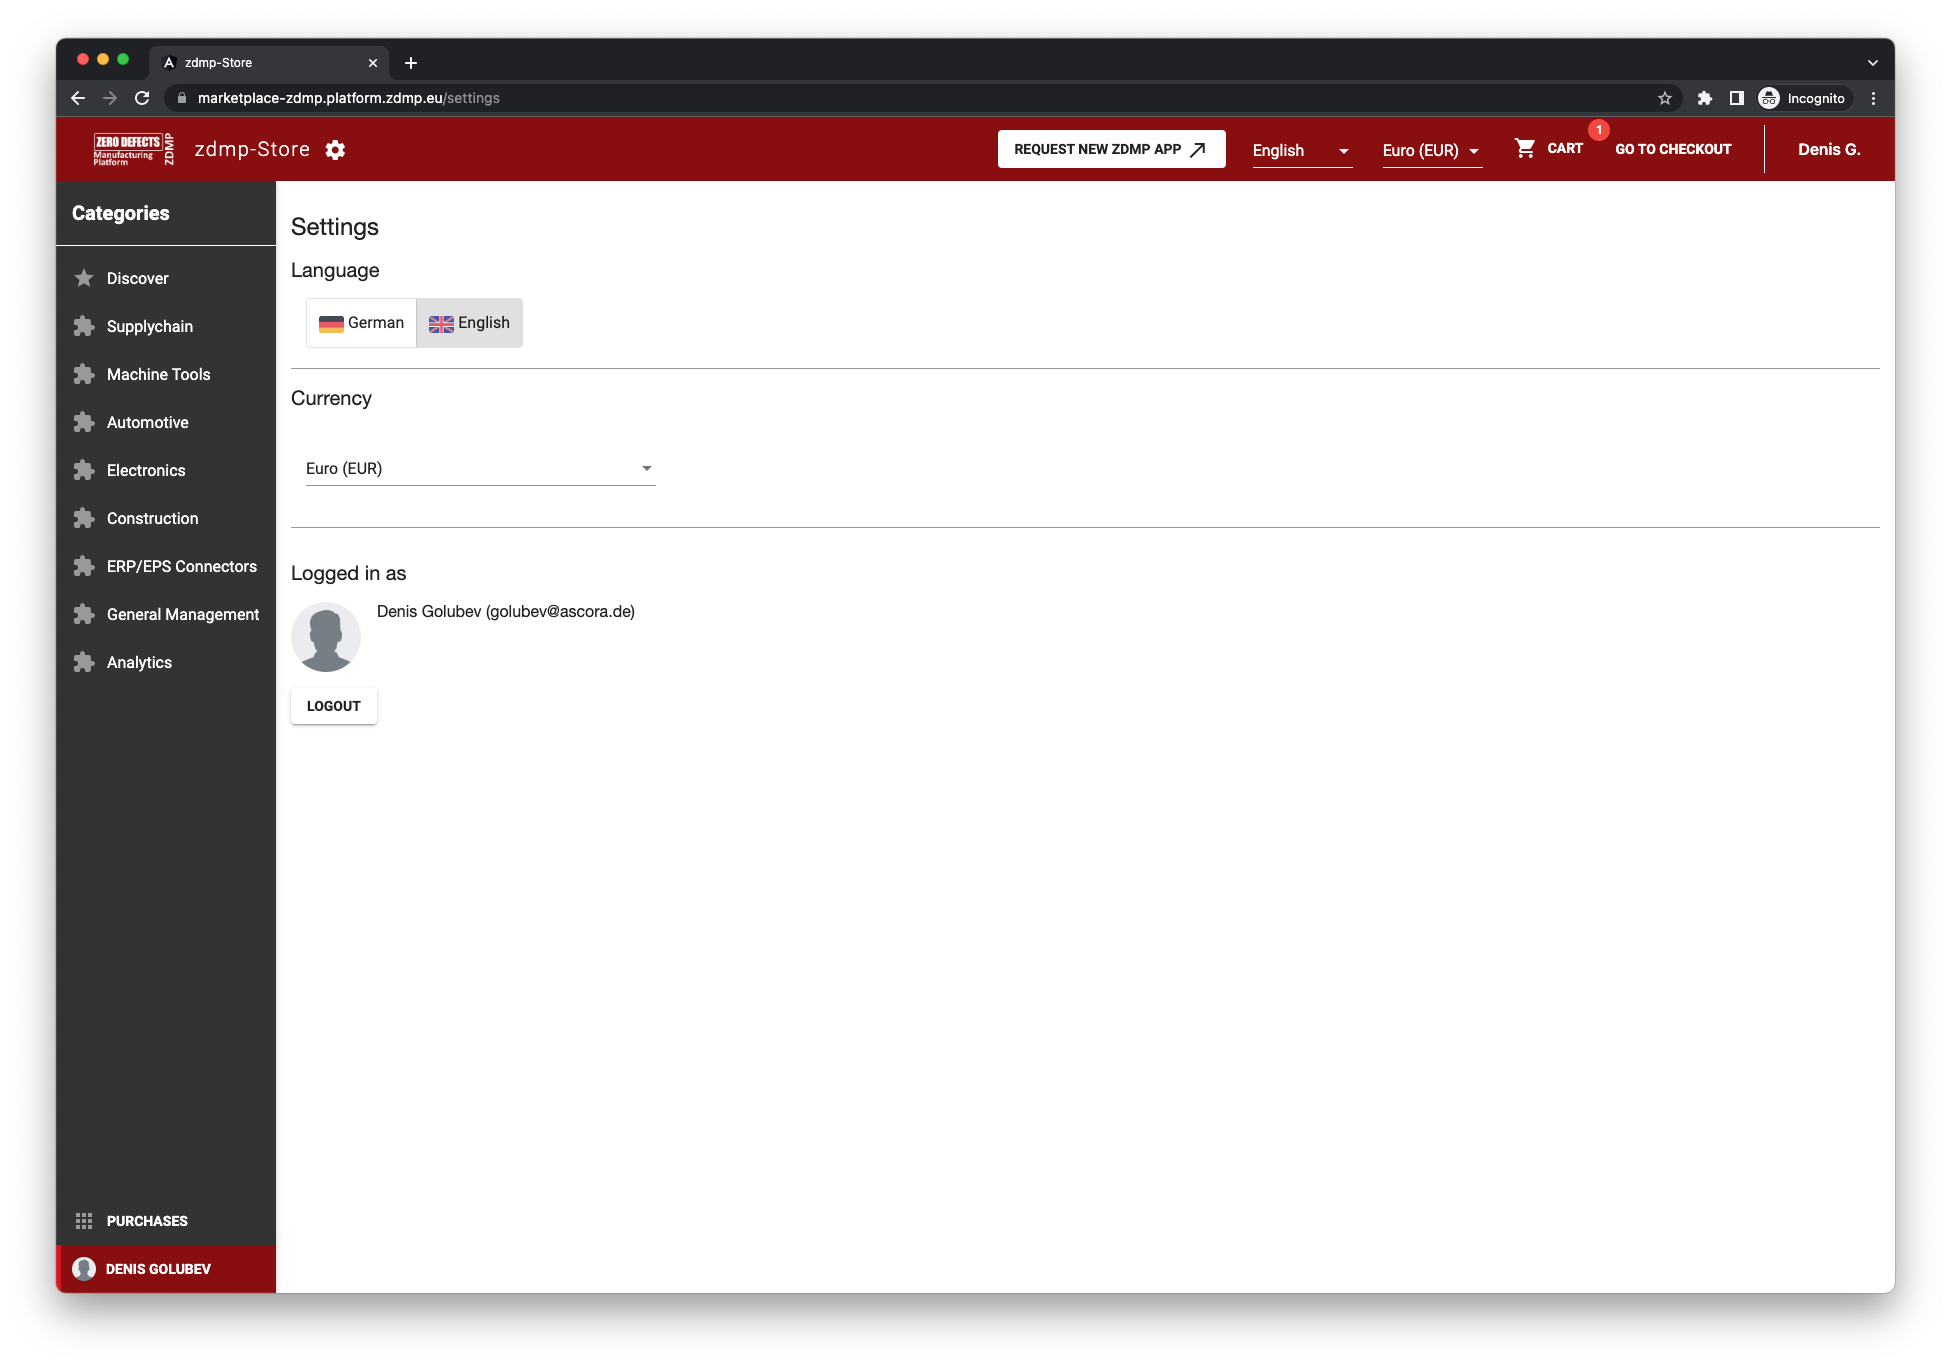
Figure 62: User Settings Screen
Additional user settings are language and used currency. Currently, only English and German are supported as languages, and Euro, US Dollar and GBP are supported. These currencies are obtained from the Product License Manager.
The software used for 3rd party ideas and suggestions regarding new/changed zApps is based on an Open-Source software called Fider. The usage is straightforward. Requests can be posted on the site, they can be voted and commented upon, images can be attached, and the user is automatically subscribed to changes or answers via email.
Figure 63: Fider zApp Requesting Application Frontend
Product License Manager
Dashboard
The dashboard contains various widget which displays helpful information based on user roles(developer/admin).
At the top of the dashboard are three counters: One for the products, one for the licenses, and the last for the affiliates. The next widget is a chart that displays the license selling evolution in time and monthly and yearly totals. The map widget displays the spreading across the world of the users that bought the licenses:
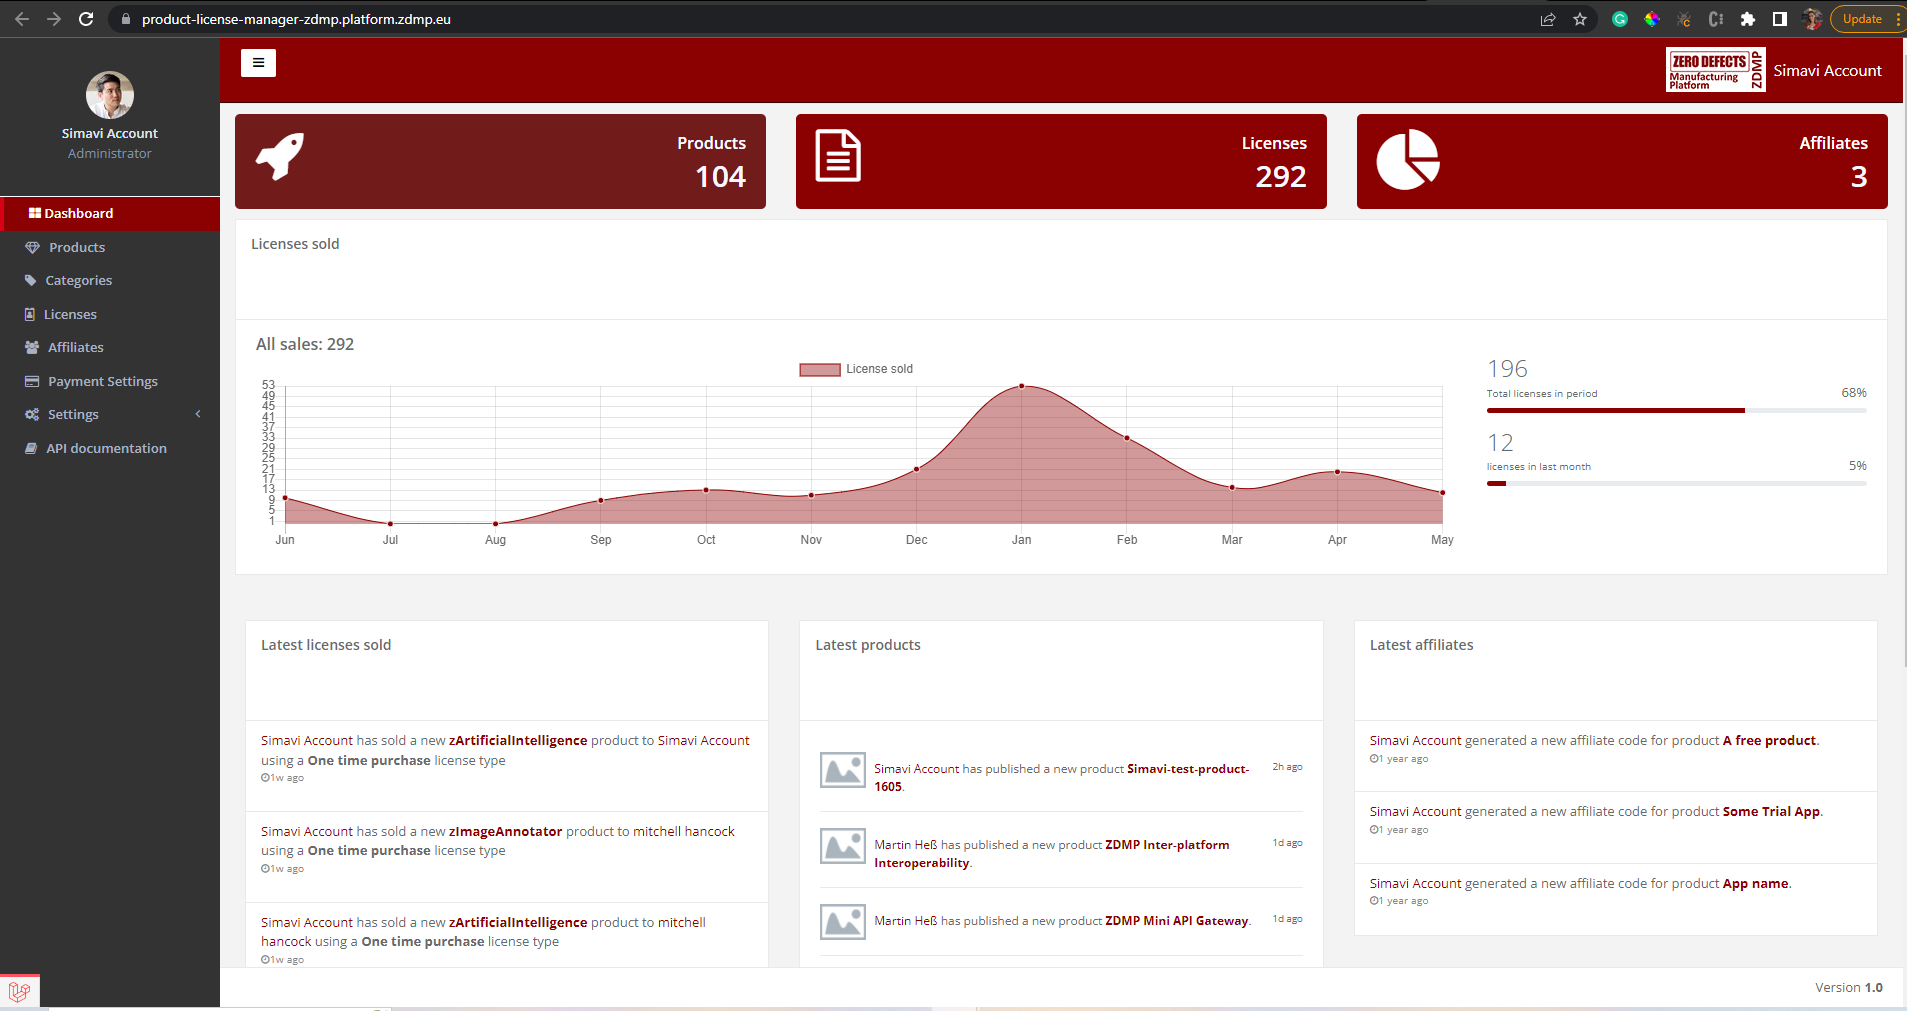
Figure 64: Backend Dashboard UI
Products List
This screen contains the product list with some of its information such as ID, name, languages, etc. Each product has a status based on its current situation. The list has some additional buttons which allows the user to export that list in CSV, Excel, and PDF file. Also, it has two other buttons that allow the user to copy to clipboard the list or to print it.
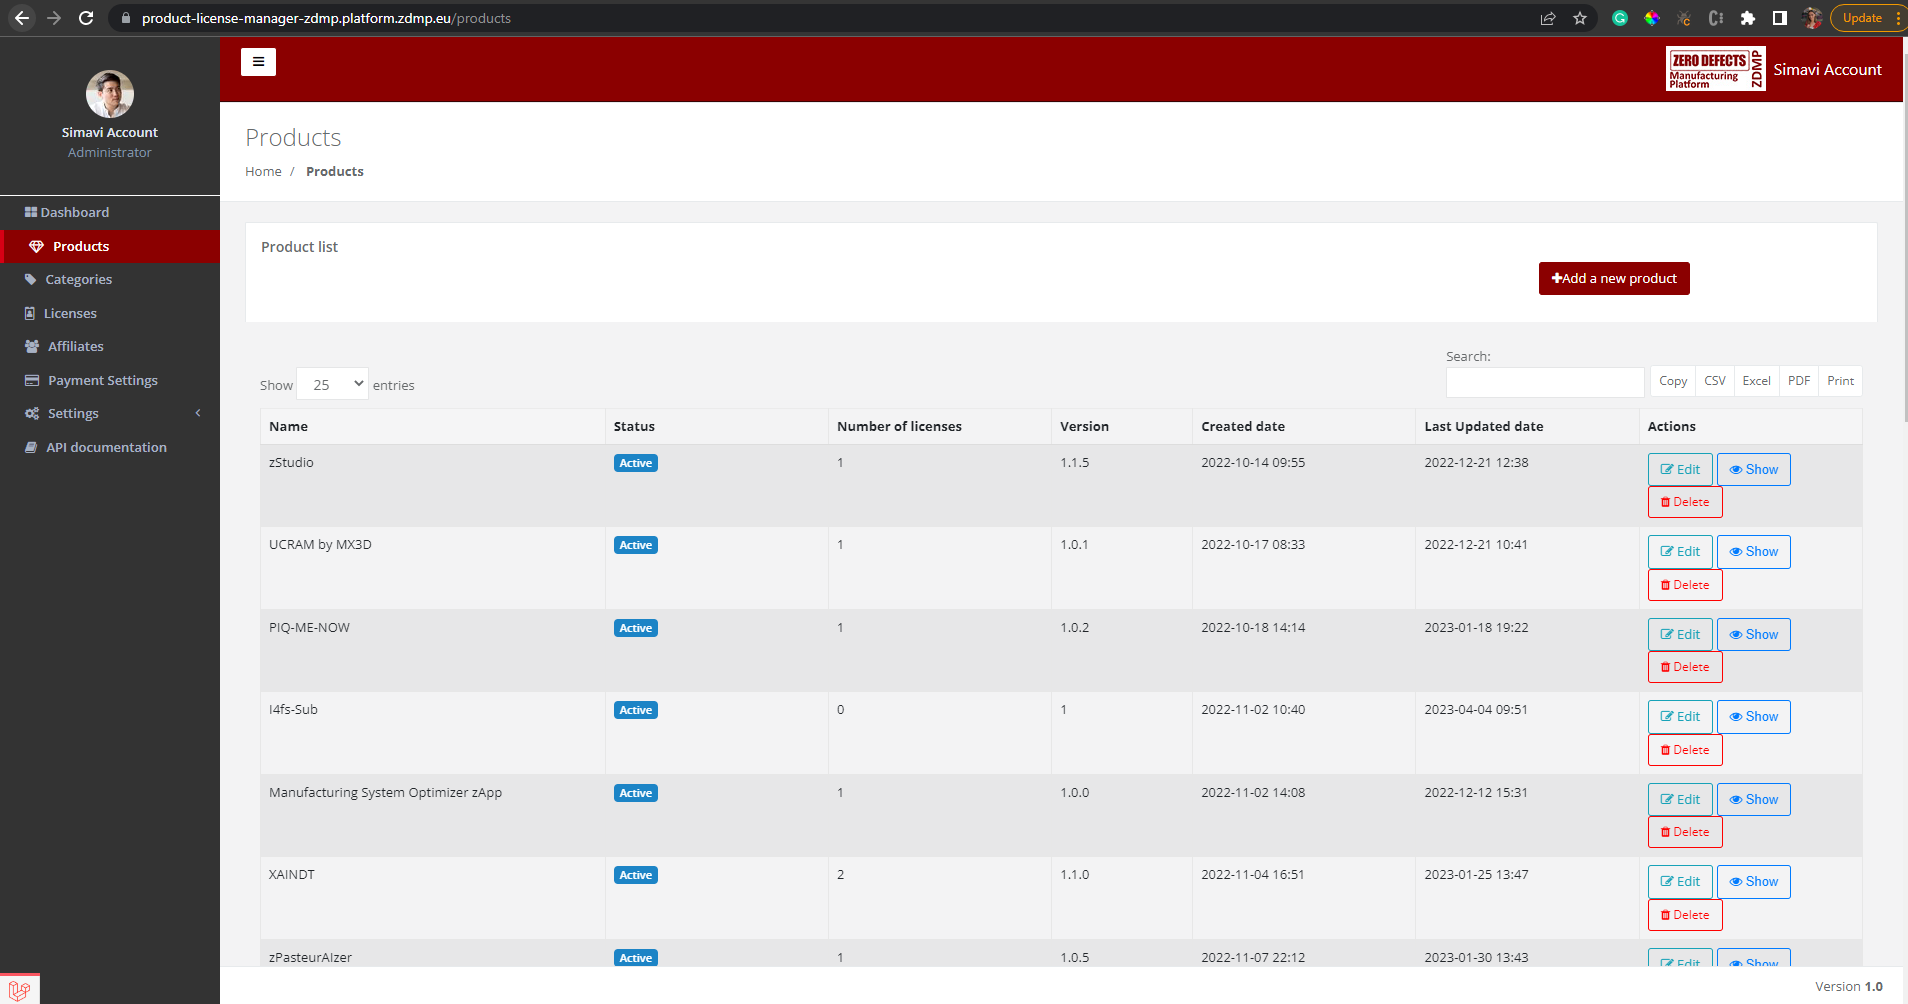
Figure 65: Backend zApp List
The product list can be also retrieved via REST API. The list can be ordered, sorted, and filtered while it is retrieved.
The REQUEST:
http://product-license-manager-zdmp.platform.zdmp.eu/api/v1/products?page=1&per_page=1
Figure 66: Http call for listing first page of products with 1 product per page
The RESPONSE:
{
“data”: [
{
“id”: “634931edc0f97”,
“user_id”: “56184b2b-190a-4ff2-a89d-f7bafbc9bfa1”,
“name”: “zStudio”,
“description”: “The zStudio or the Application Builder provides a framework of elements that support the development of services and zApps for ZDMP. The Application Builder provides an UI editor for zApps to the developers. This enables the drag-and-drop elements to embed the resources and services that a zApp requires, as well as to access design orientated data stored in ZDMP (models, patterns, and behaviours).”,
“version”: “1.1.5”,
“url”: “”,
“status”: “active”,
“version_purpose”: null,
“supported_platforms”: [
{
“id”: 3,
“name”: “Web”
}
],
“categories”: [
{
“id”: 3,
“name”: “Automotive”,
“description”: null,
“image”: null,
“icon”: null,
“created_at”: “2021-09-15T12:40:25.000000Z”
},
{
“id”: 4,
“name”: “Electronics”,
“description”: null,
“image”: null,
“icon”: null,
“created_at”: “2021-09-15T12:40:25.000000Z”
},
{
“id”: 5,
“name”: “Construction”,
“description”: null,
“image”: null,
“icon”: null,
“created_at”: “2021-09-15T12:40:25.000000Z”
}
],
“translations”: [
{
“code”: “ay”,
“language”: “Aymara”,
“name”: “Produkt–005”,
“description”: “Produkt–005”
}
],
“licenses”: [
{
“id”: 268,
“product_id”: 54,
“organisation_id”: null,
“license_type_id”: 1,
“duration”: “0”,
“price”: “0”,
“currency_id”: “EUR”,
“created_at”: “2022-12-21T12:38:46.000000Z”,
“link_of_license”: “http:\/\/apache.org\/licenses\/LICENSE-2.0”,
“description_of_license”: “Apache 2.0 "
}
],
“tags”: [
[
“application_builder”
],
[
“nocode”
],
[
“zdm”
]
],
“installation”: null,
“images”: [
{
“url”: “https:\/\/minio-zdmp.platform.zdmp.eu\/marketplace\/images\/a684eceee76fc522773286a895bc8436\/100\/Screenshot-2022-12-21-at-13.36.56.png?X-Amz-Content-Sha256=UNSIGNED-PAYLOAD&X-Amz-Algorithm=AWS4-HMAC-SHA256&X-Amz-Credential=minio%2F20230420%2Fus-east-1%2Fs3%2Faws4_request&X-Amz-Date=20230420T141848Z&X-Amz-SignedHeaders=host&X-Amz-Expires=300&X-Amz-Signature=9cda6bfcf6e14c1e3293d5ae9dc52d35389f718e14dac3d0a3408dad68dae3cf”,
“order”: 0,
“expire_at”: “2023-04-20T14:23:48.517346Z”
}
],
“download_url”: “https:\/\/product-license-manager-zdmp.platform.zdmp.eu\/products\/634931edc0f97\/download”,
“dependencies”: [
“Monitoring and Alerting”,
“Autonomous Computing”
],
“consultancy_assets”: [],
“product_type”: “zApp”,
“associated_hardware”: “”,
“associated_services”: “”,
“helm_chart_name”: “zdmp-application-builder”,
“file_video_link”: “”,
“document_file_link”: null,
“asset_file_link”: null,
“onCloud”: 0,
“reviews”: {
“total”: 0,
“average”: null,
“current_user”: []
}
}]
Figure 67: JSON listing first page of products with 1 product per page
Add a new product
Before adding a product, the developer should read and agree the developer agreement, then select a type of product (zApp, zComponent, other) and then start to complete the product information.
Adding a new product is a process that can be performed in the following ways: Using the Product Manager UI or using the Product Manager REST API.
Every time a product is created, it receives the “Ready for review” status and an email is sent to designated moderators to check if the product has the right information. While the https://software.zdmp.eu/docs/components/enterprise-tier/application-runtime/ product is reviewed, it gets the status “Reviewing” so it cannot be processed by another reviewer at the same time. After reviewing, the moderator sets the next status, either they will accept and product or they will reject it and send it back to the owner to do the necessary changes. Only the accepted products can be displayed in the Marketplace frontend.
Within the UI can be found four tabs, each has a set of fields with a common purpose. The Info tab contains the main product information such: Product id, name, version, category, download file, dependencies, associated hardware/services etc. The primary language is English, and the main currency is Euro.
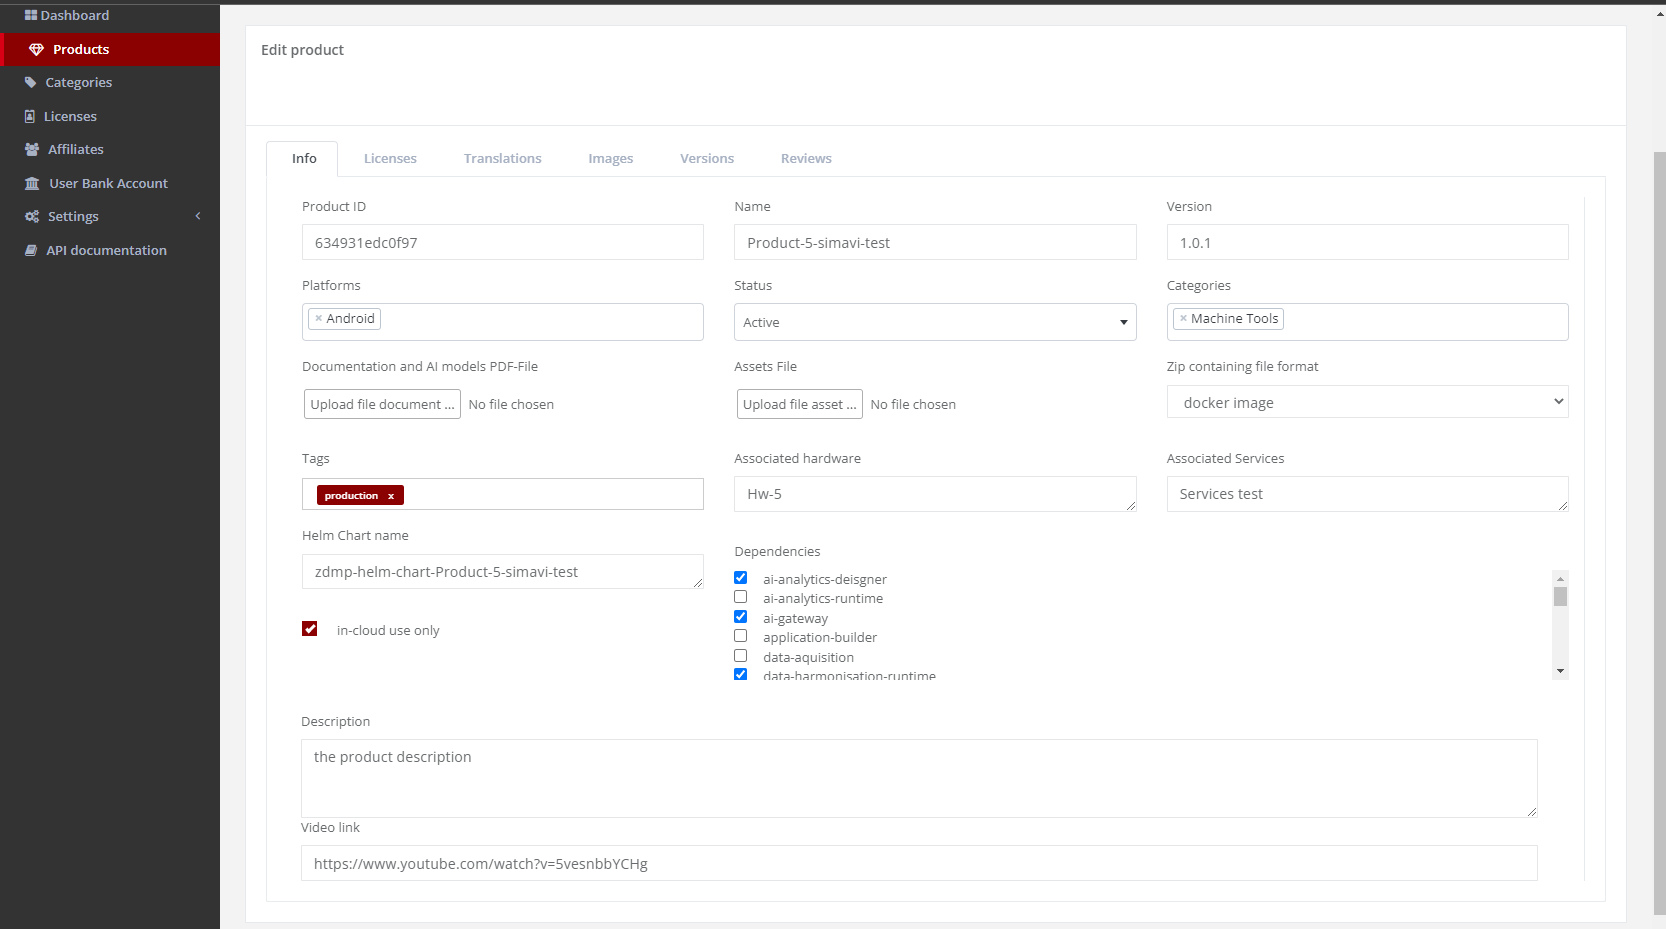
Figure 68: Add / Edit Product Backend UI
The Licensing tab adds the possibility to add different licenses based on the duration, license type, price and currency, each license has license link and description.
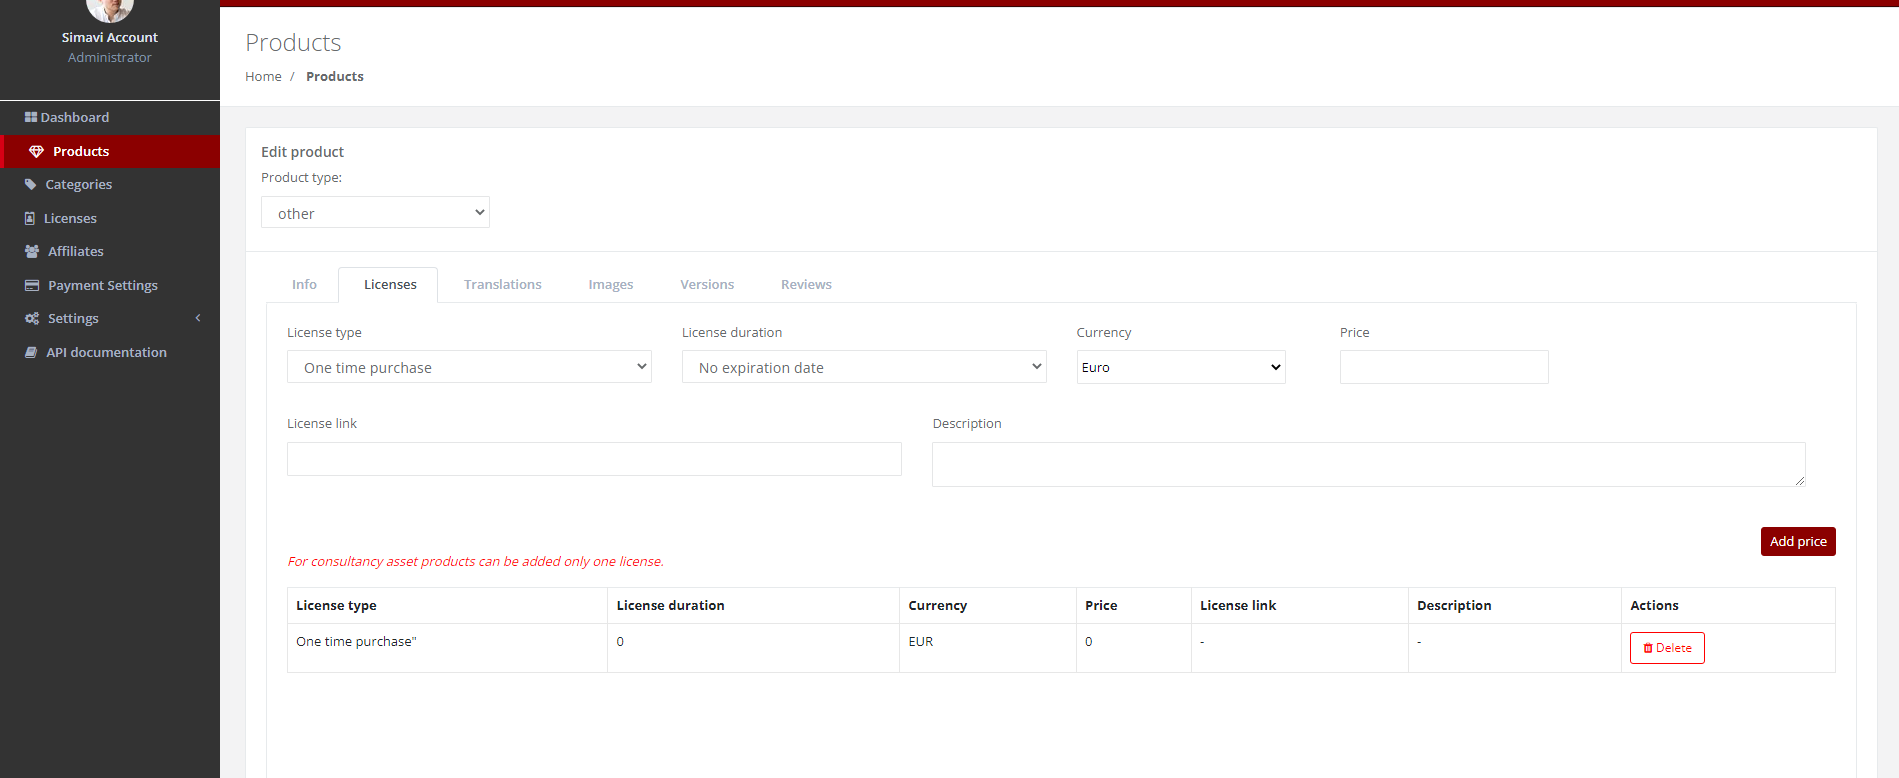
Figure 69: Product Licenses UI
The Translations tab adds the possibility to translate the product name and product description. There is no limit, it can be translated to any known language.
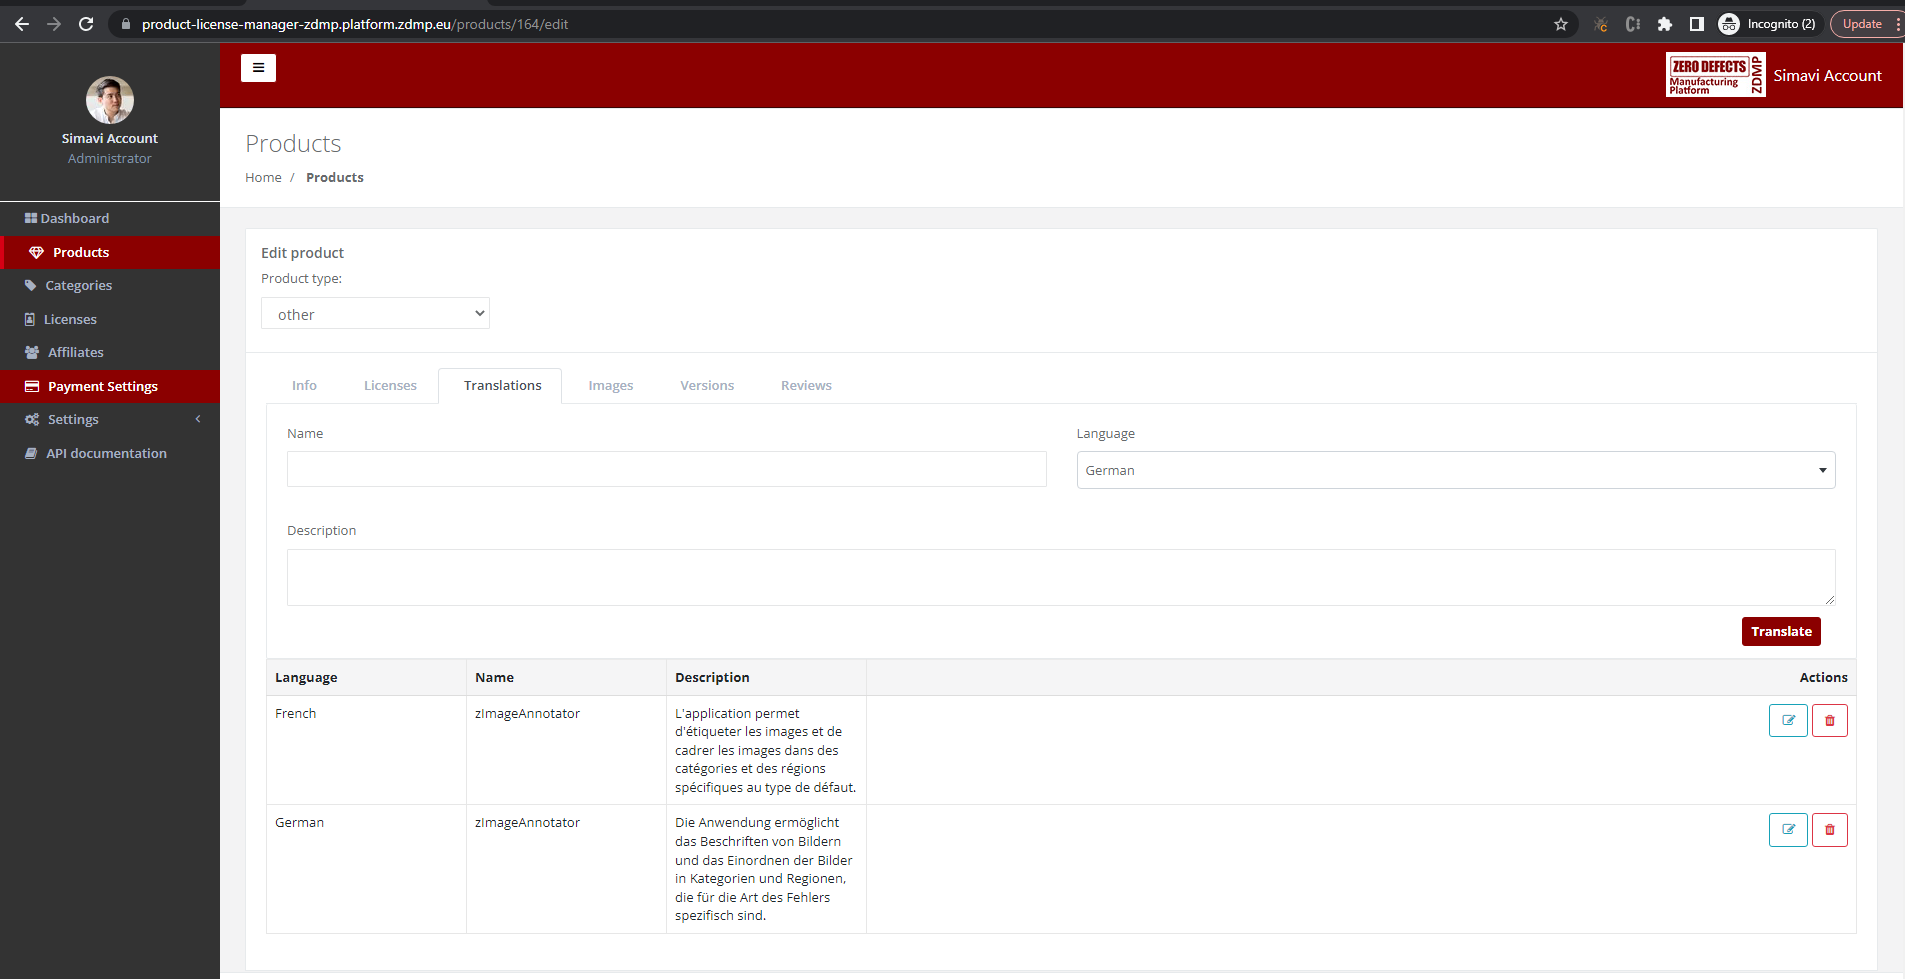
Figure 70: Translations UI
The images tab adds the possibility to display screenshots of the product and its functions:
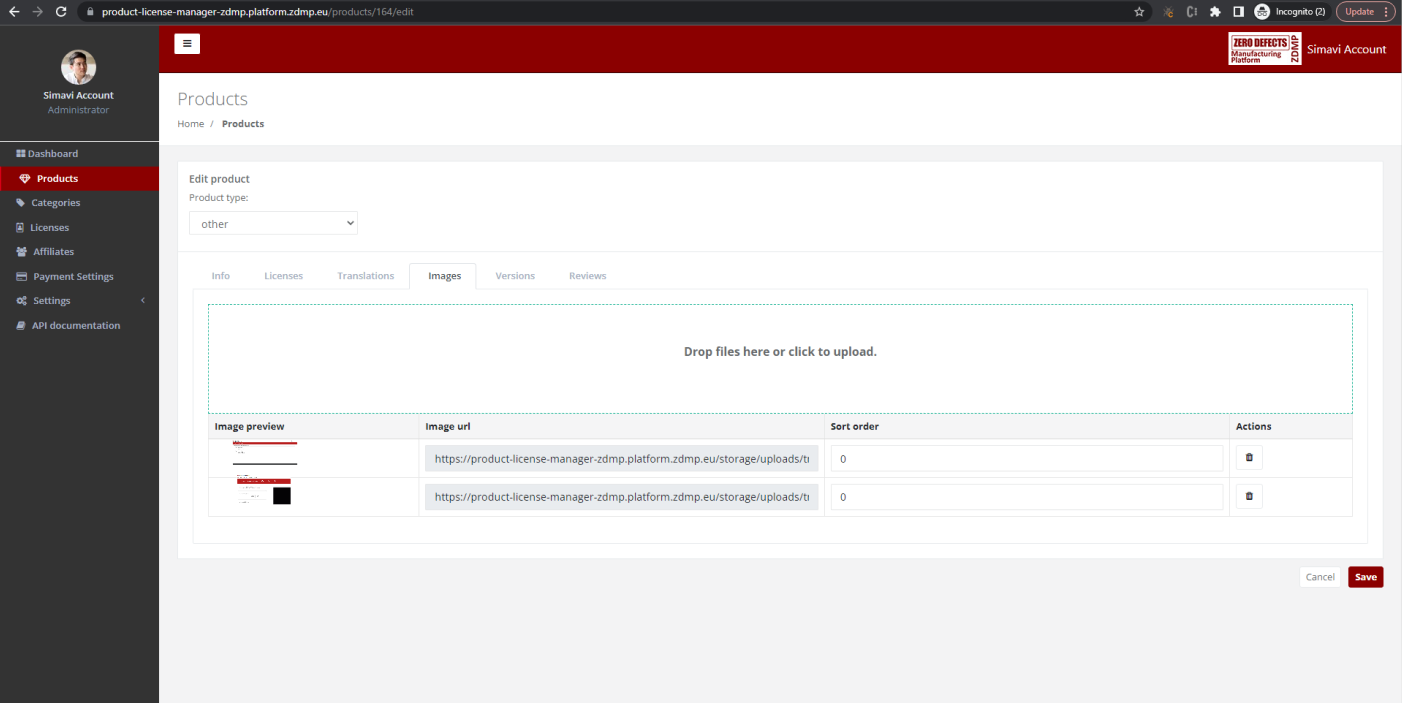
Figure 71: Product Screenshots UI
The product can be created also via REST API:
http://product-license-manager-zdmp.platform.zdmp.eu/api/v1/products
Figure 72: Create product HTTP call
{
    "product_id": "123",
    "name": "App name",
    "description":  "App description"
}
Figure 73: Product created JSON response
Add a new license
The license list can be seen via the Product License Manager UI. After each new license, the product owner receives an email notifying him about the purchase.
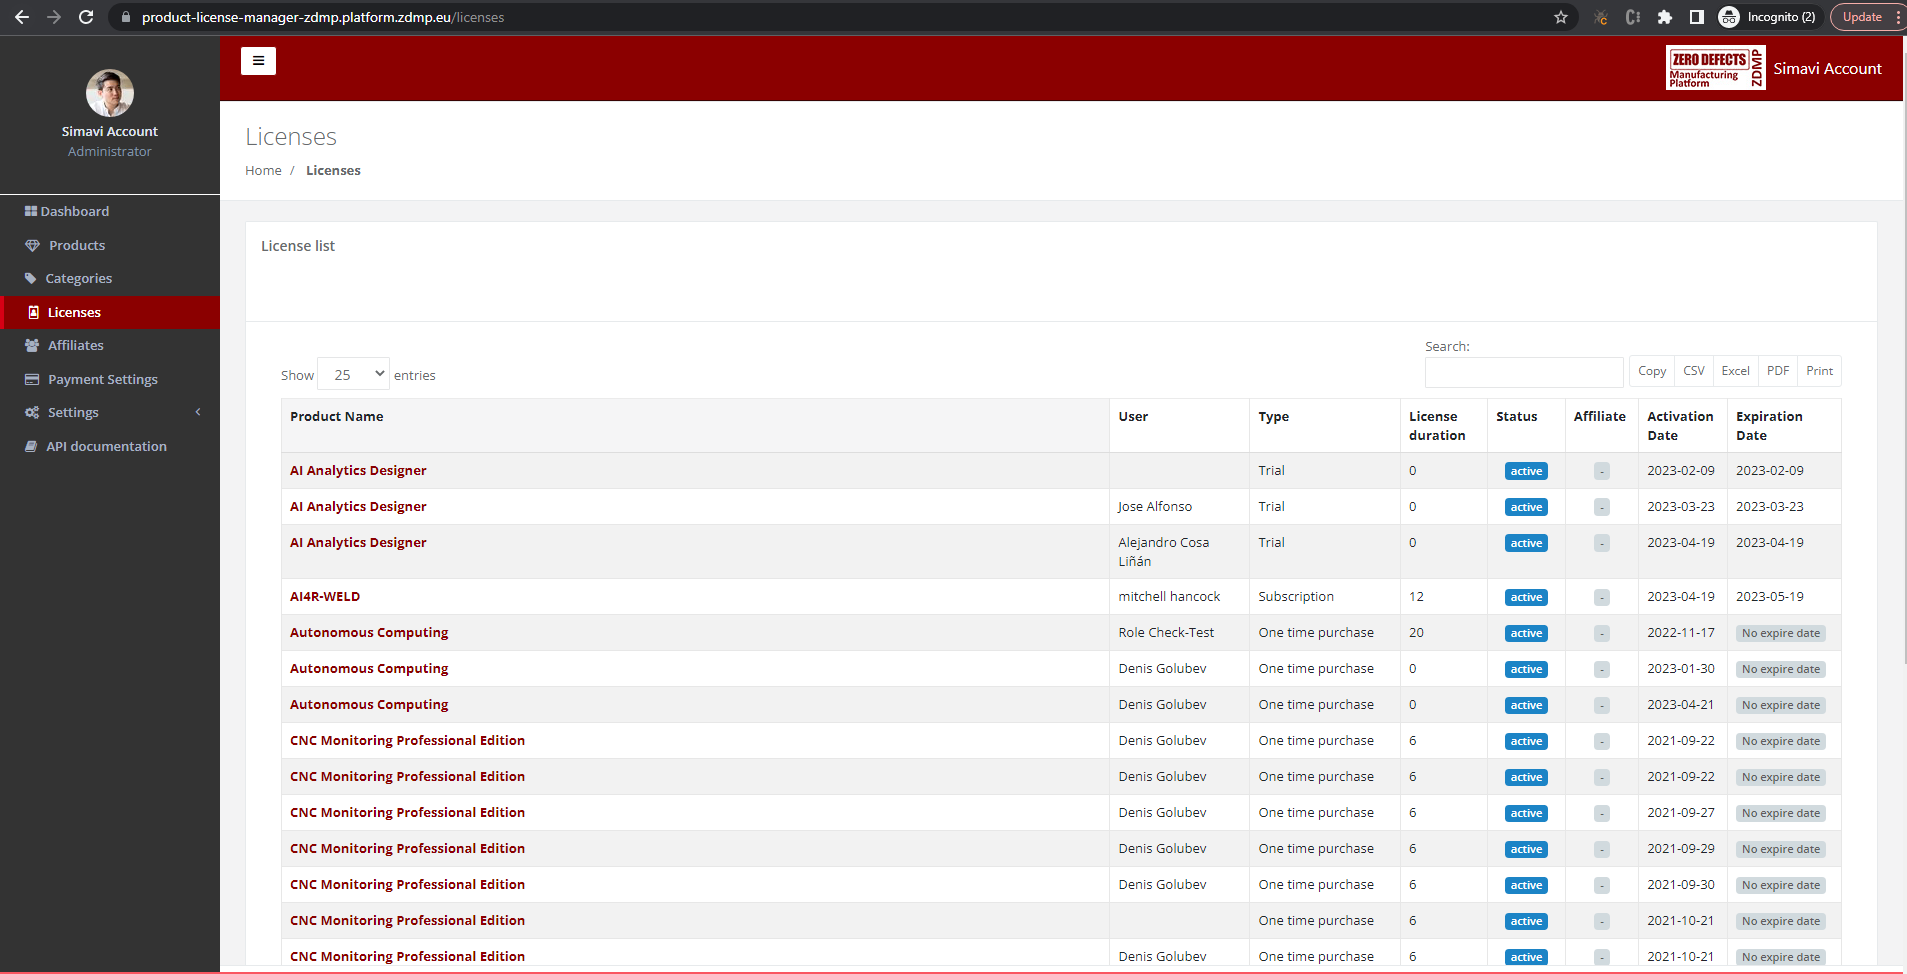
Figure 74: Product License Creation UI
The license can be created only with the REST API, below can be seen a test request:
http://product-license-manager-zdmp.platform.zdmp.eu/api/v1/licenses
Figure 75: License creation Http call
[
{
“id”: 49,
“organisation_id”: null,
“product_id”: “9321-DCBA”,
“realm”: “Simavi”,
“license_type_id”: 1,
“duration”: 6,
“currency_id”: “EUR”,
“user_id”: “d533e599-08e7-499c-831d-07213e39f26f”,
“ref_id”: “b5c70892ee83add32780ced2e9dc6e0c”,
“status”: “active”,
“expire_at”: “2022-06-16T00:00:00.000000Z”,
“created_at”: “2021-12-16T15:53:35.000000Z”,
“updated_at”: “2021-12-16T15:53:35.000000Z”,
“type”: {
“type”: 1,
“name”: “One time purchase”,
“created_at”: “2021-09-15T12:40:23.000000Z”,
“translations”: []
},
“currency”: {
“id”: “EUR”,
“name”: “Euro”,
“symbol”: “€”
},
“subscriptions”: [],
“url”: null,
“link_of_license”: “”,
“description_of_license”: “”,
“license_link”: “”,
“license_description”: "”
}
]
Figure 76: License created JSON response
CRUD Supported platforms
Each product is created for certain platforms. The product form has a select box with multiple options from which the user can choose the supported platforms. That list is manageable in the Supported Platforms screen where they can be added or edited.
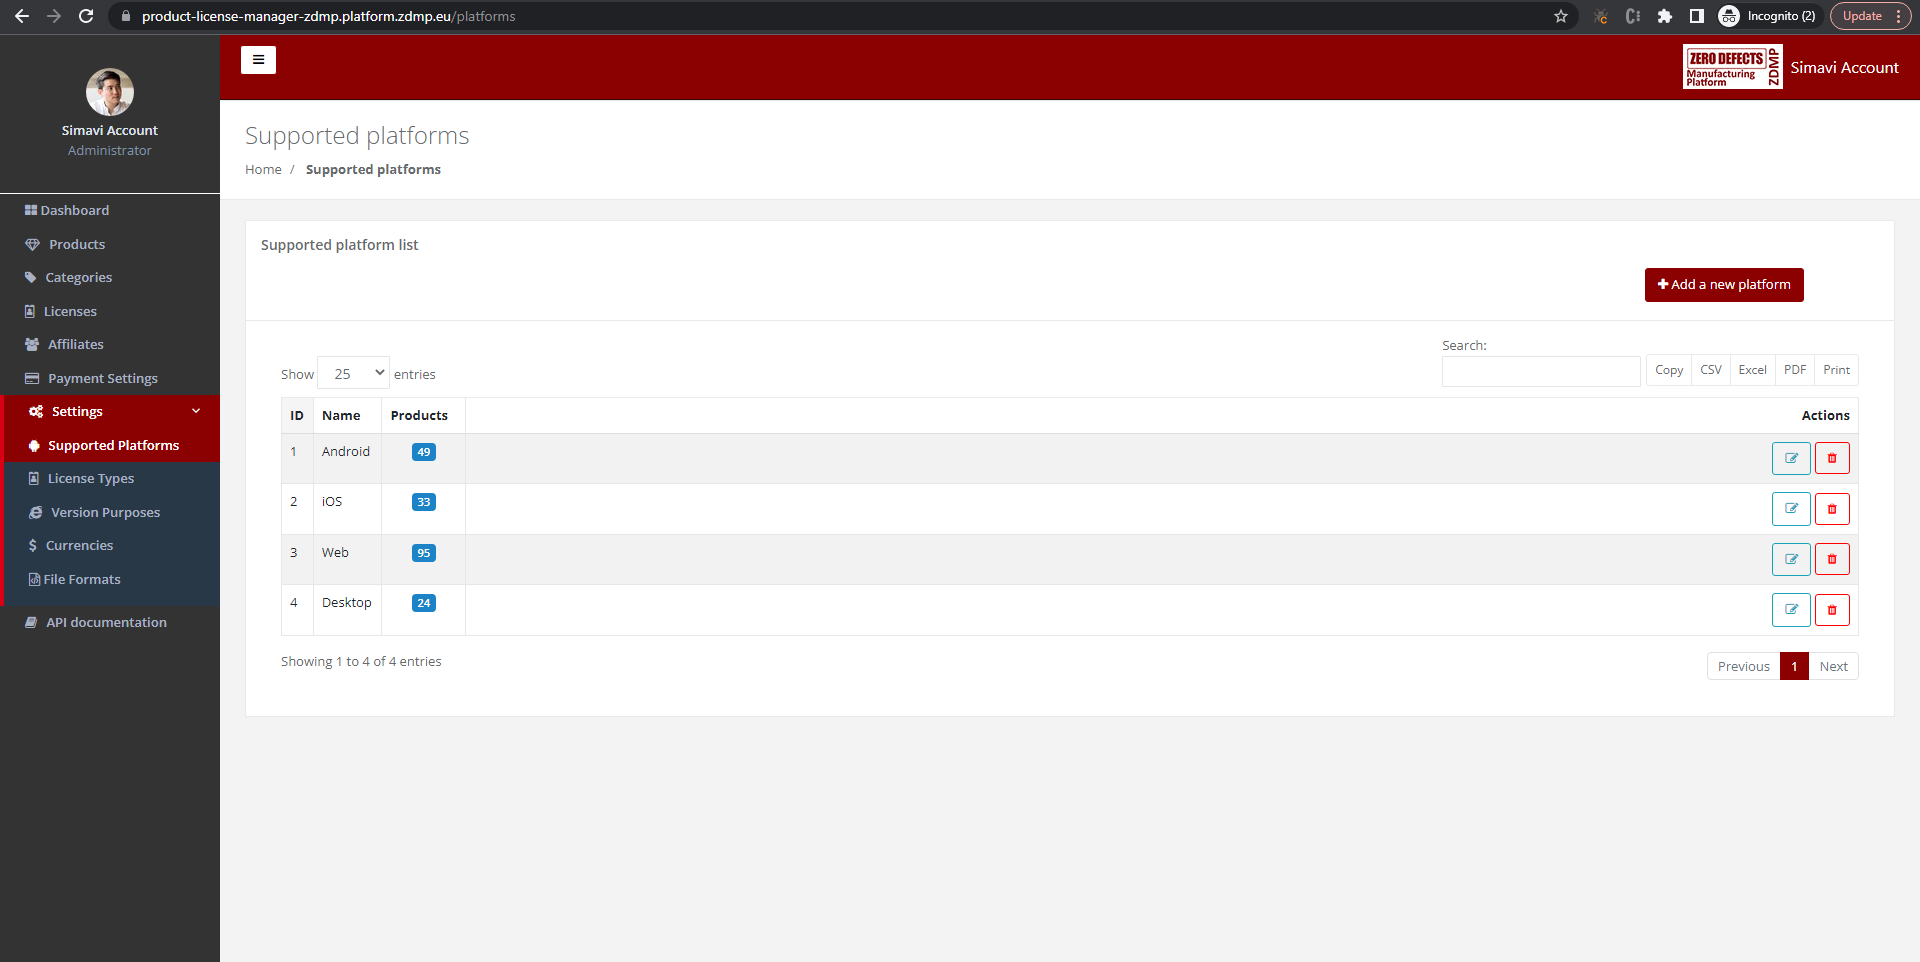
Figure 77: Supported Platforms UI
This list can also be retrieved using the REST API. This is necessary because the user needs the platforms IDs for the product creations request.
http://product-license-manager-zdmp.platform.zdmp.eu/api/v1/platforms
Figure 78: List supported platforms Http call
[
{
“id”: 1,
“name”: “Android”
},
{
“id”: 2,
“name”: “iOS”
},
{
“id”: 3,
“name”: “Web”
},
{
“id”: 4,
“name”: “Desktop”
}
]
Figure 79: Available platforms JSON response
CRUD License Types
Each license has a type which is required for the notification system and the license management system. These types are manageable in the License Type screen:
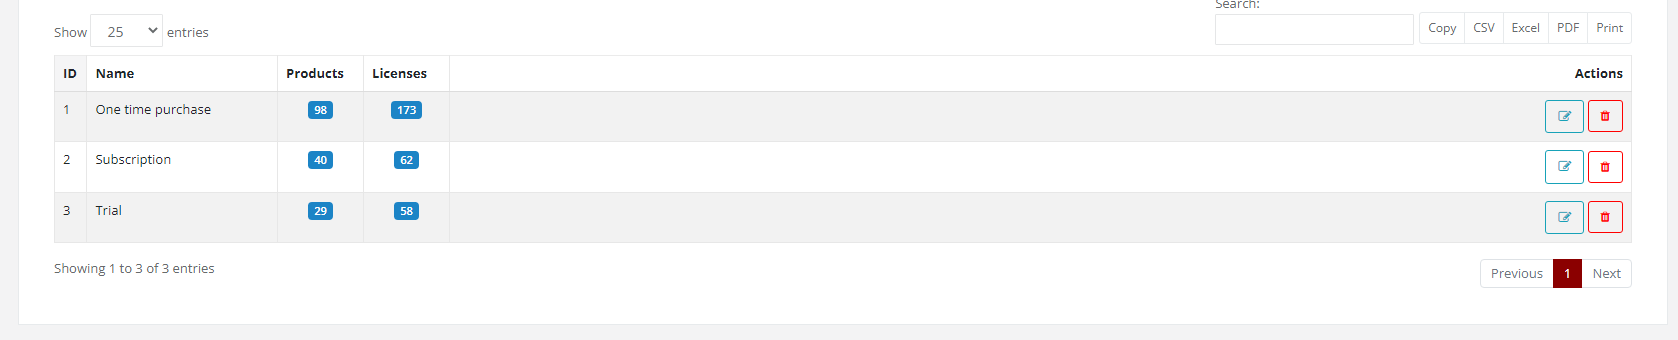
Figure 80: License Type Screen
This list can also be retrieved using the REST API. This is necessary because the user needs the license type ids for the license creations request:
http://product-license-manager-zdmp.platform.zdmp.eu/api/v1/licenses/types
Figure 81: Retrieve Licenses type Http call
[
    {
        "type": 1,
        "name": "One time purchase",
        "created_at": "2021-06-14T11:17:43.000000Z",
        "translations": []
    },
    {
        "type": 2,
        "name": "Subscription",
        "created_at": "2021-06-14T11:17:43.000000Z",
        "translations": []
    },
    {
        "type": 3,
        "name": "Trial",
        "created_at": "2021-06-14T11:17:43.000000Z",
        "translations": []
    }
]
Figure 82: List of the license types as JSON response
CRUD Version Purpose
Each product is created for certain purpose. The product form has a select box multiple options from which the user can choose the version purpose. That list is manageable in the Version Purposes screen where they can be added or edited.
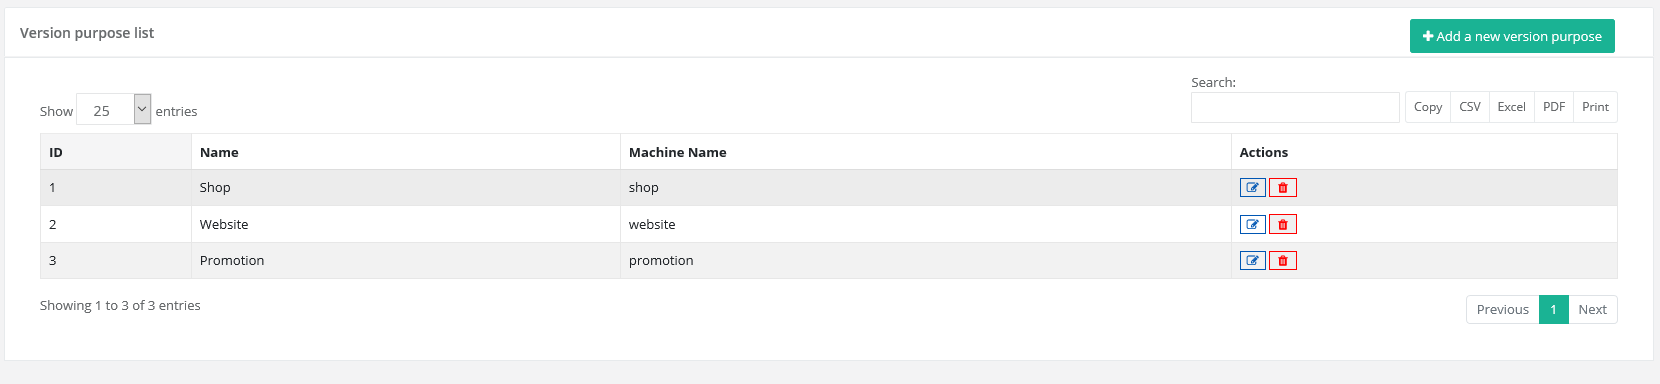
Figure 83: Version Purpose Screen
This list can also be retrieved using the REST API. This is necessary because the user needs the version purpose id for the product creation request:
http://product-license-manager-zdmp.platform.zdmp.eu/api/v1/version-purposes
Figure 84: retrieve version Http call
[
    {
        "id": 1,
        "name": "Shop"
    },
    {
        "id": 2,
        "name": "Website"
    },
    {
        "id": 3,
        "name": "Promotion"
    }
]
Figure 85: List available version JSON response
CRUD Currency List
Each product has at least a price with a currency. This screen allows the user to edit the currency names and symbols at this point.
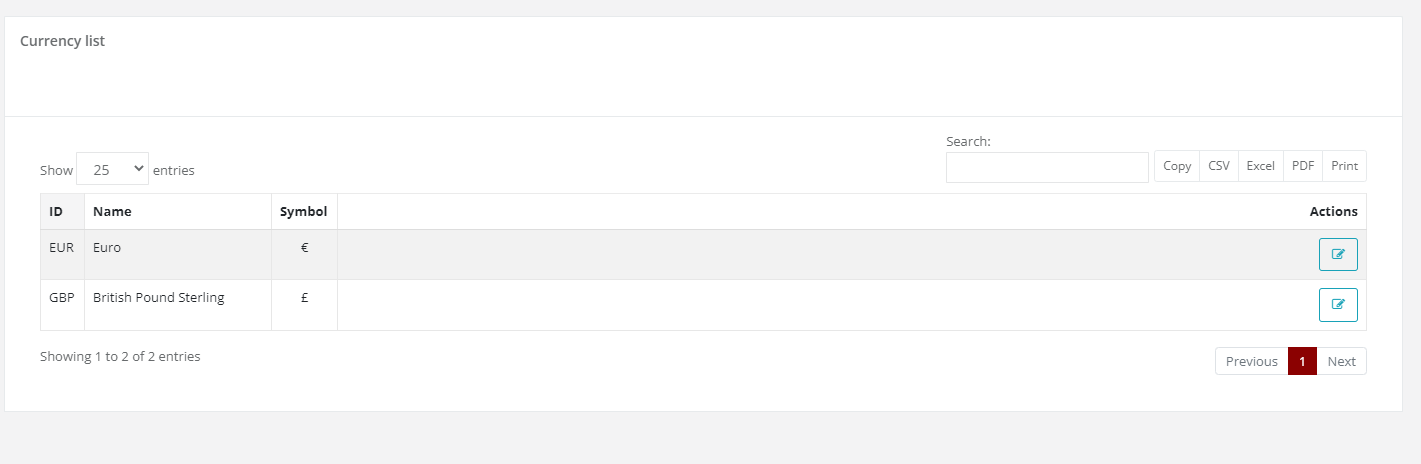
Figure 86: Currency List UI
Affiliates
Each user can create referral links for tracking the sales of a product in various contexts like social media, backlinks etc:
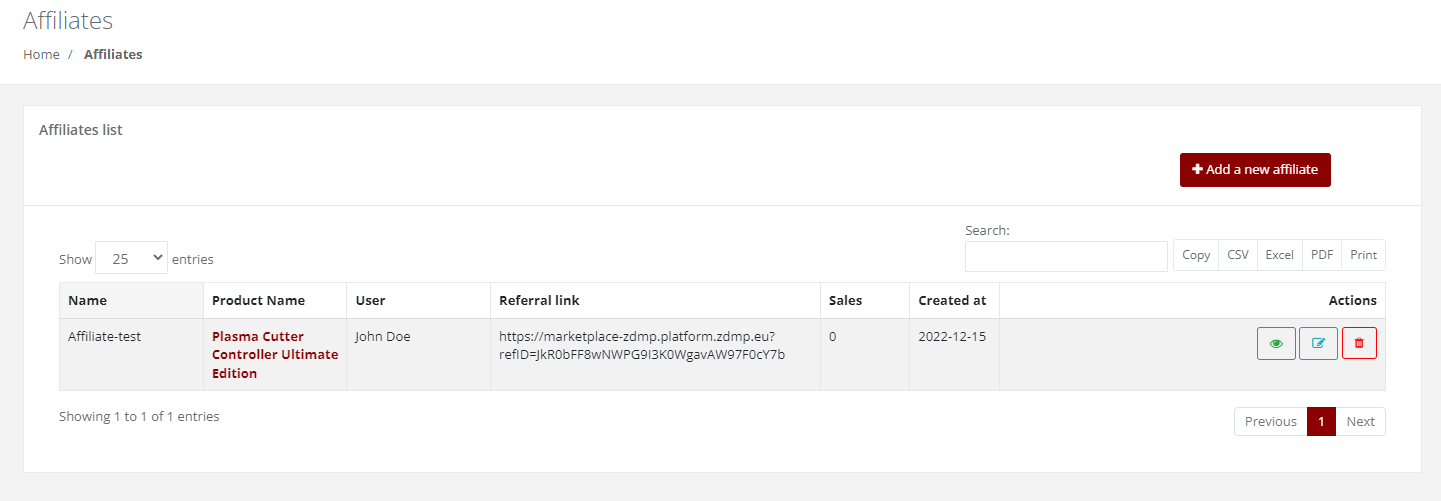
Figure 87: Affiliate Referral User Interface
User Bank Account
Developer users must set up a Stripe connection to get the revenue from their application. They start the process by clicking on the Connect with Stripe button, after that they will be redirected to the Stripe On-boarding page where they have to complete their information.
After the user complete the Stripe On-boarding they can see their payments and other related information on their Stripe Dashboard
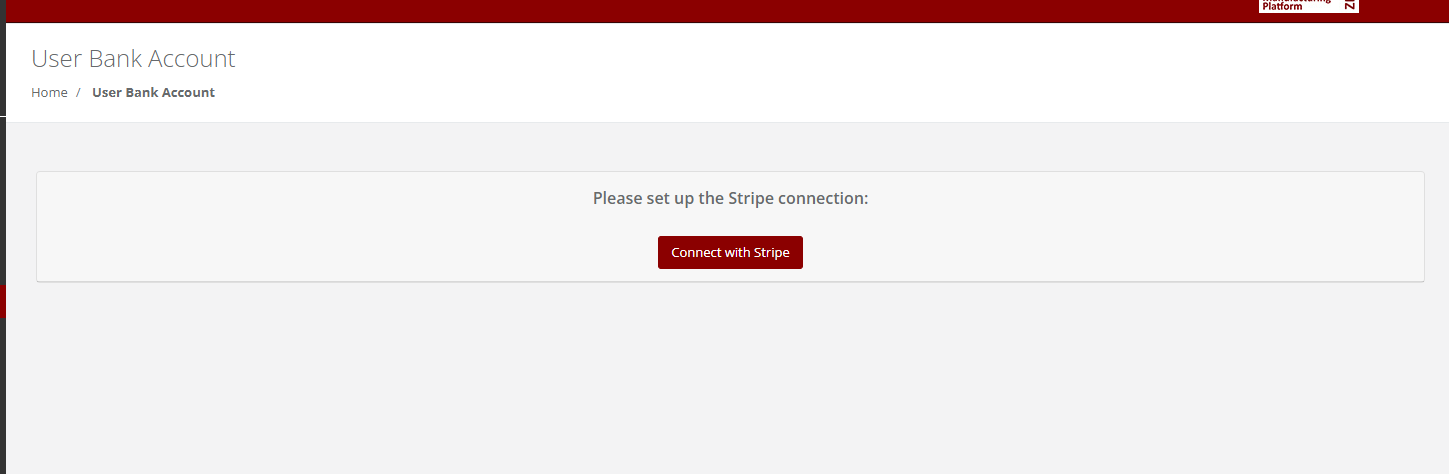
Figure 93: User Bank Account User Interface
Payment Settings
Admin users can set a custom percentage for a developer, type of product or type of license, otherwise if the percentage is not set, the default value will be considered.
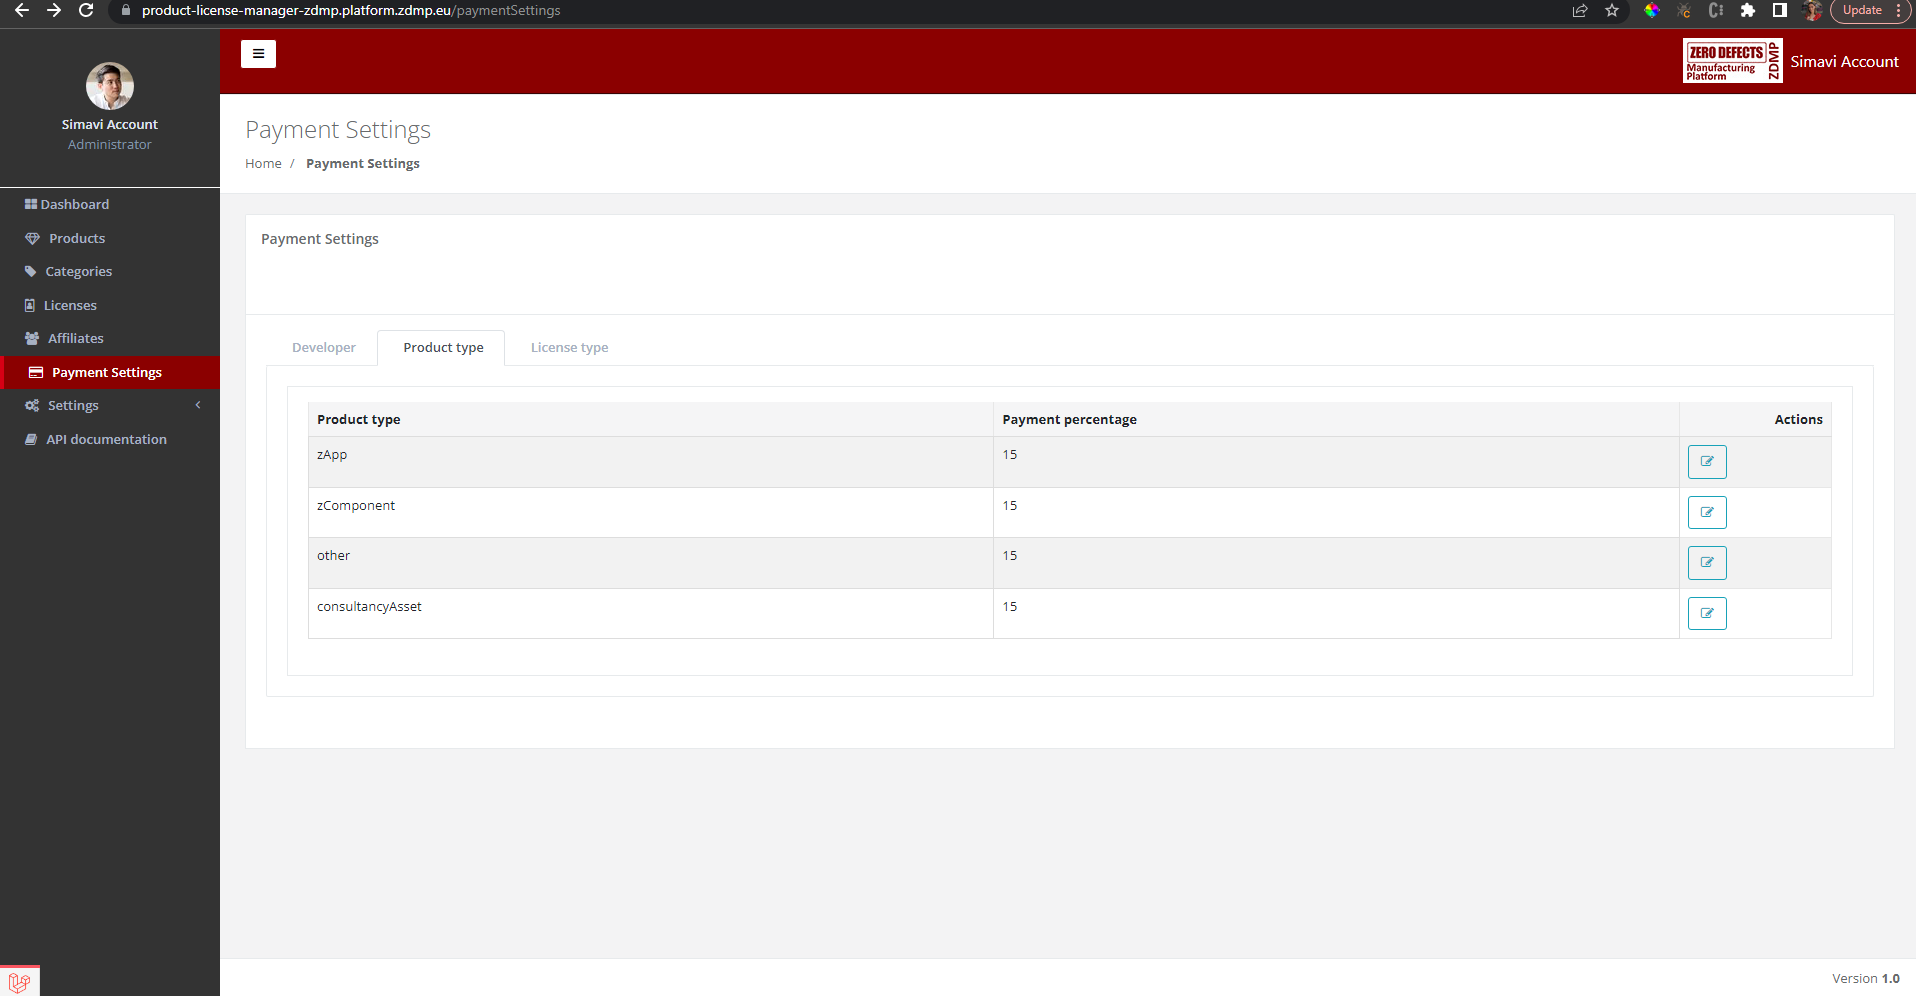
Figure 94: Payment Settings User Interface